Managing Runs
Reports
Section titled “Reports”When you run tests with Testomat.io it will generate a Run Report with the results. We have such options as basic view and extended view. Let’s have a look at each of them.
Basic view
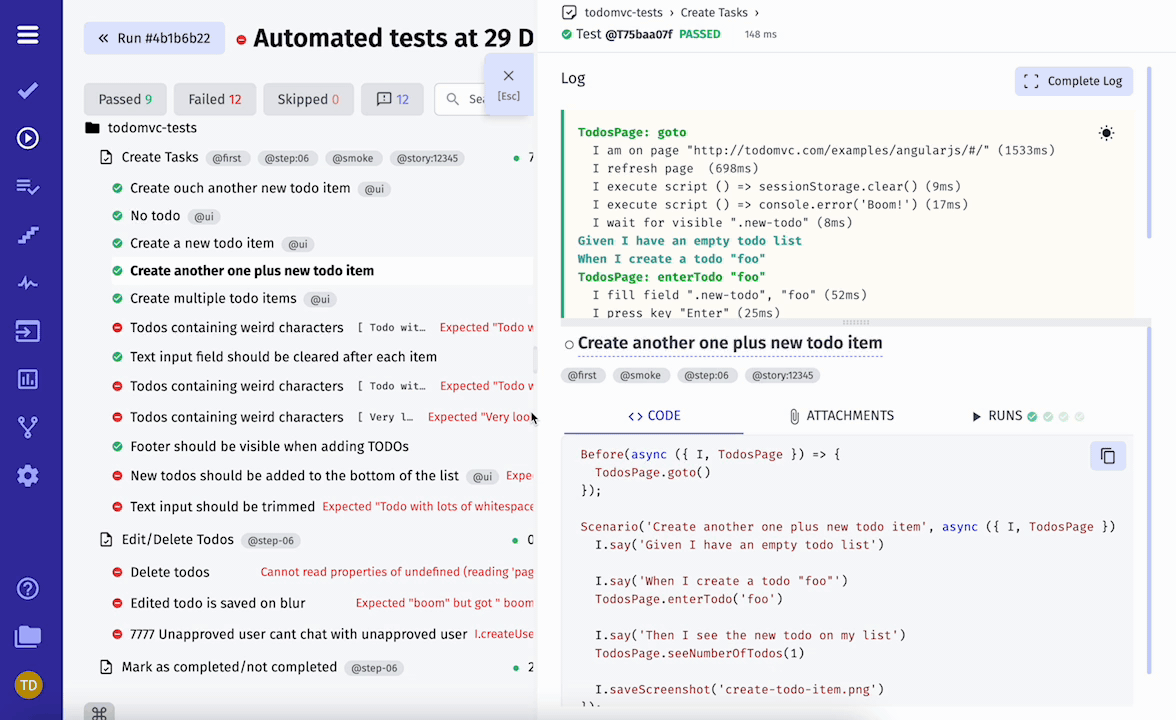
Clicking on the Test Run will toggle RunReport screen in basic view.
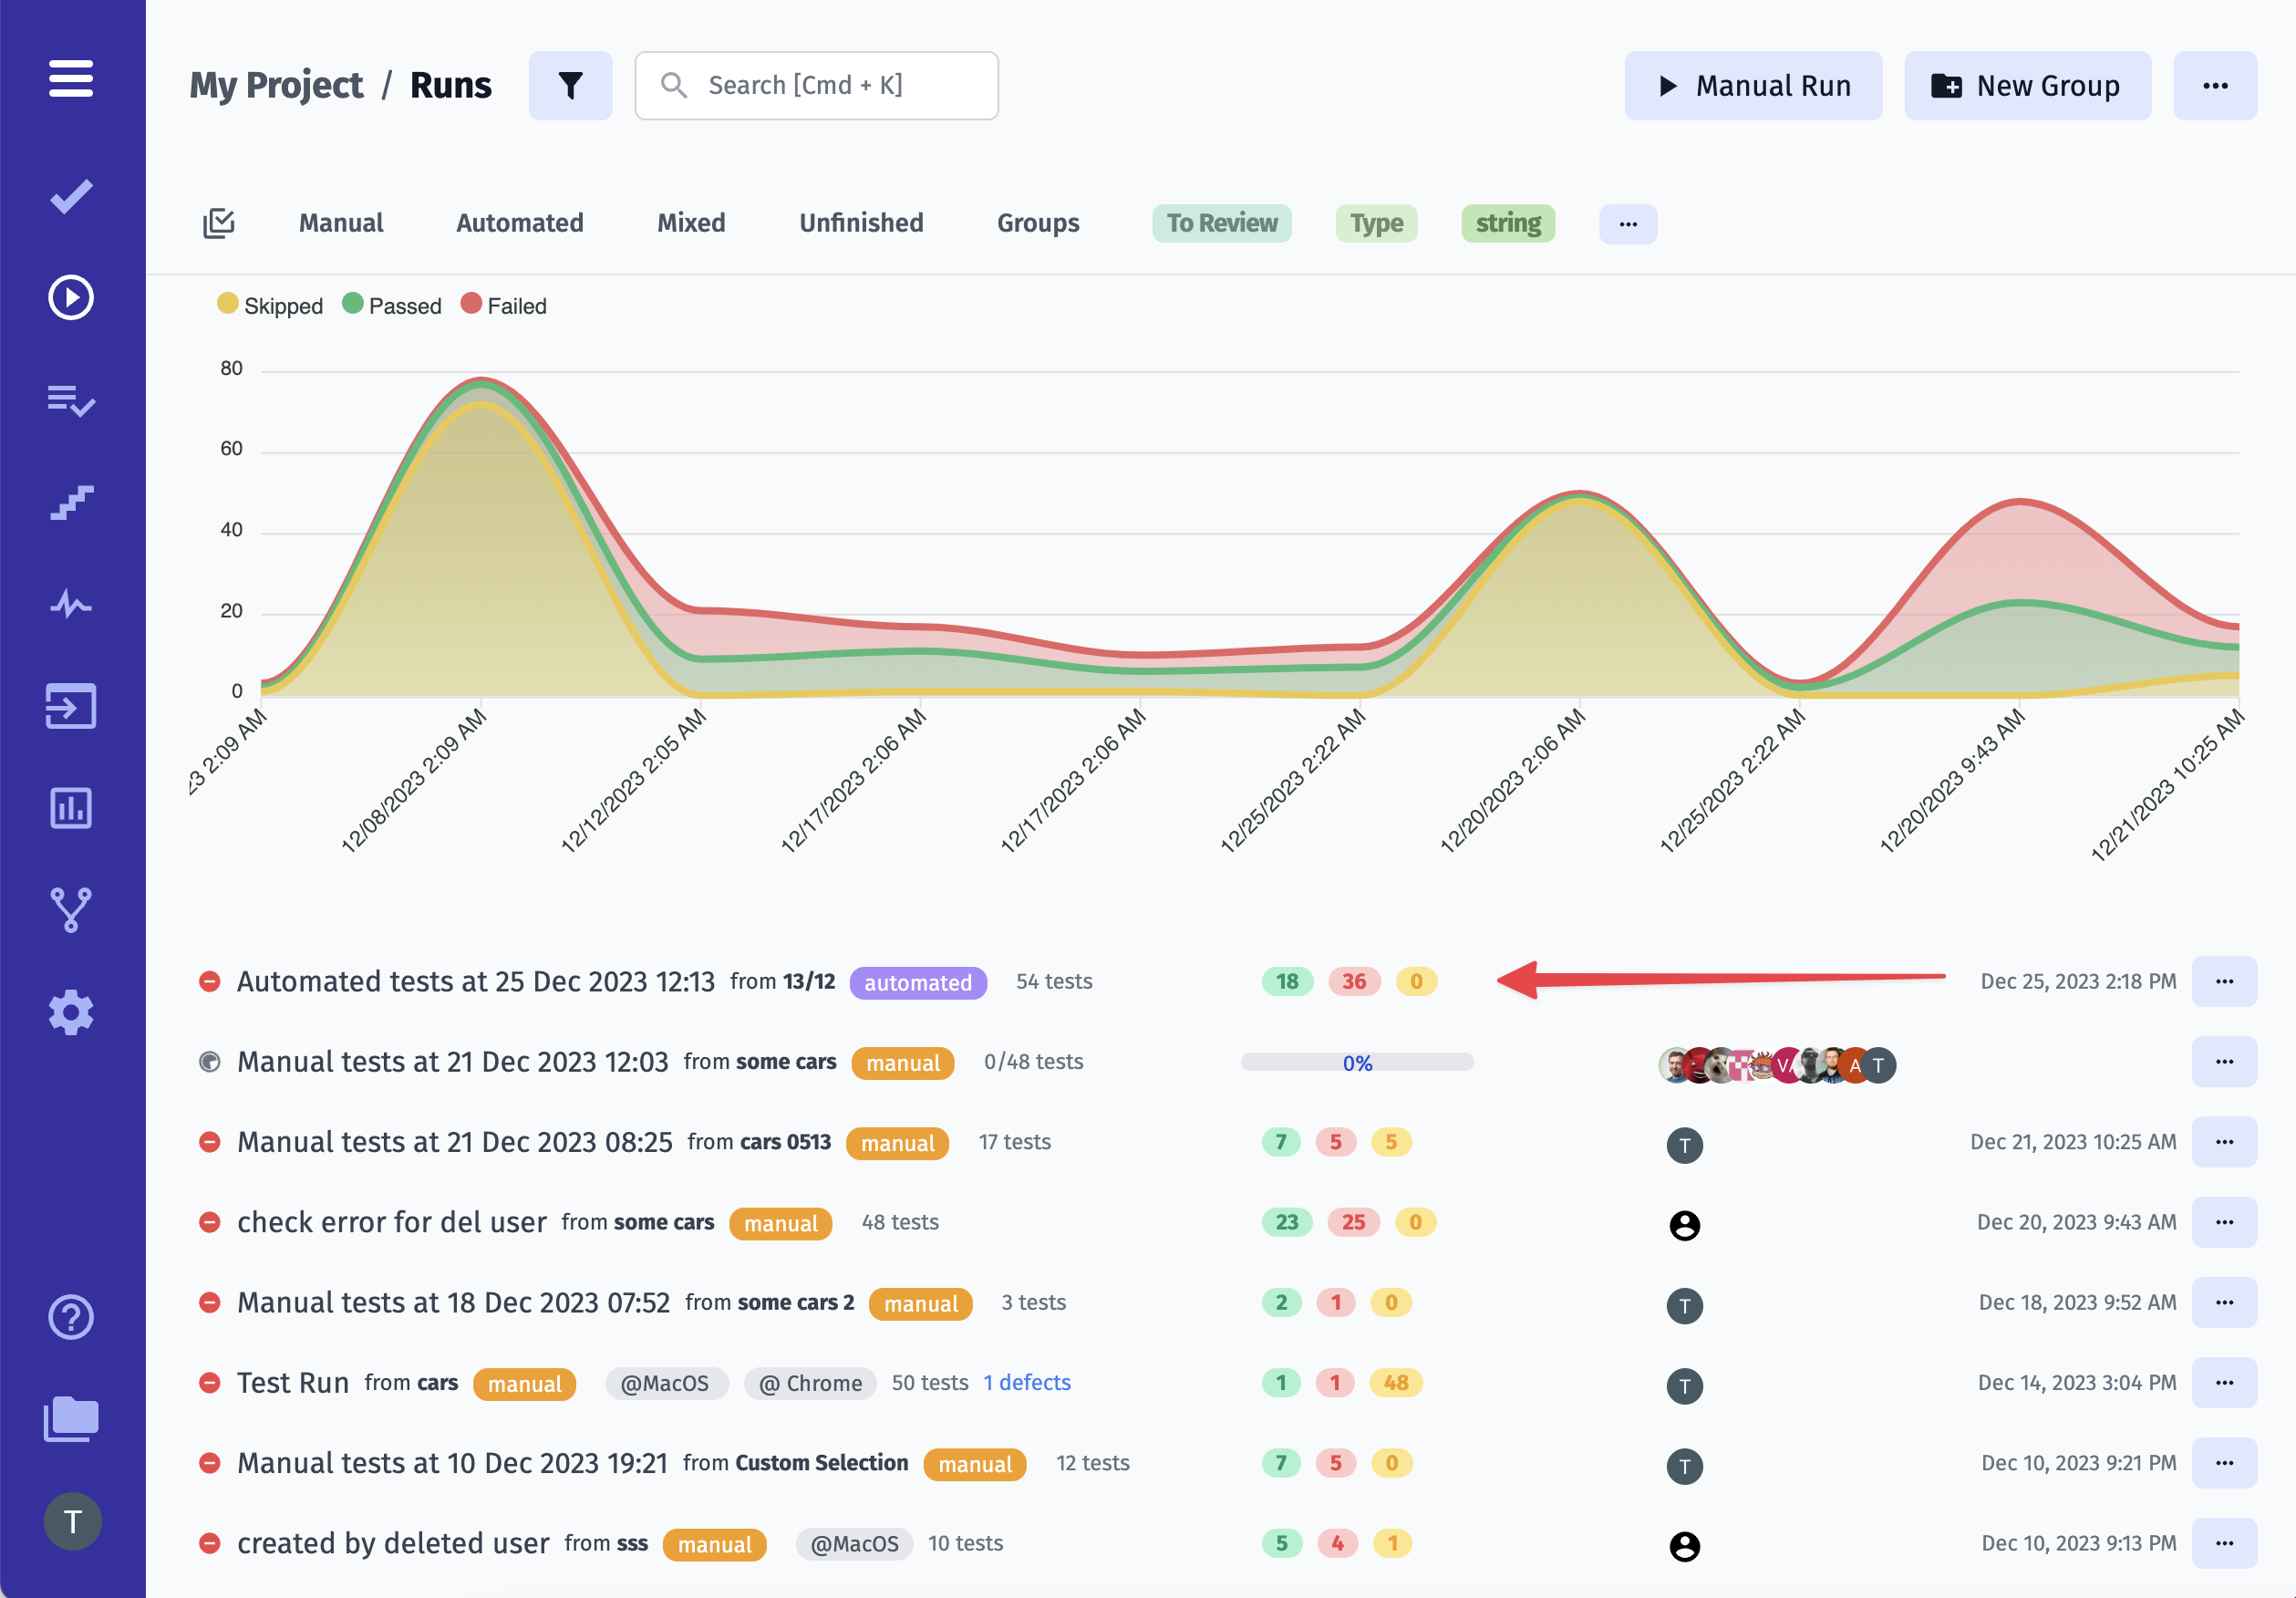
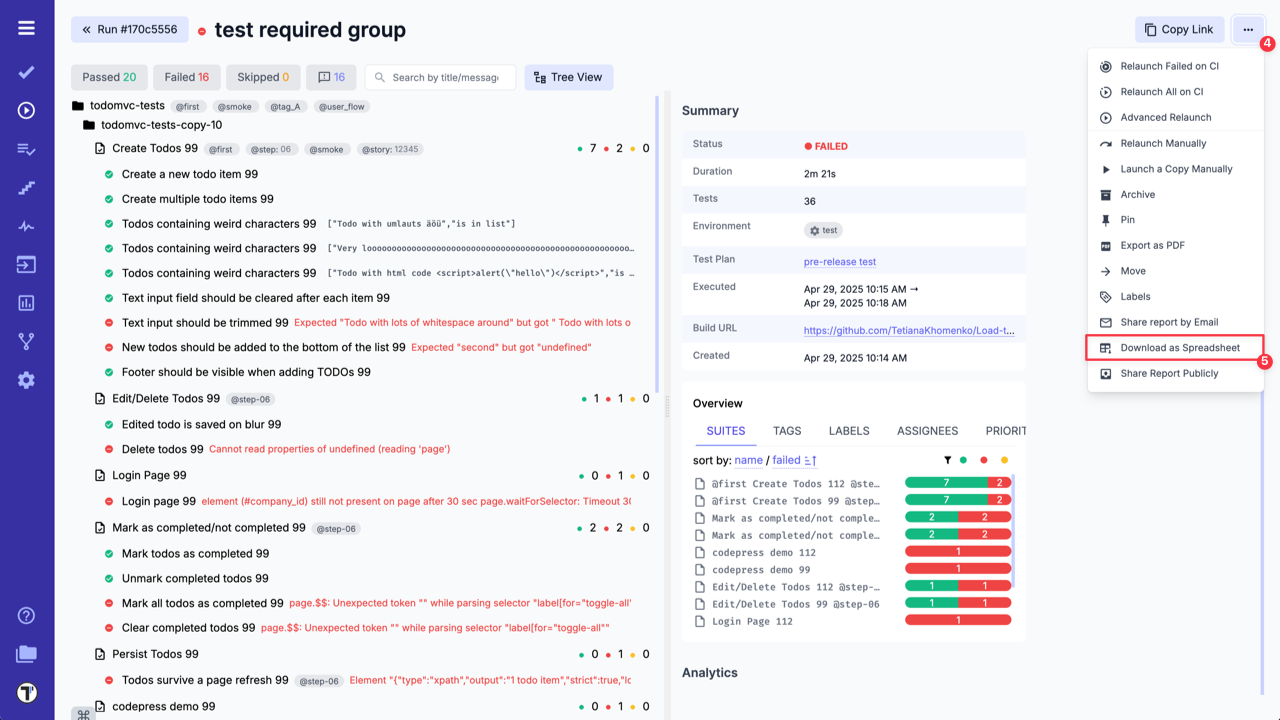
Here you can see 1. a list of tests, 2. their status (Passed/ Failed/ Skipped), 3. general information on the Run Result.
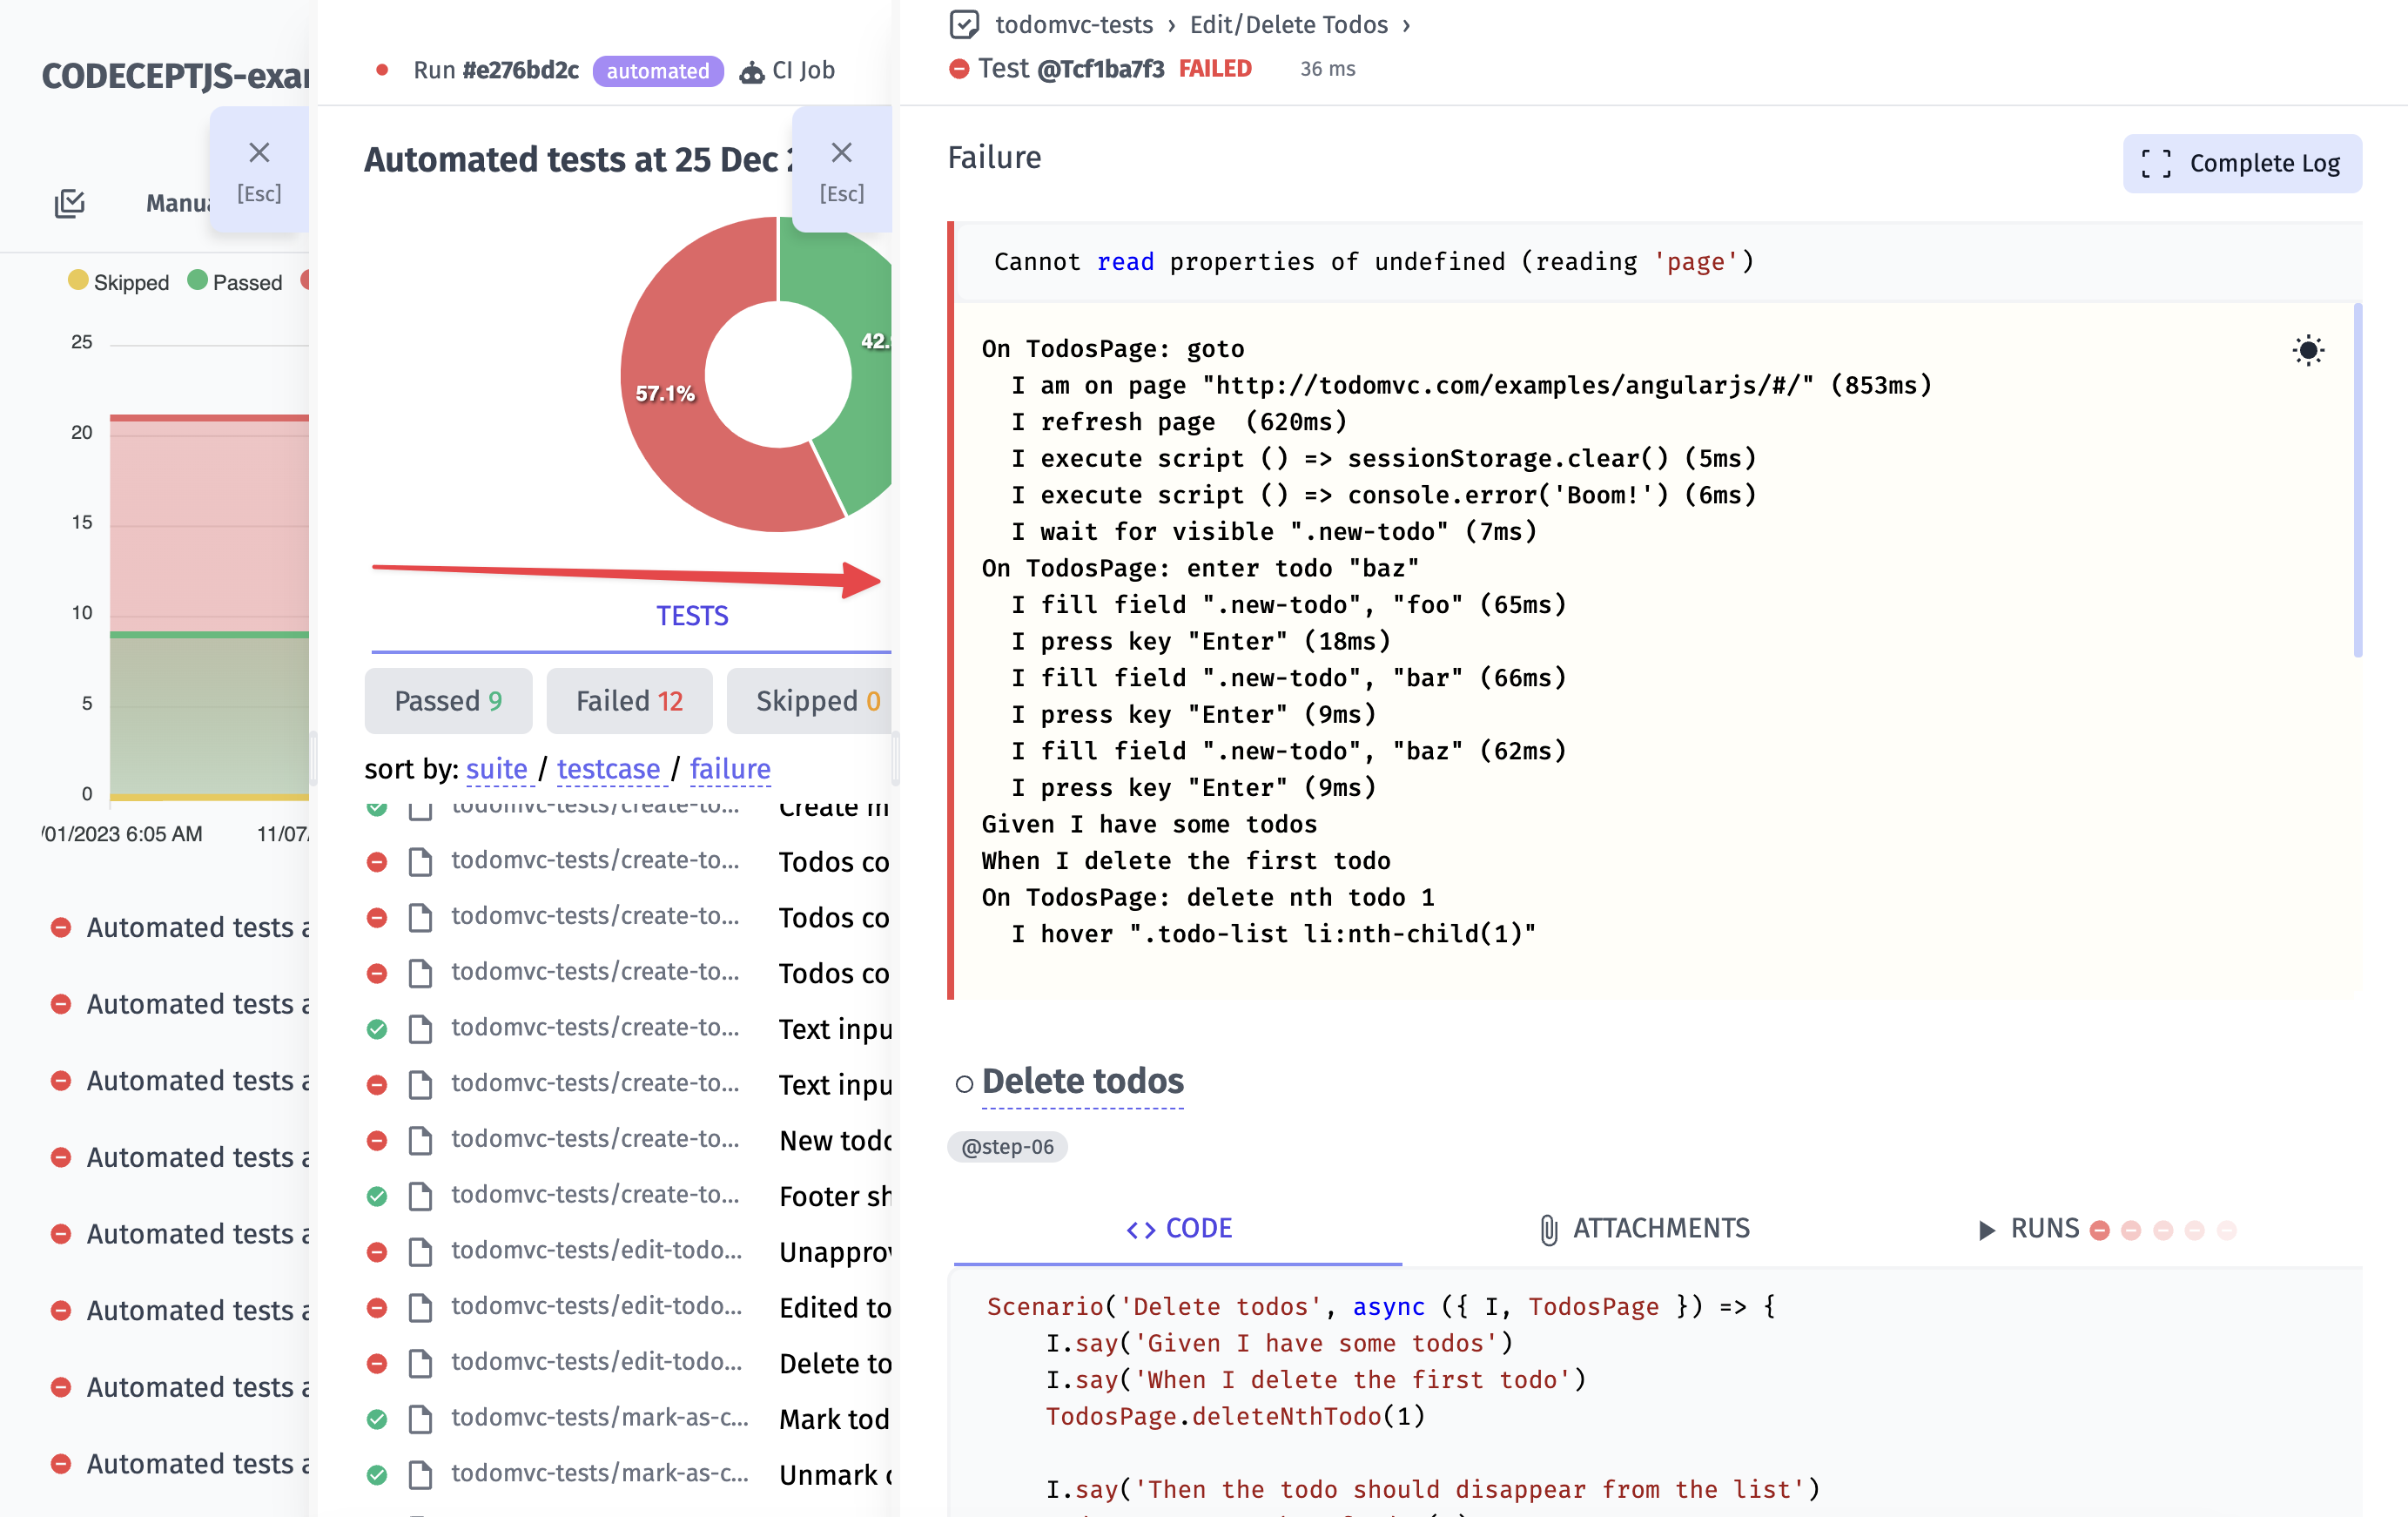
Also, you can click on test and open it to see details.
Moreover, you can view the history of run results by filtering them by group name.
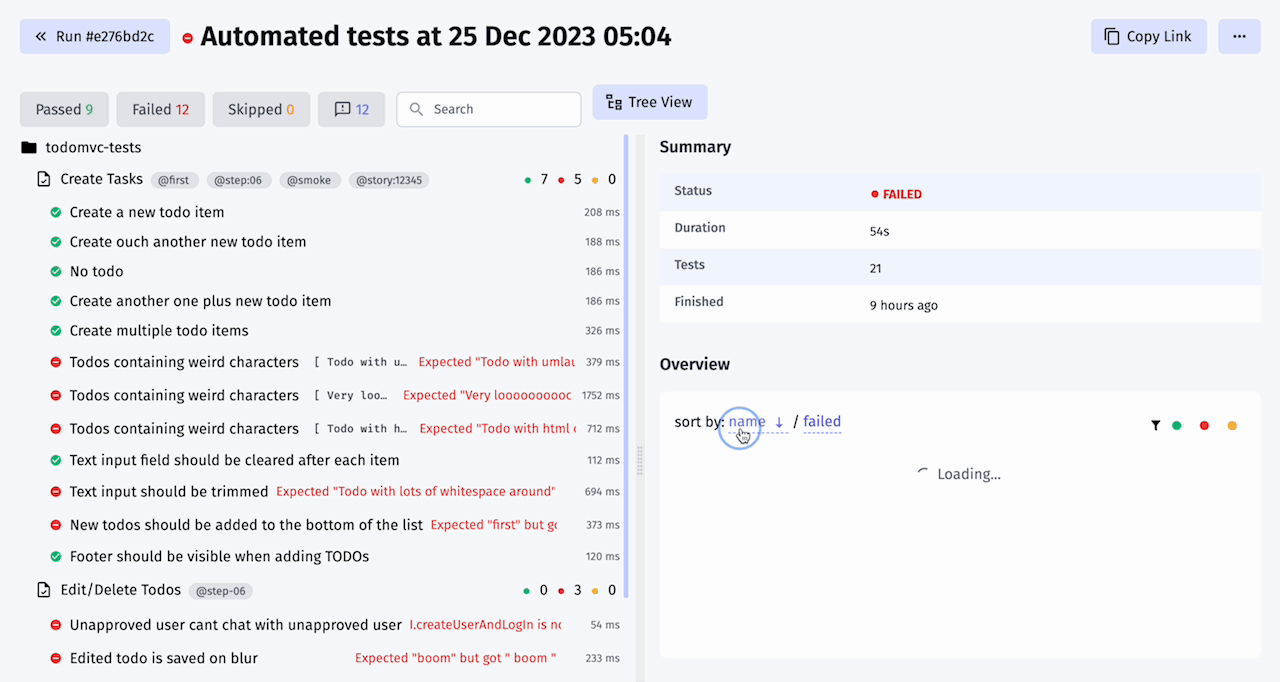
Extended view
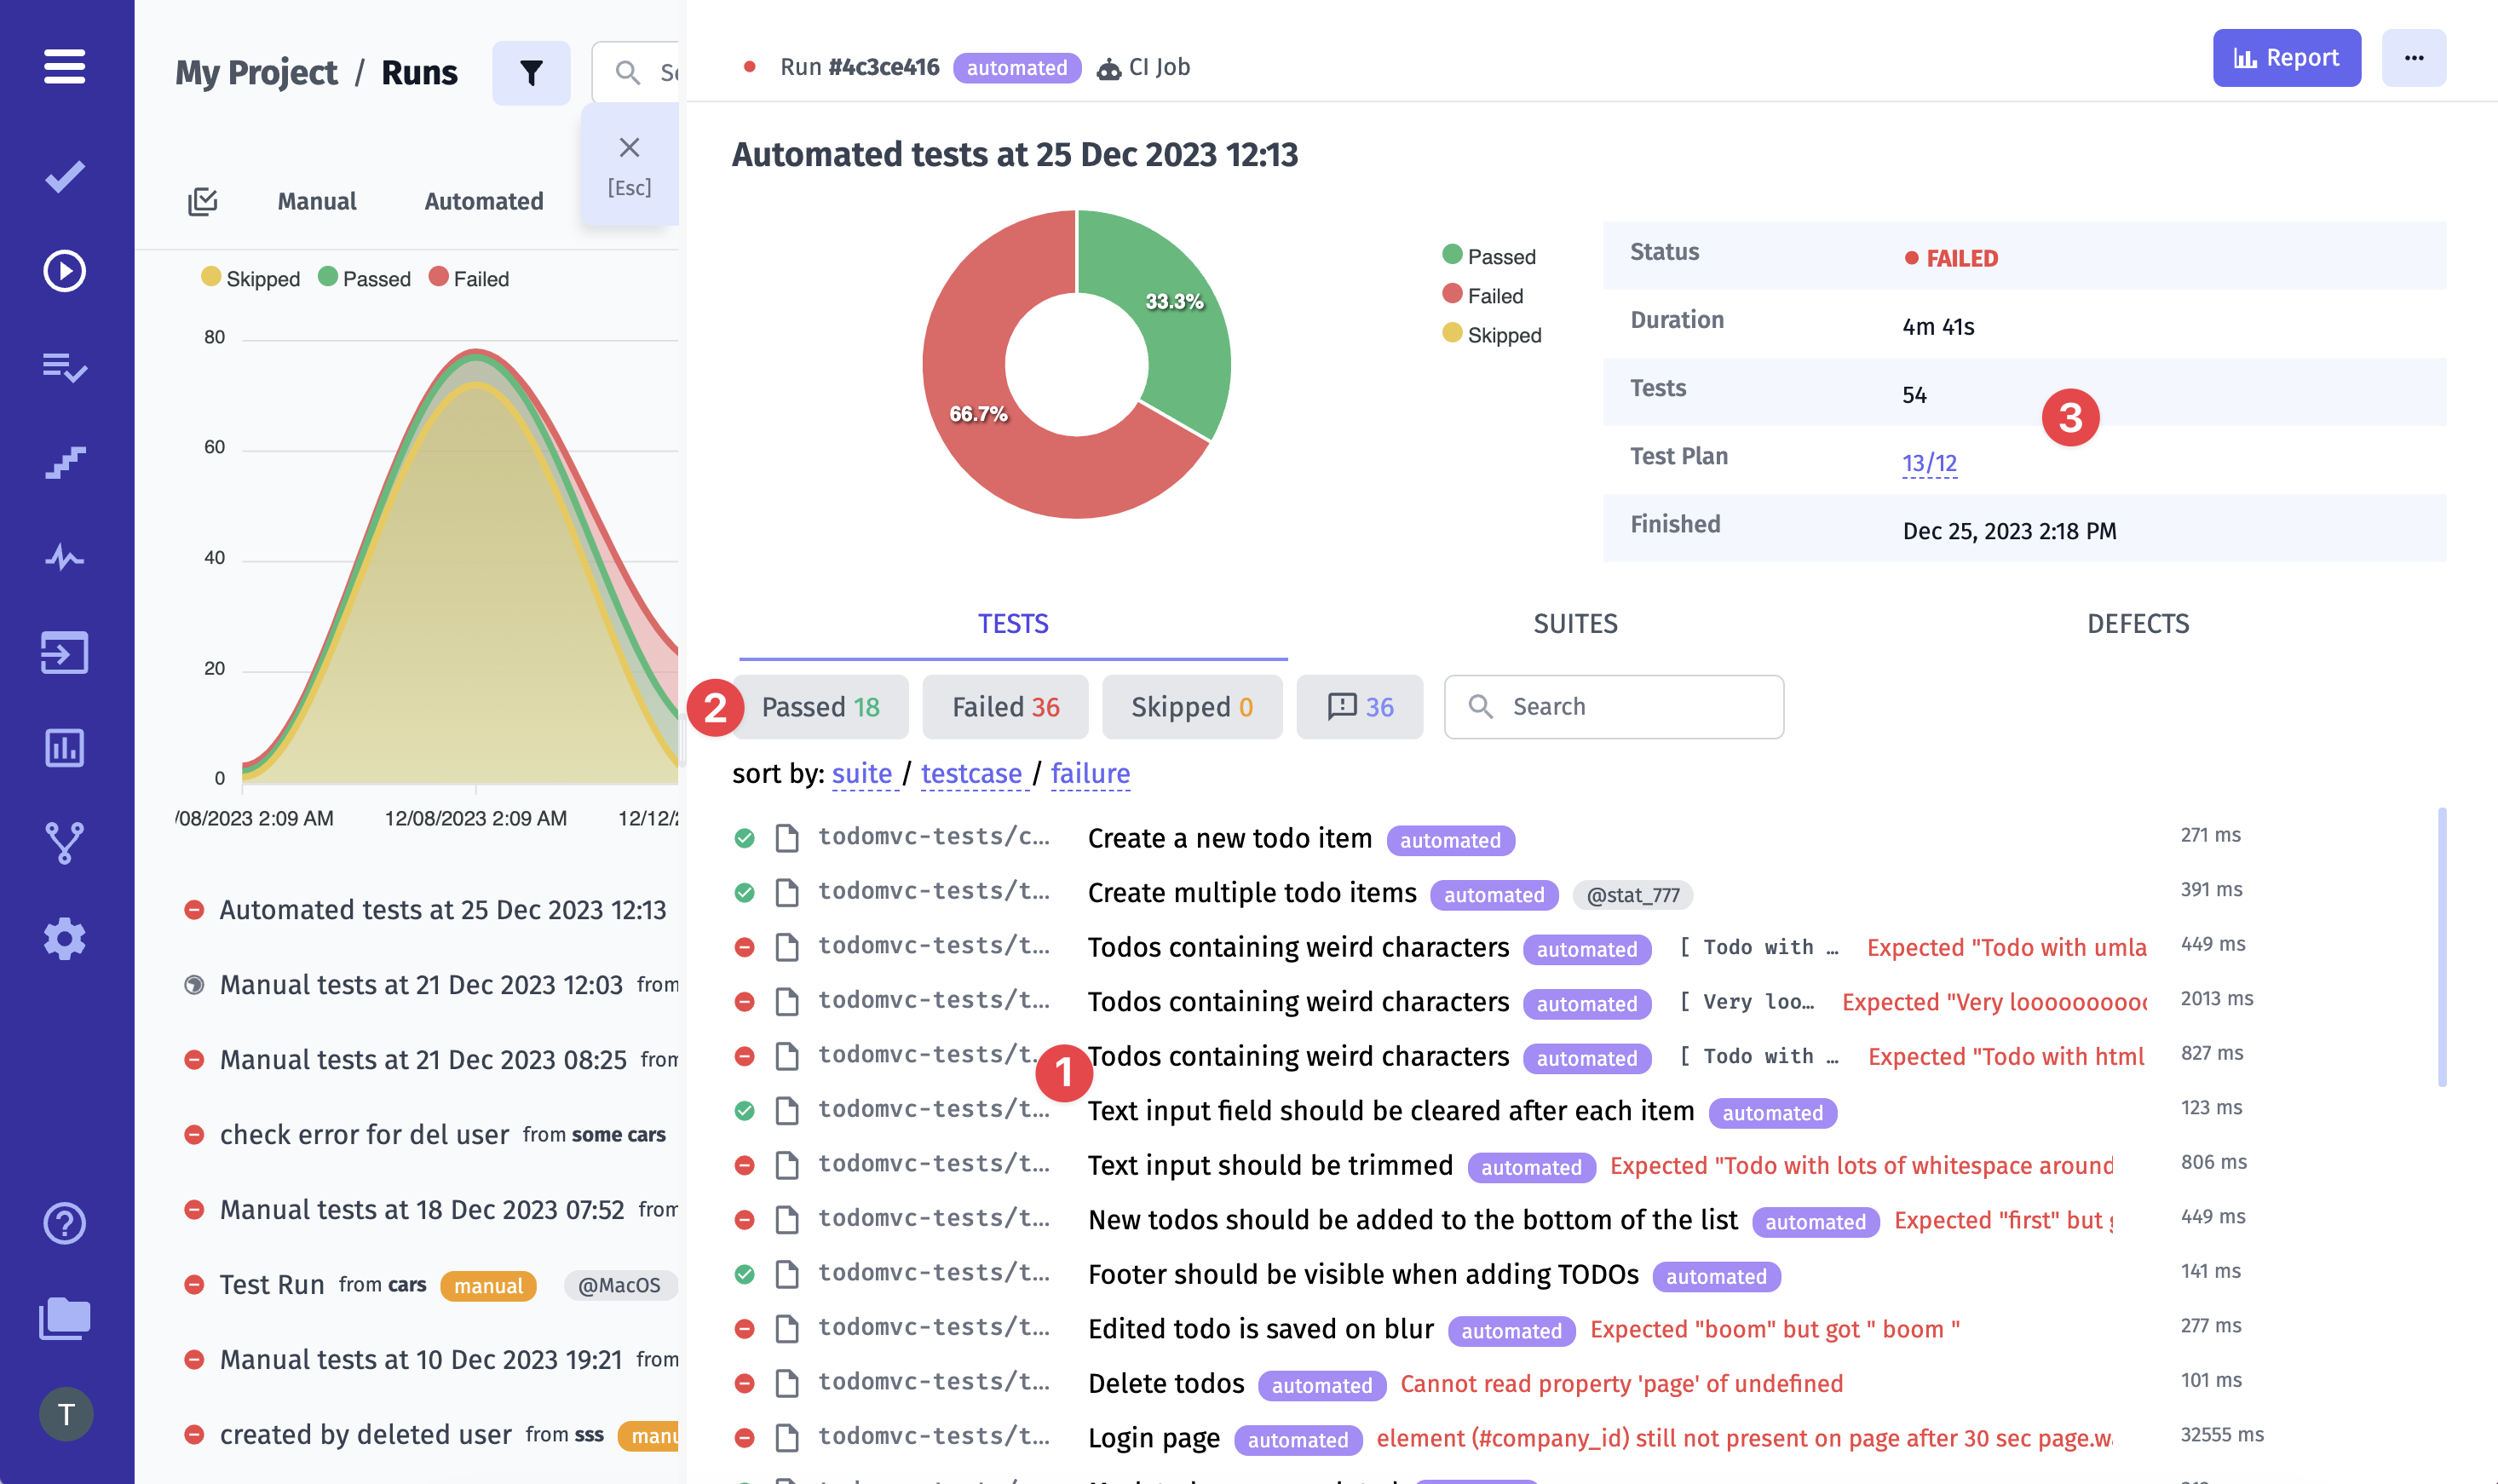
If you click on Report button you will see the extended view of the Run Report.
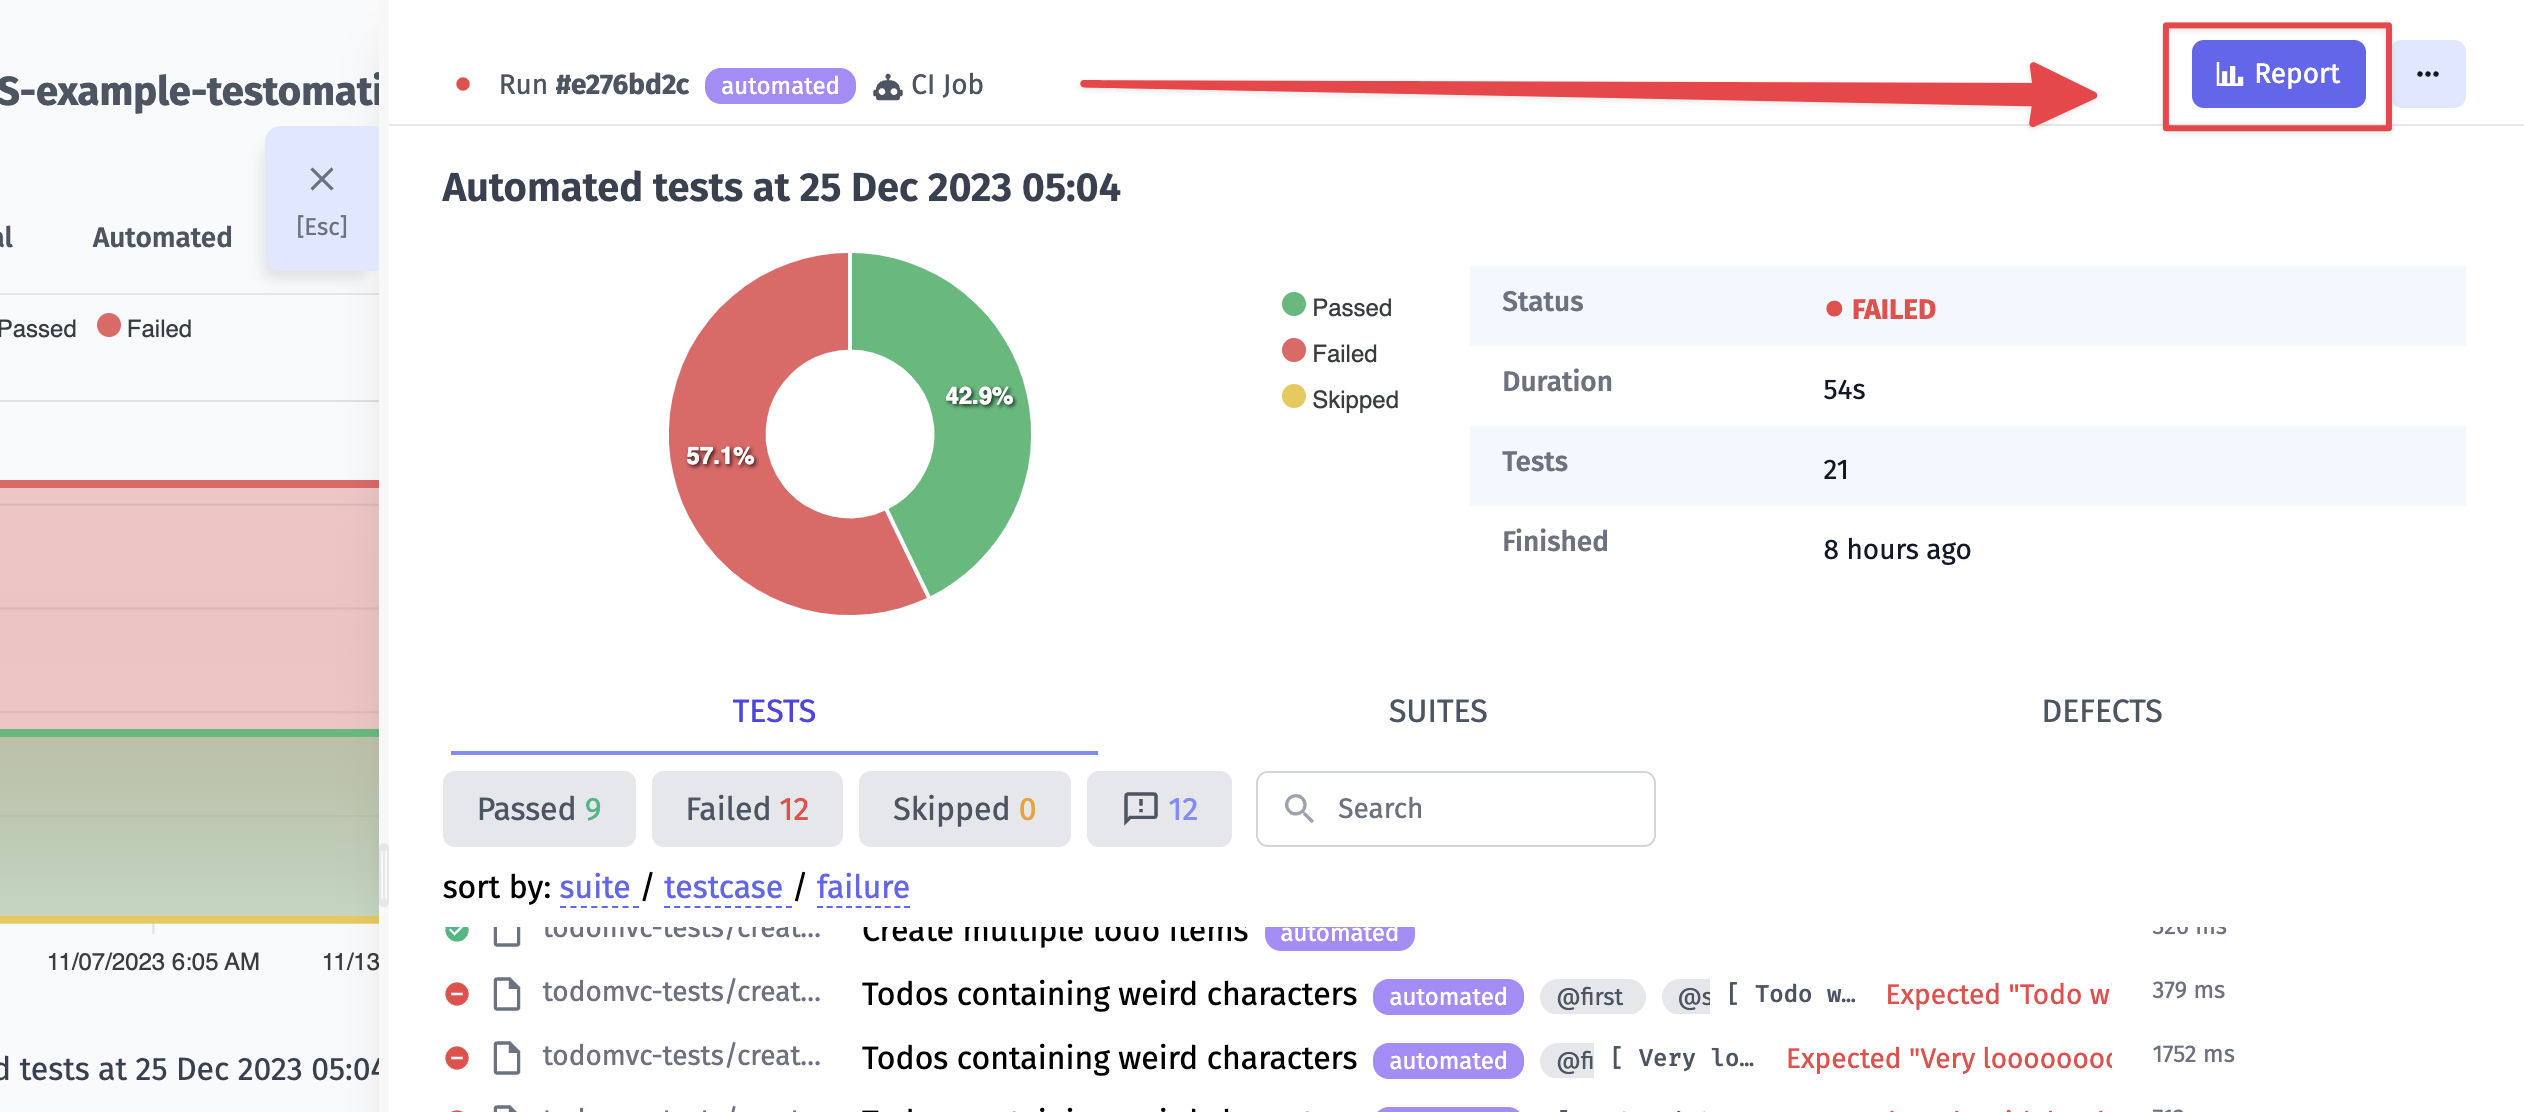
You can see such options here: 1. a list of tests 2. overview of all executed tests 3. Report Summary.
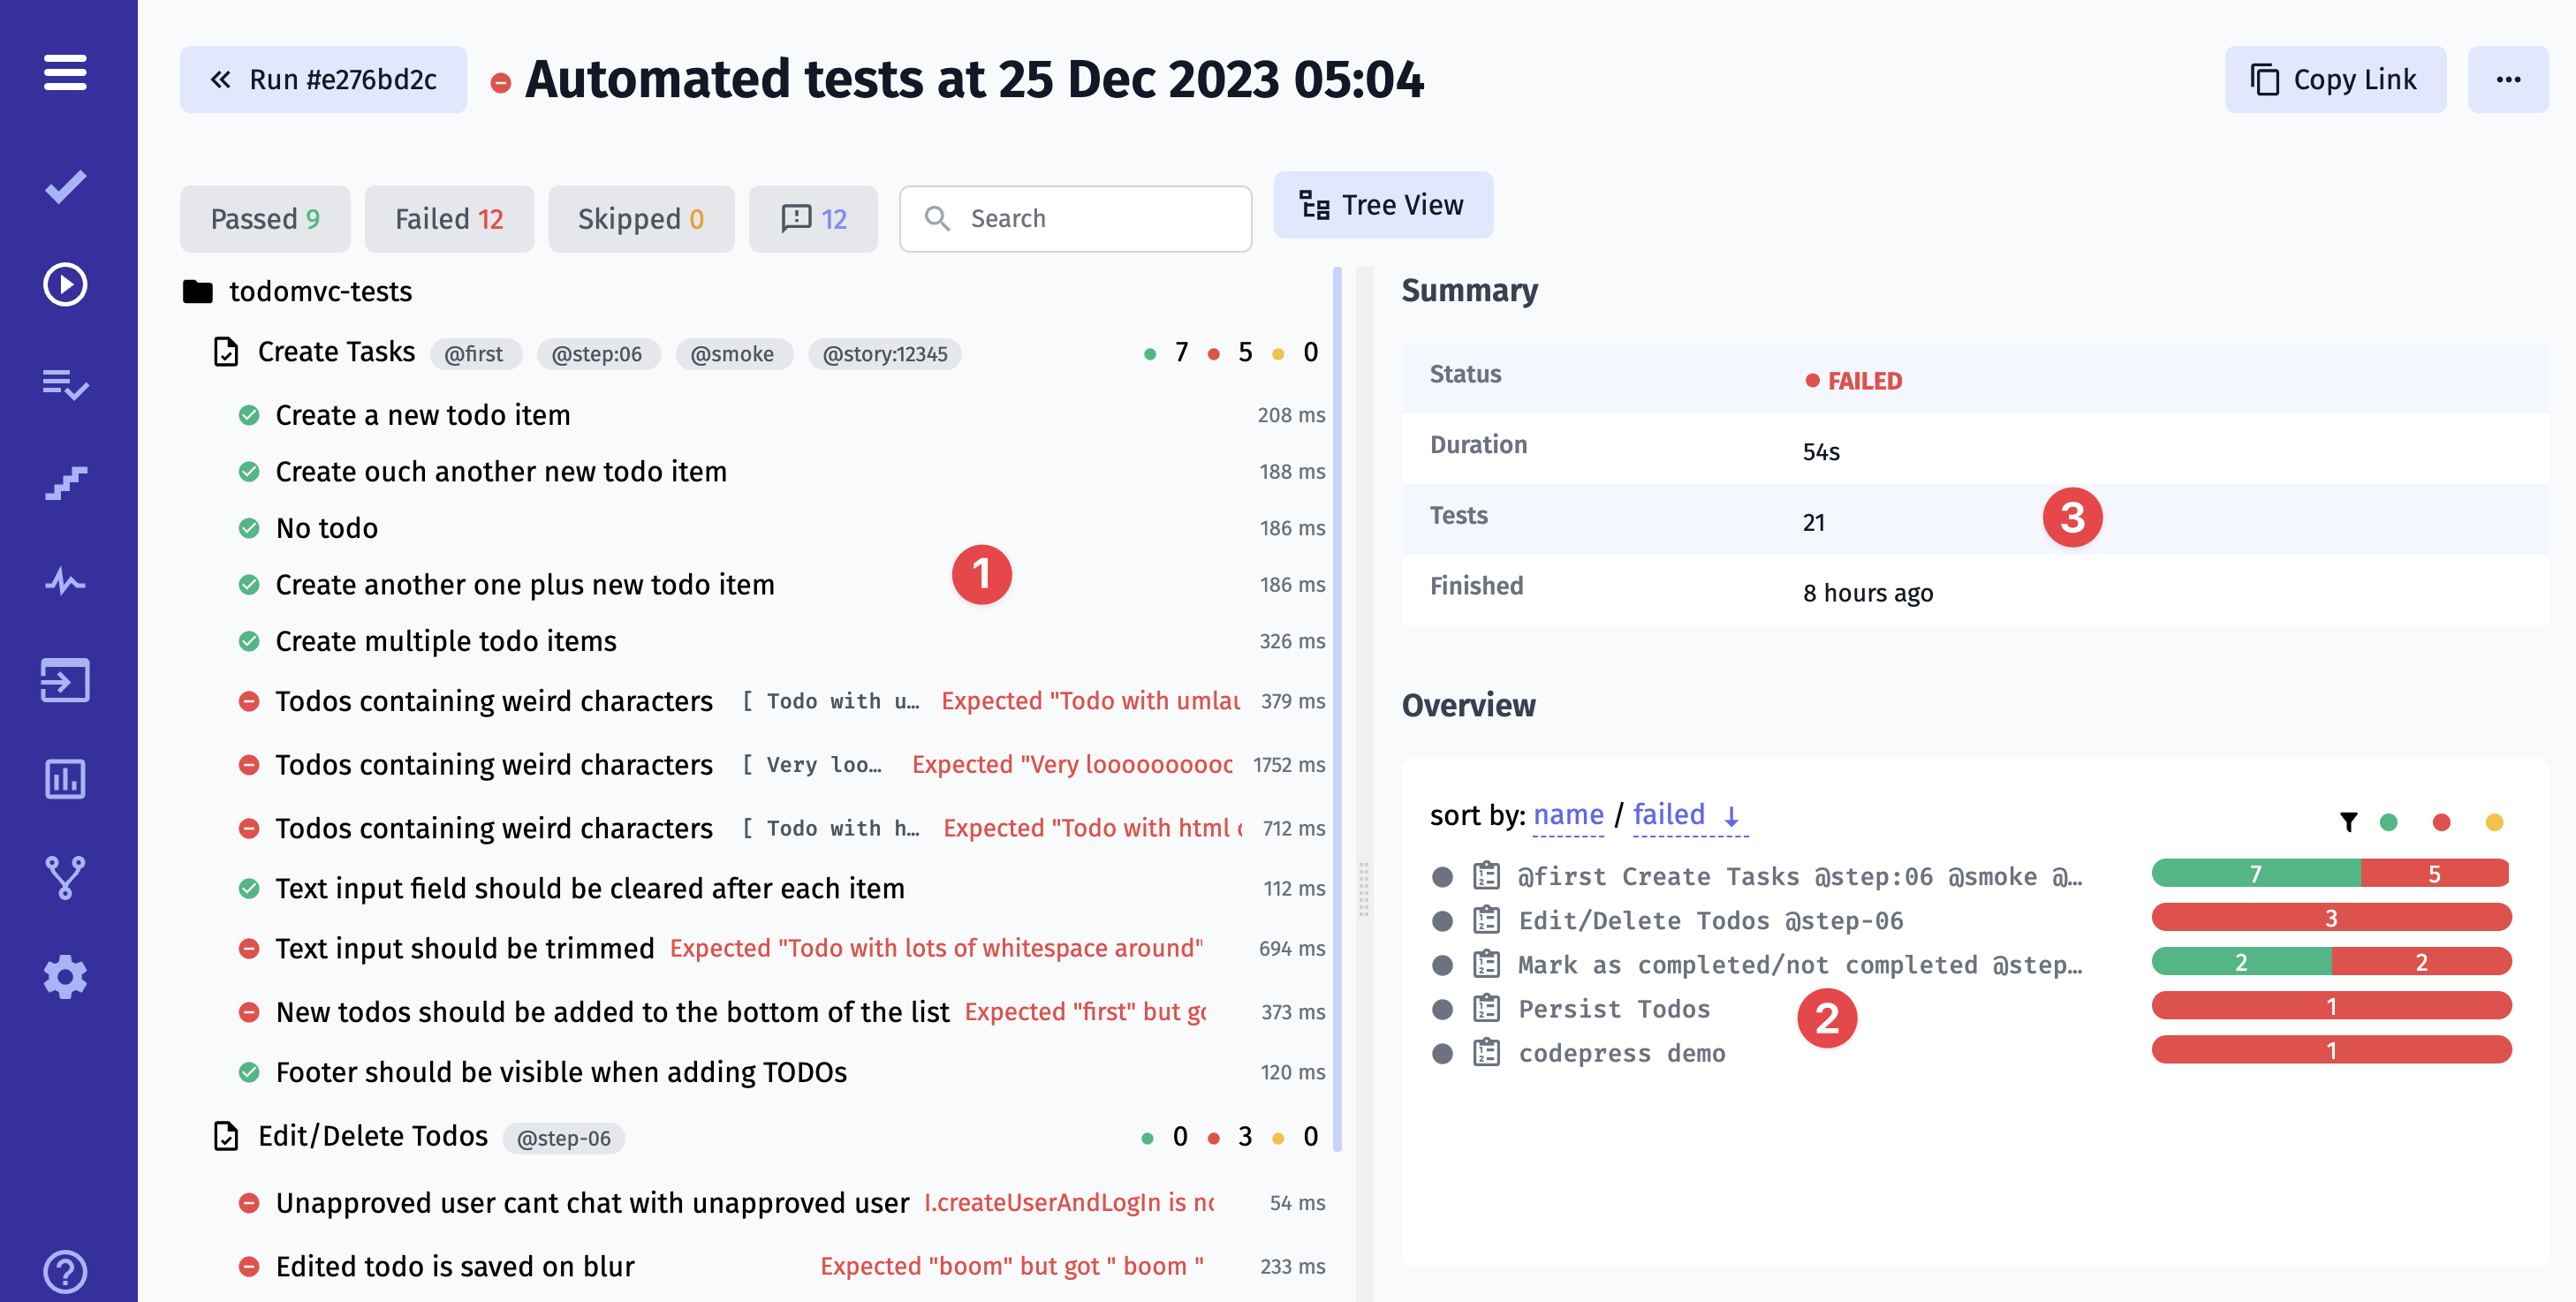
You can sort suites by Name and by Failed status in the Overview widget.
You can use ↓ and ↑ keys to navigate the tests and have a quick view of details for each test.
Test Case History
When you launch a test run and make changes to test case title or description - a new entry is added to the test case’s history. This entry records who made the edit and when it occurred.
- Navigate to the Runs section.
- Launch a new Run or continue an existing Run.
- Click the three dots menu next to the test case you want to edit.
- Select Edit.
- Modify the test case title or description as needed.
- Click Save to apply the changes.
- The new history entry will appear directly in the test case block, showing who edited the test case and the date and time of the change.
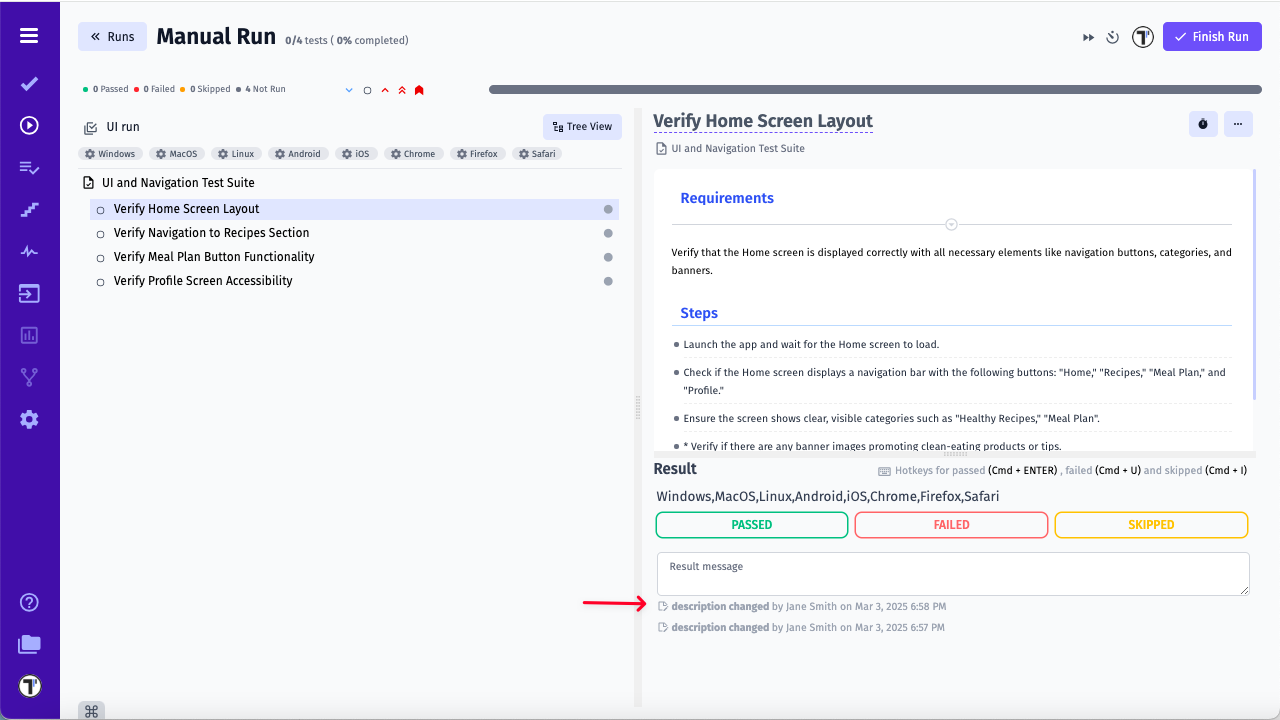
Please note that the test case history is only available while the test run is in progress.
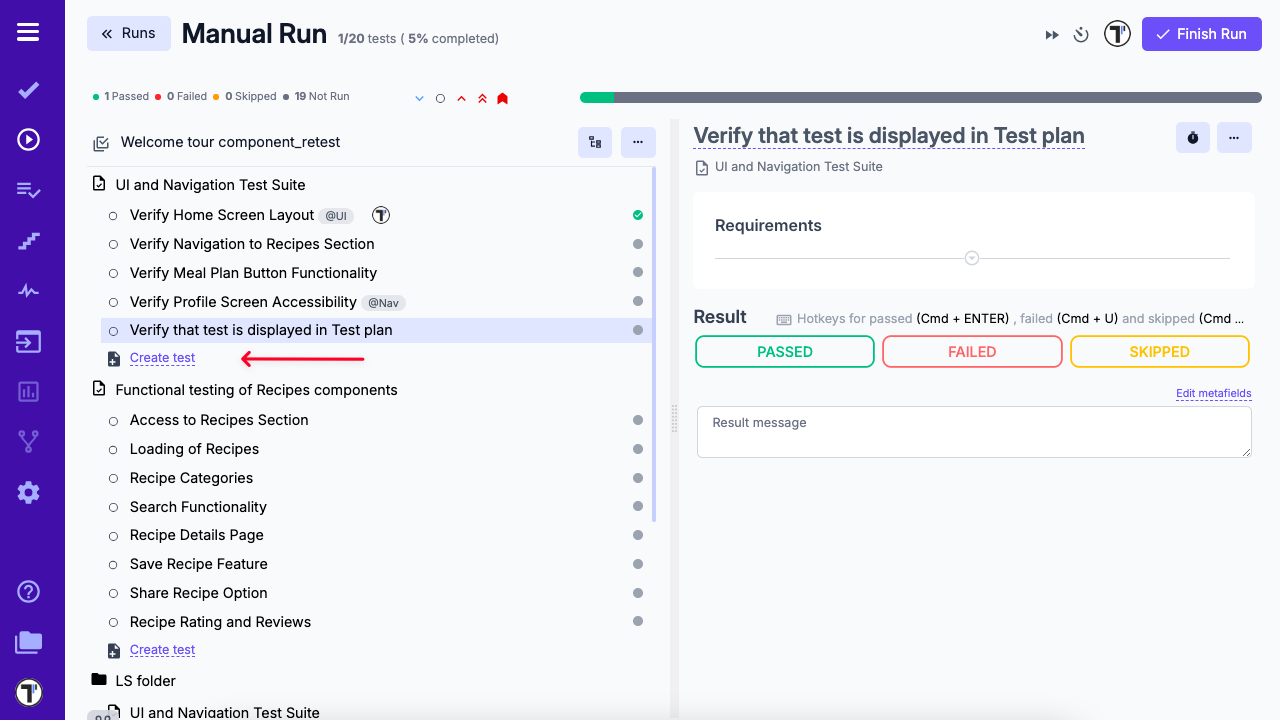
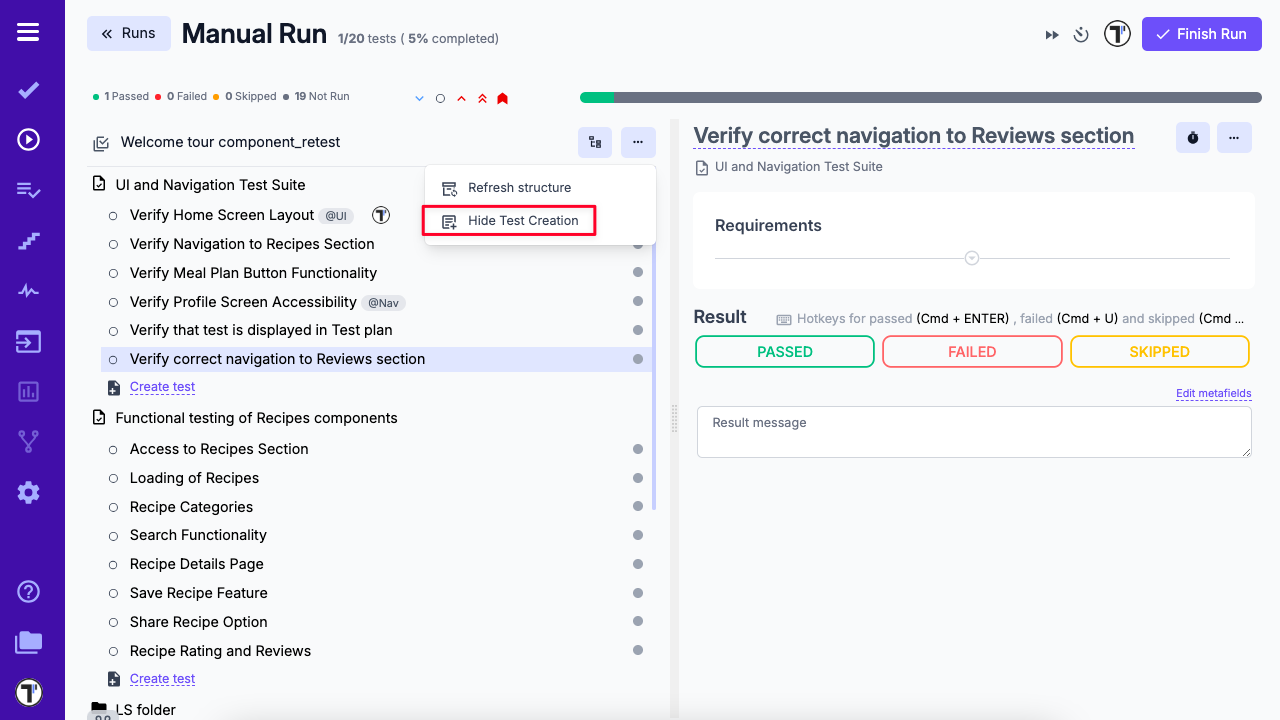
How to Create a Test Case within a Run
Section titled “How to Create a Test Case within a Run”You can create test cases directly within a test Run, avoiding additional navigation and ensuring the new tests are automatically included in the associated test plan.
-
Go to the Runs tab.
-
Start the desired test run.
-
Scroll to the bottom of the test suite.
-
Click the Create test button.
-
Enter the test case details in the provided field.
-
Click the checkmark ✔️ icon to add the new test case, or the X icon to discard it.
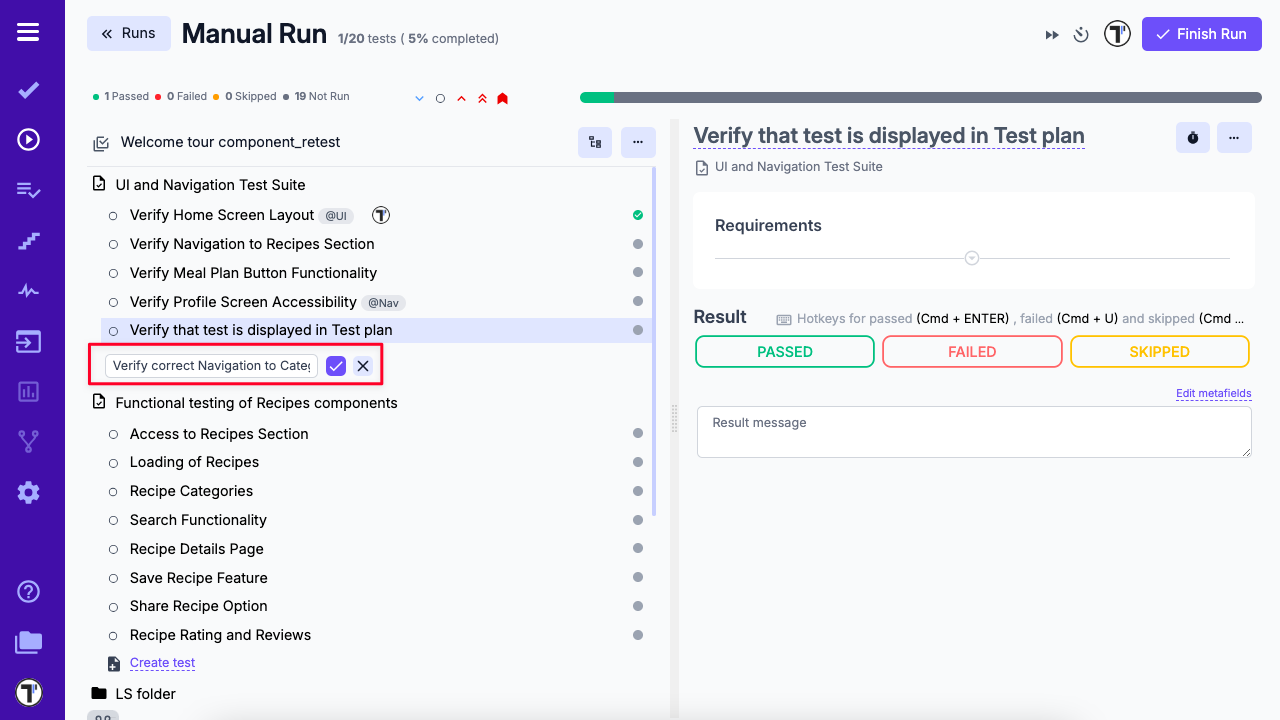
The Create Test button can be hidden via the Hide Test Creation option in the Run dropdown menu.
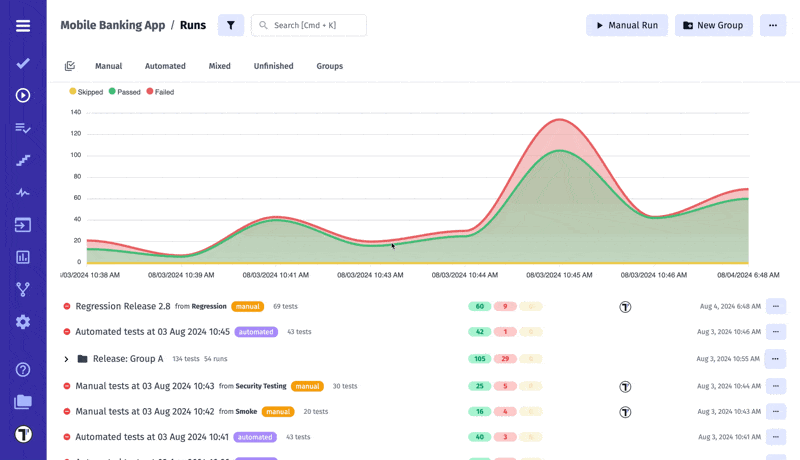
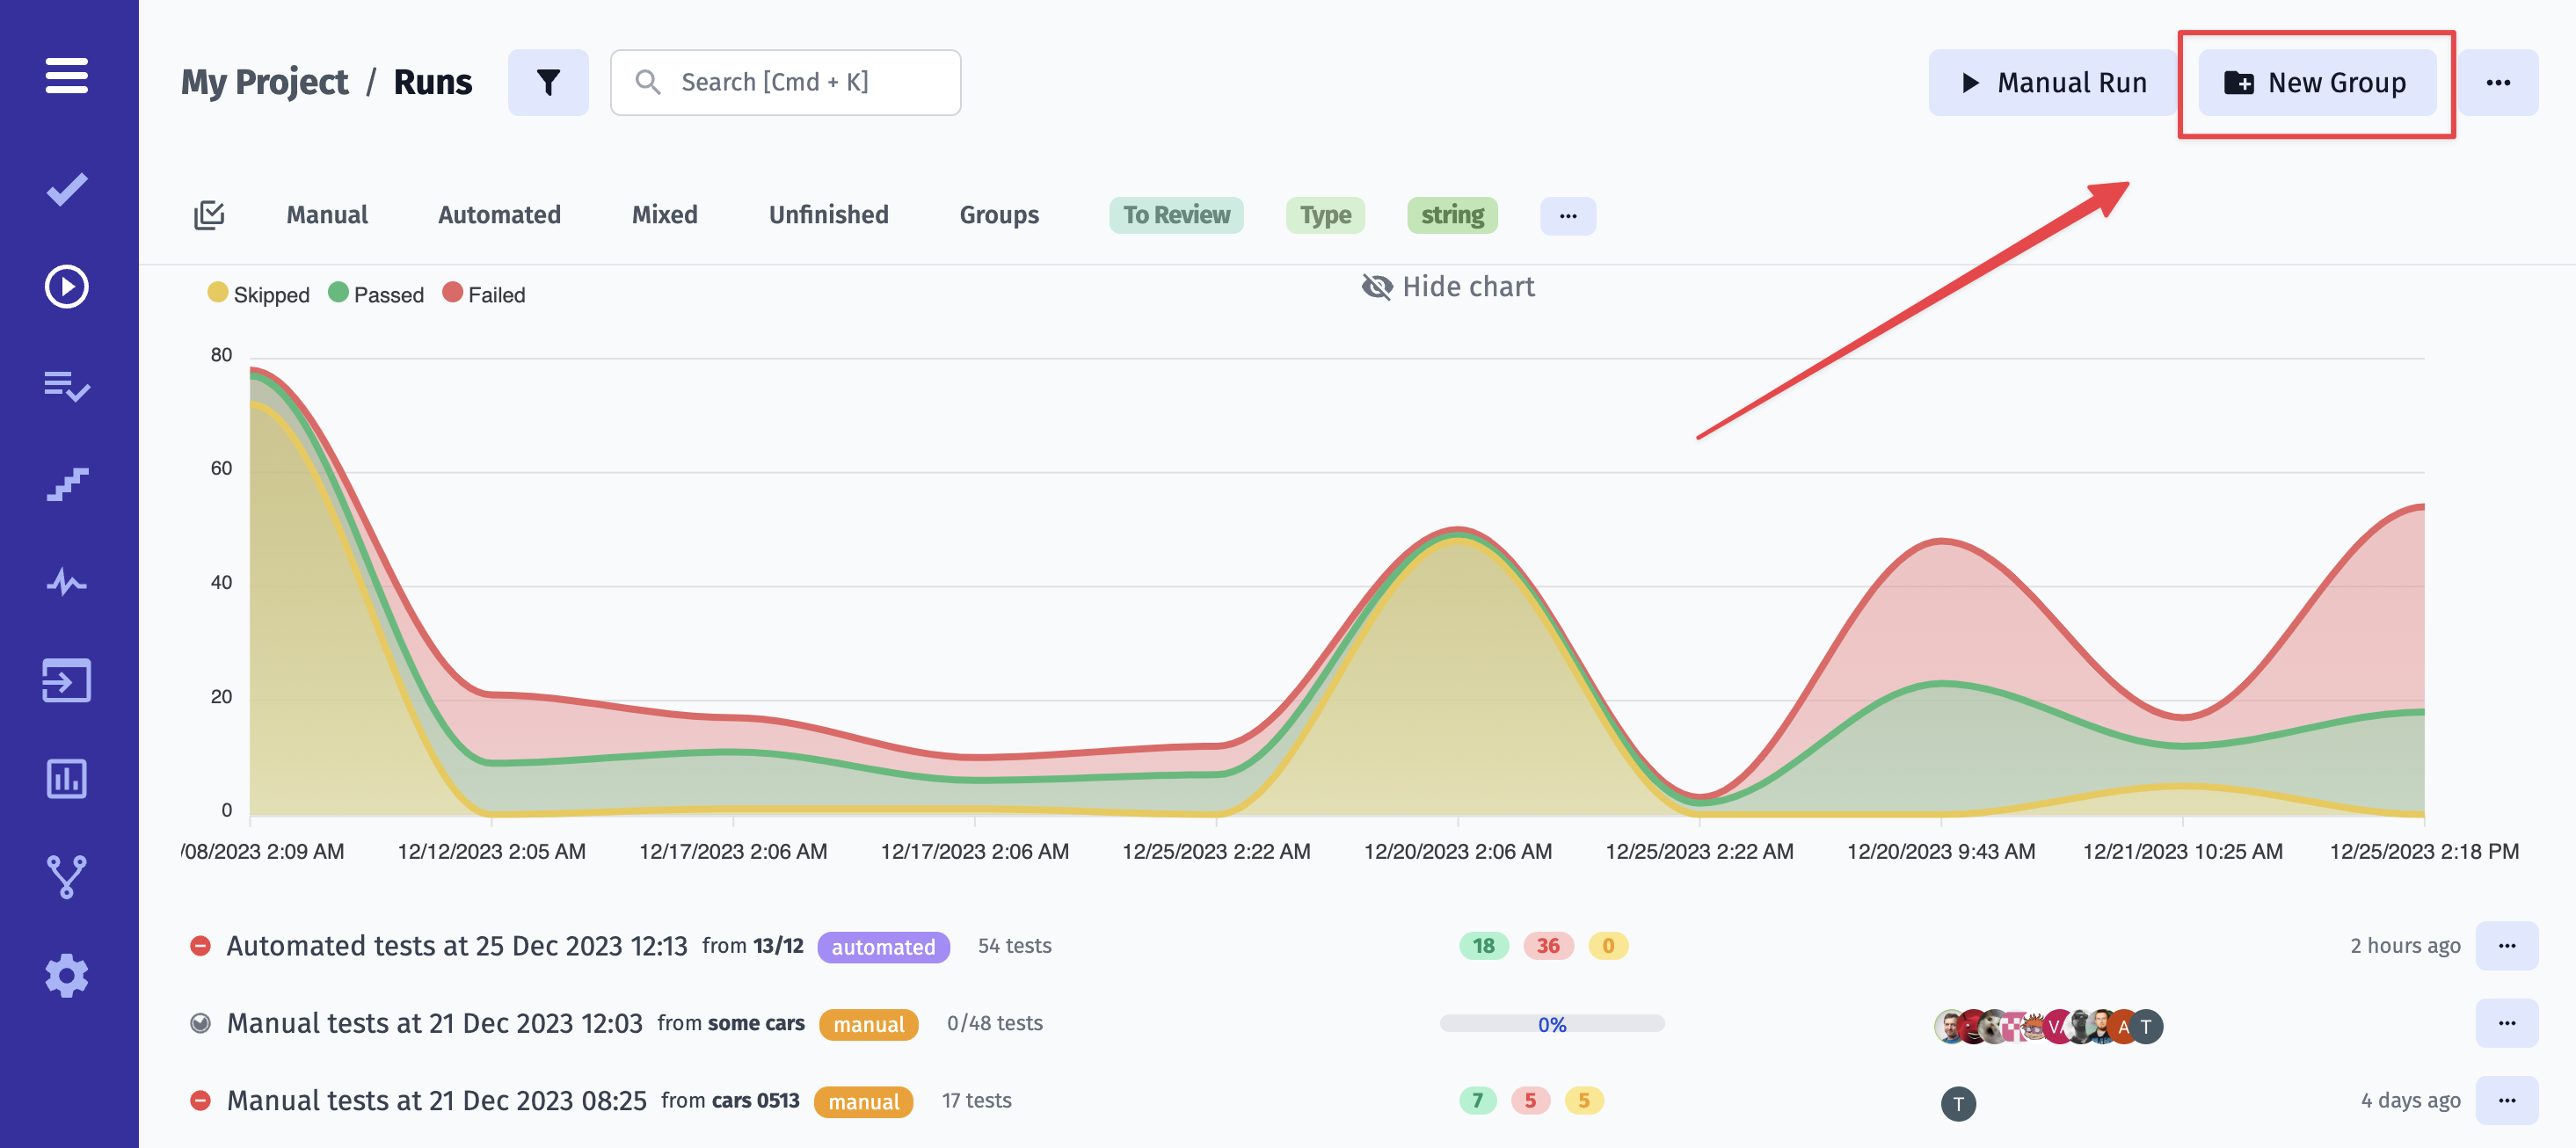
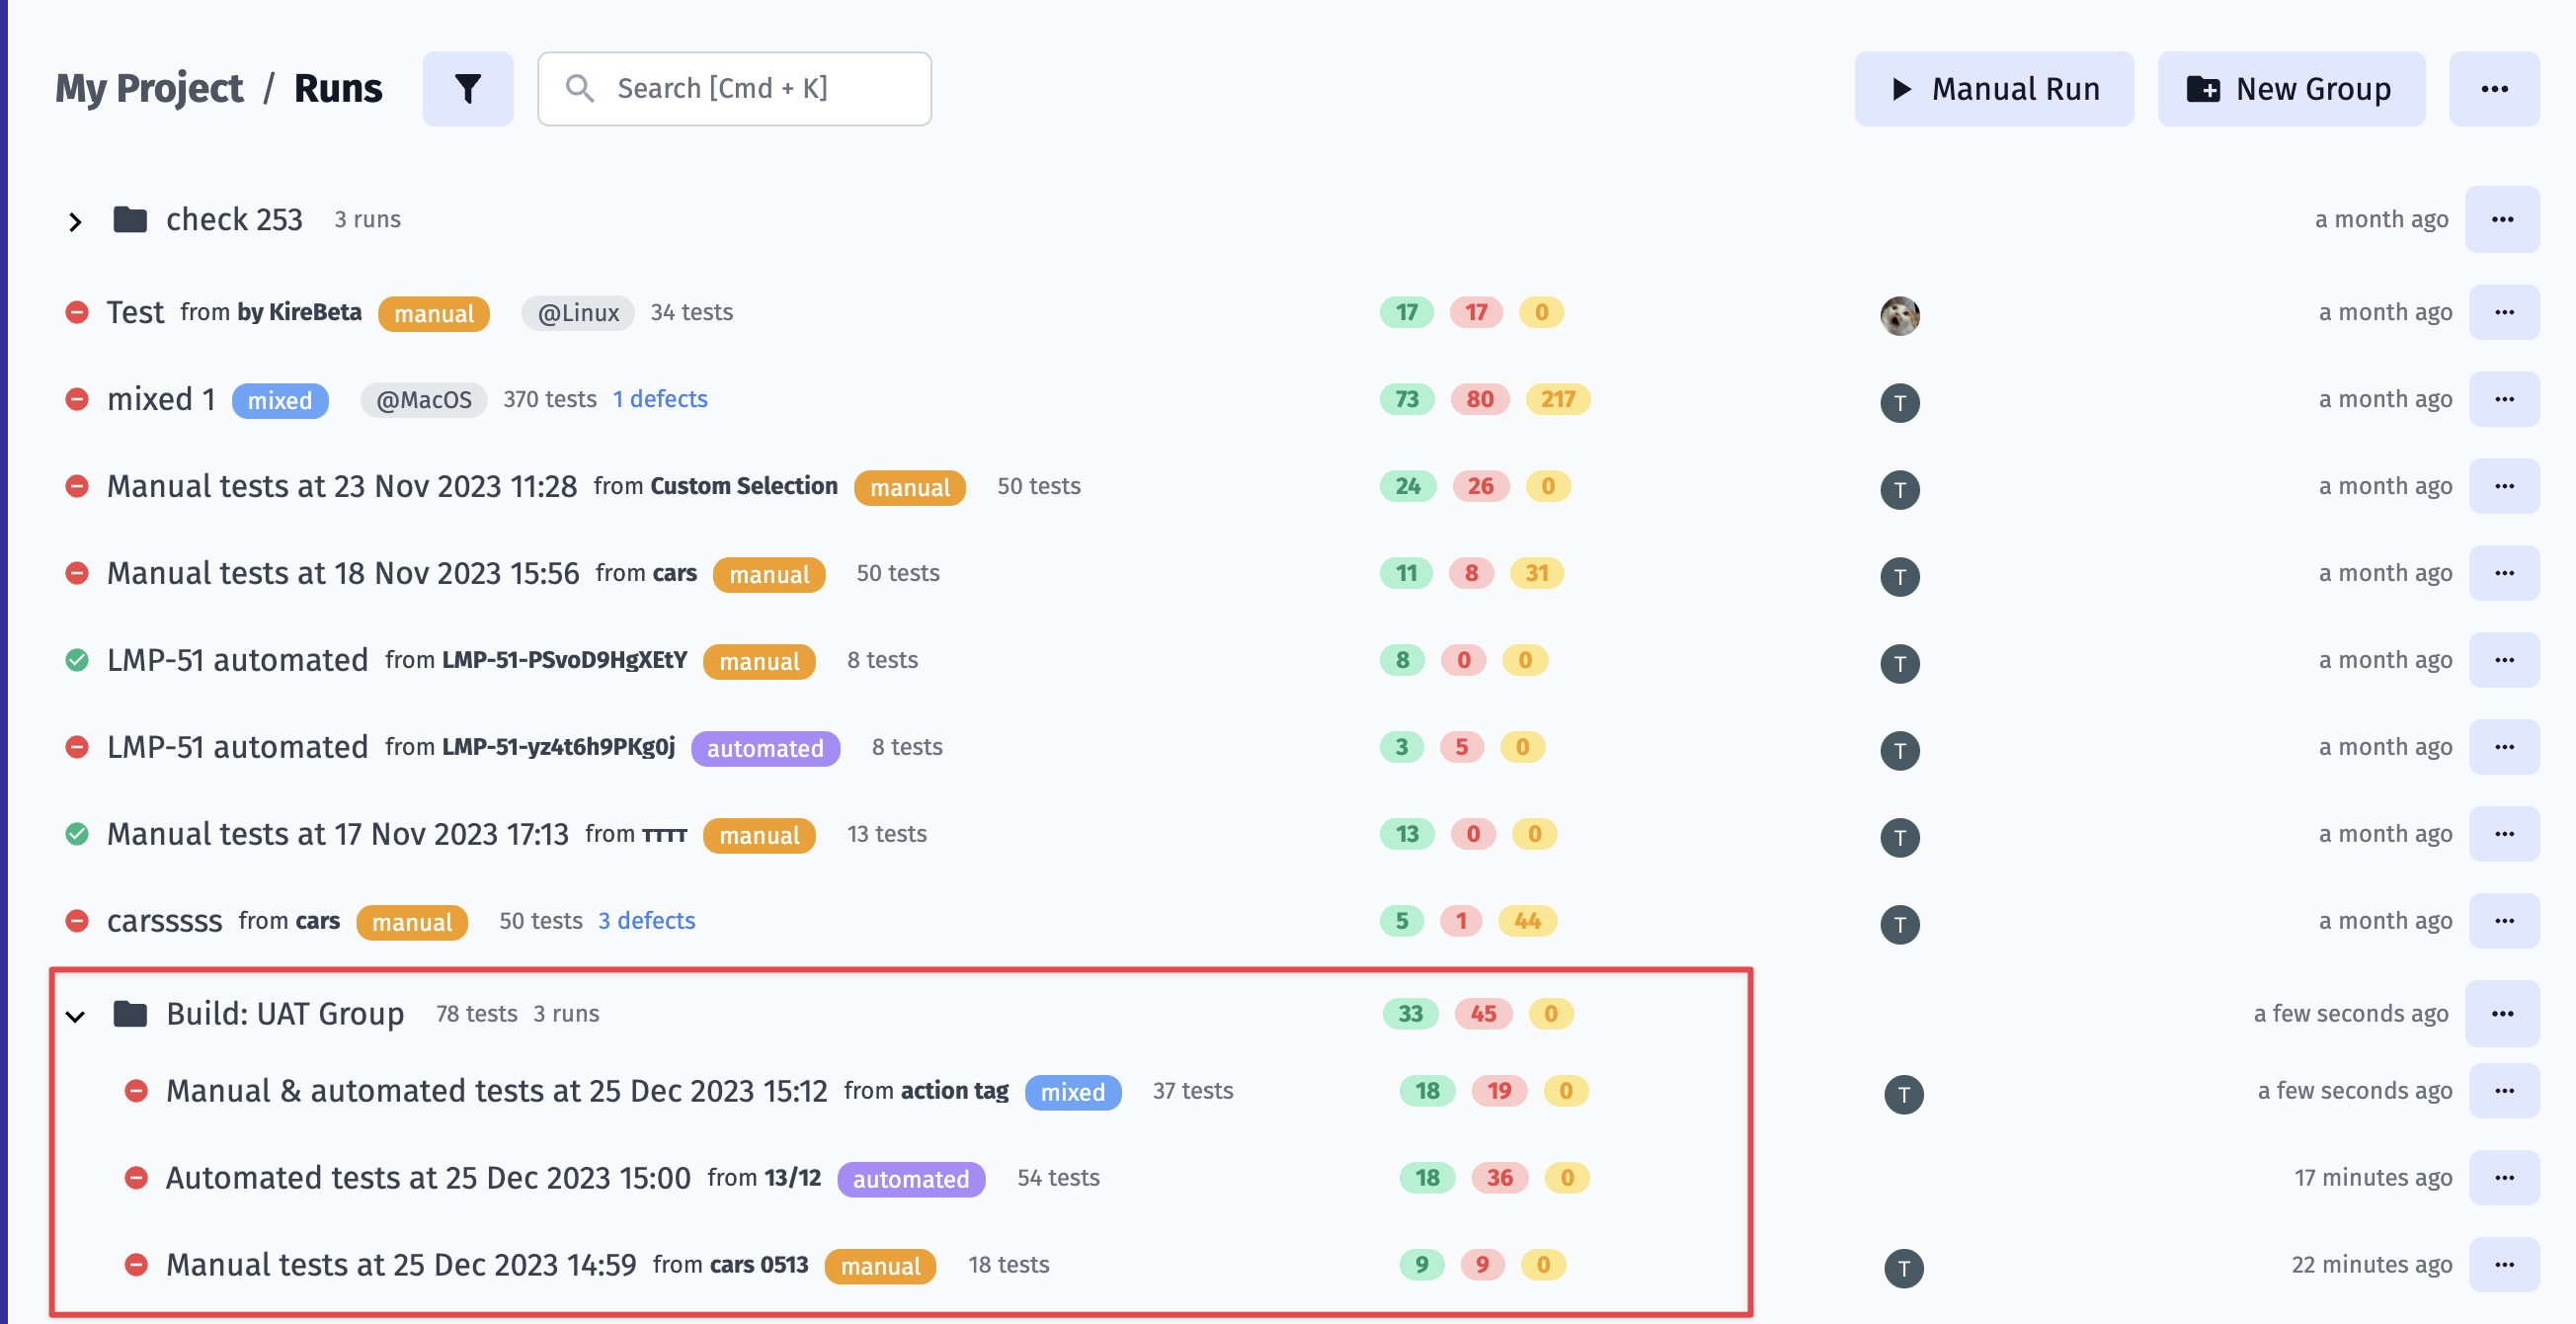
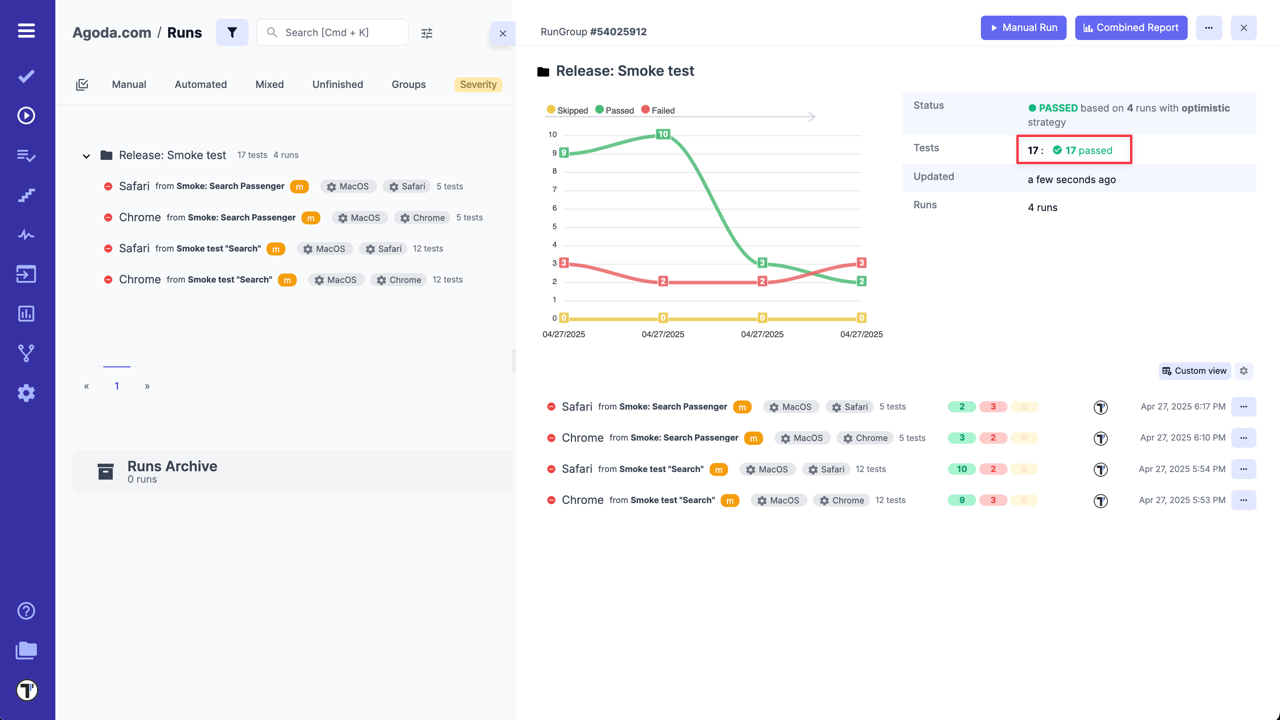
RunGroups
Section titled “RunGroups”First, let’s clarify what Run Groups are in Testomat.io. They allow you to organize and group multiple test runs together based on criteria like sprint, release, functional area, or any other logical grouping. This helps in analyzing aggregated results and getting a consolidated view of your testing efforts.
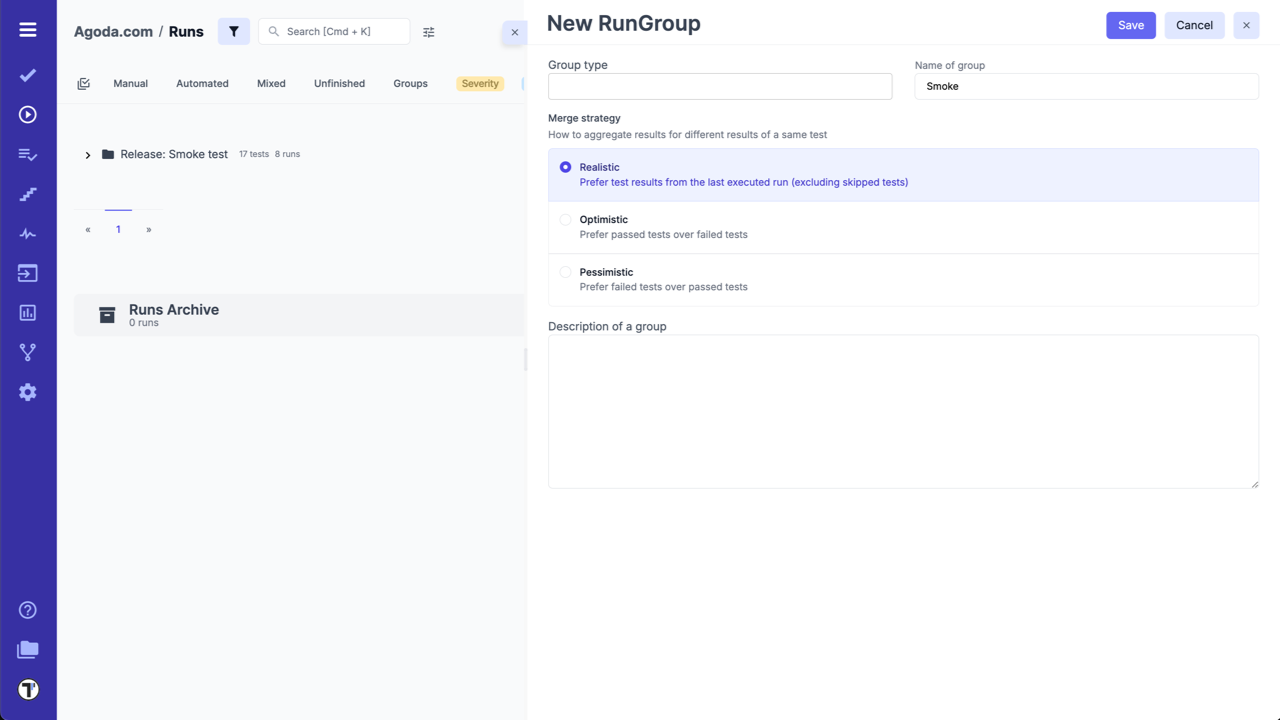
To create a new Run Group, click on New Group button:
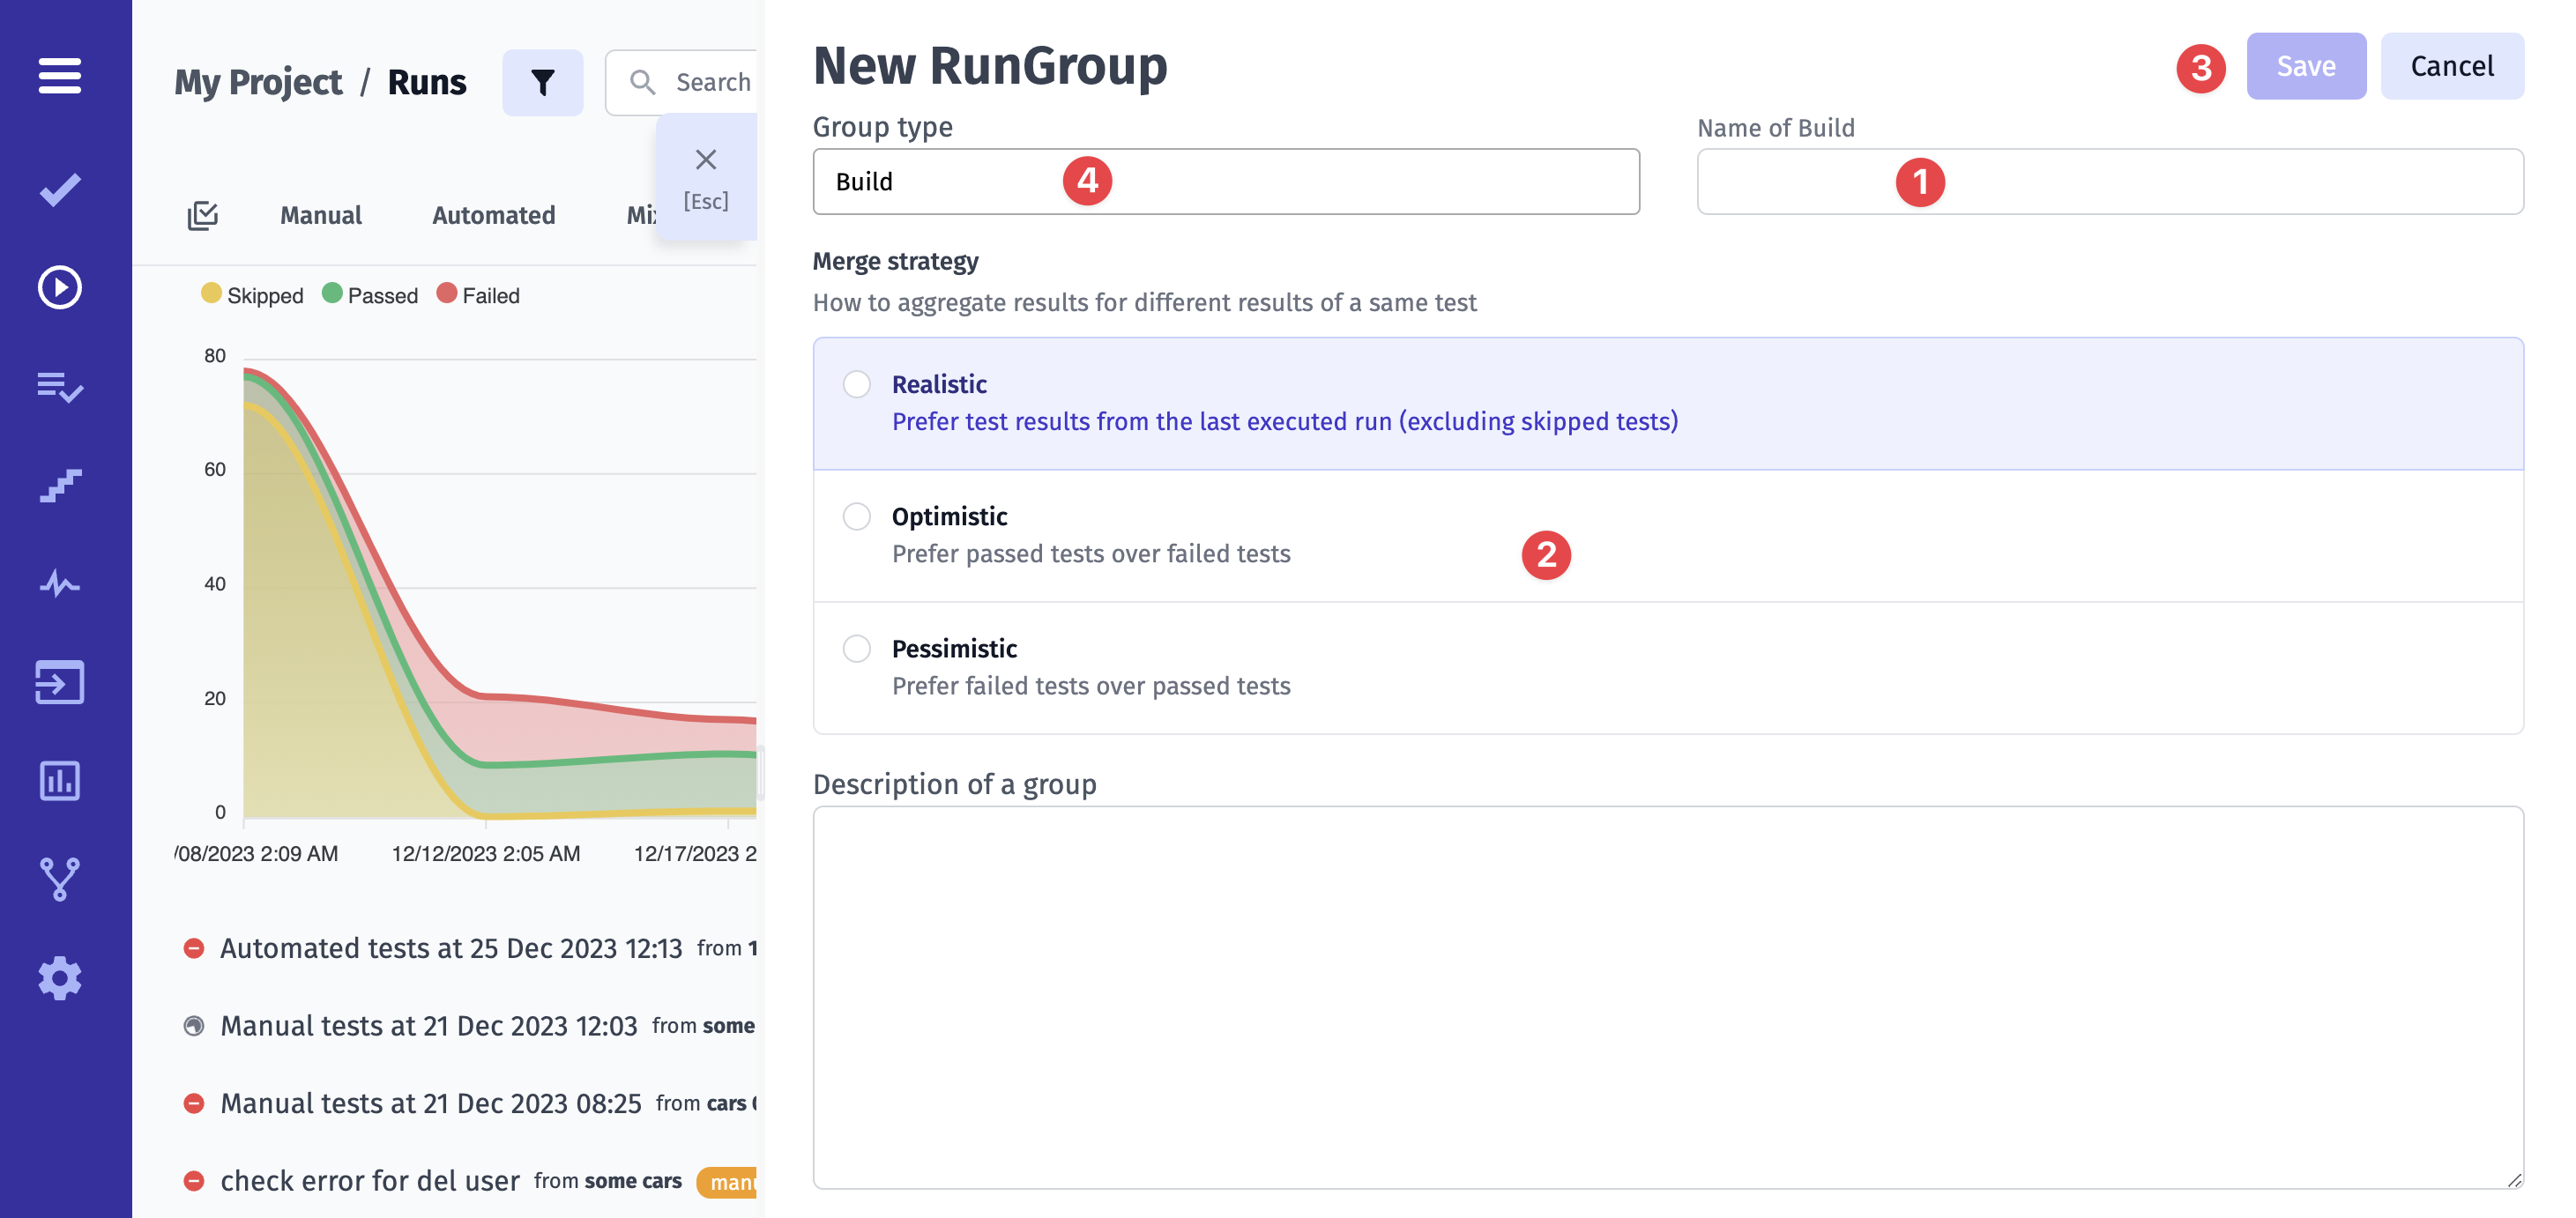
On New RunGroup screen you need
- Add a Name of a group
- Choose Merge strategy
- Choose a group type (optional)
- Click on Save button
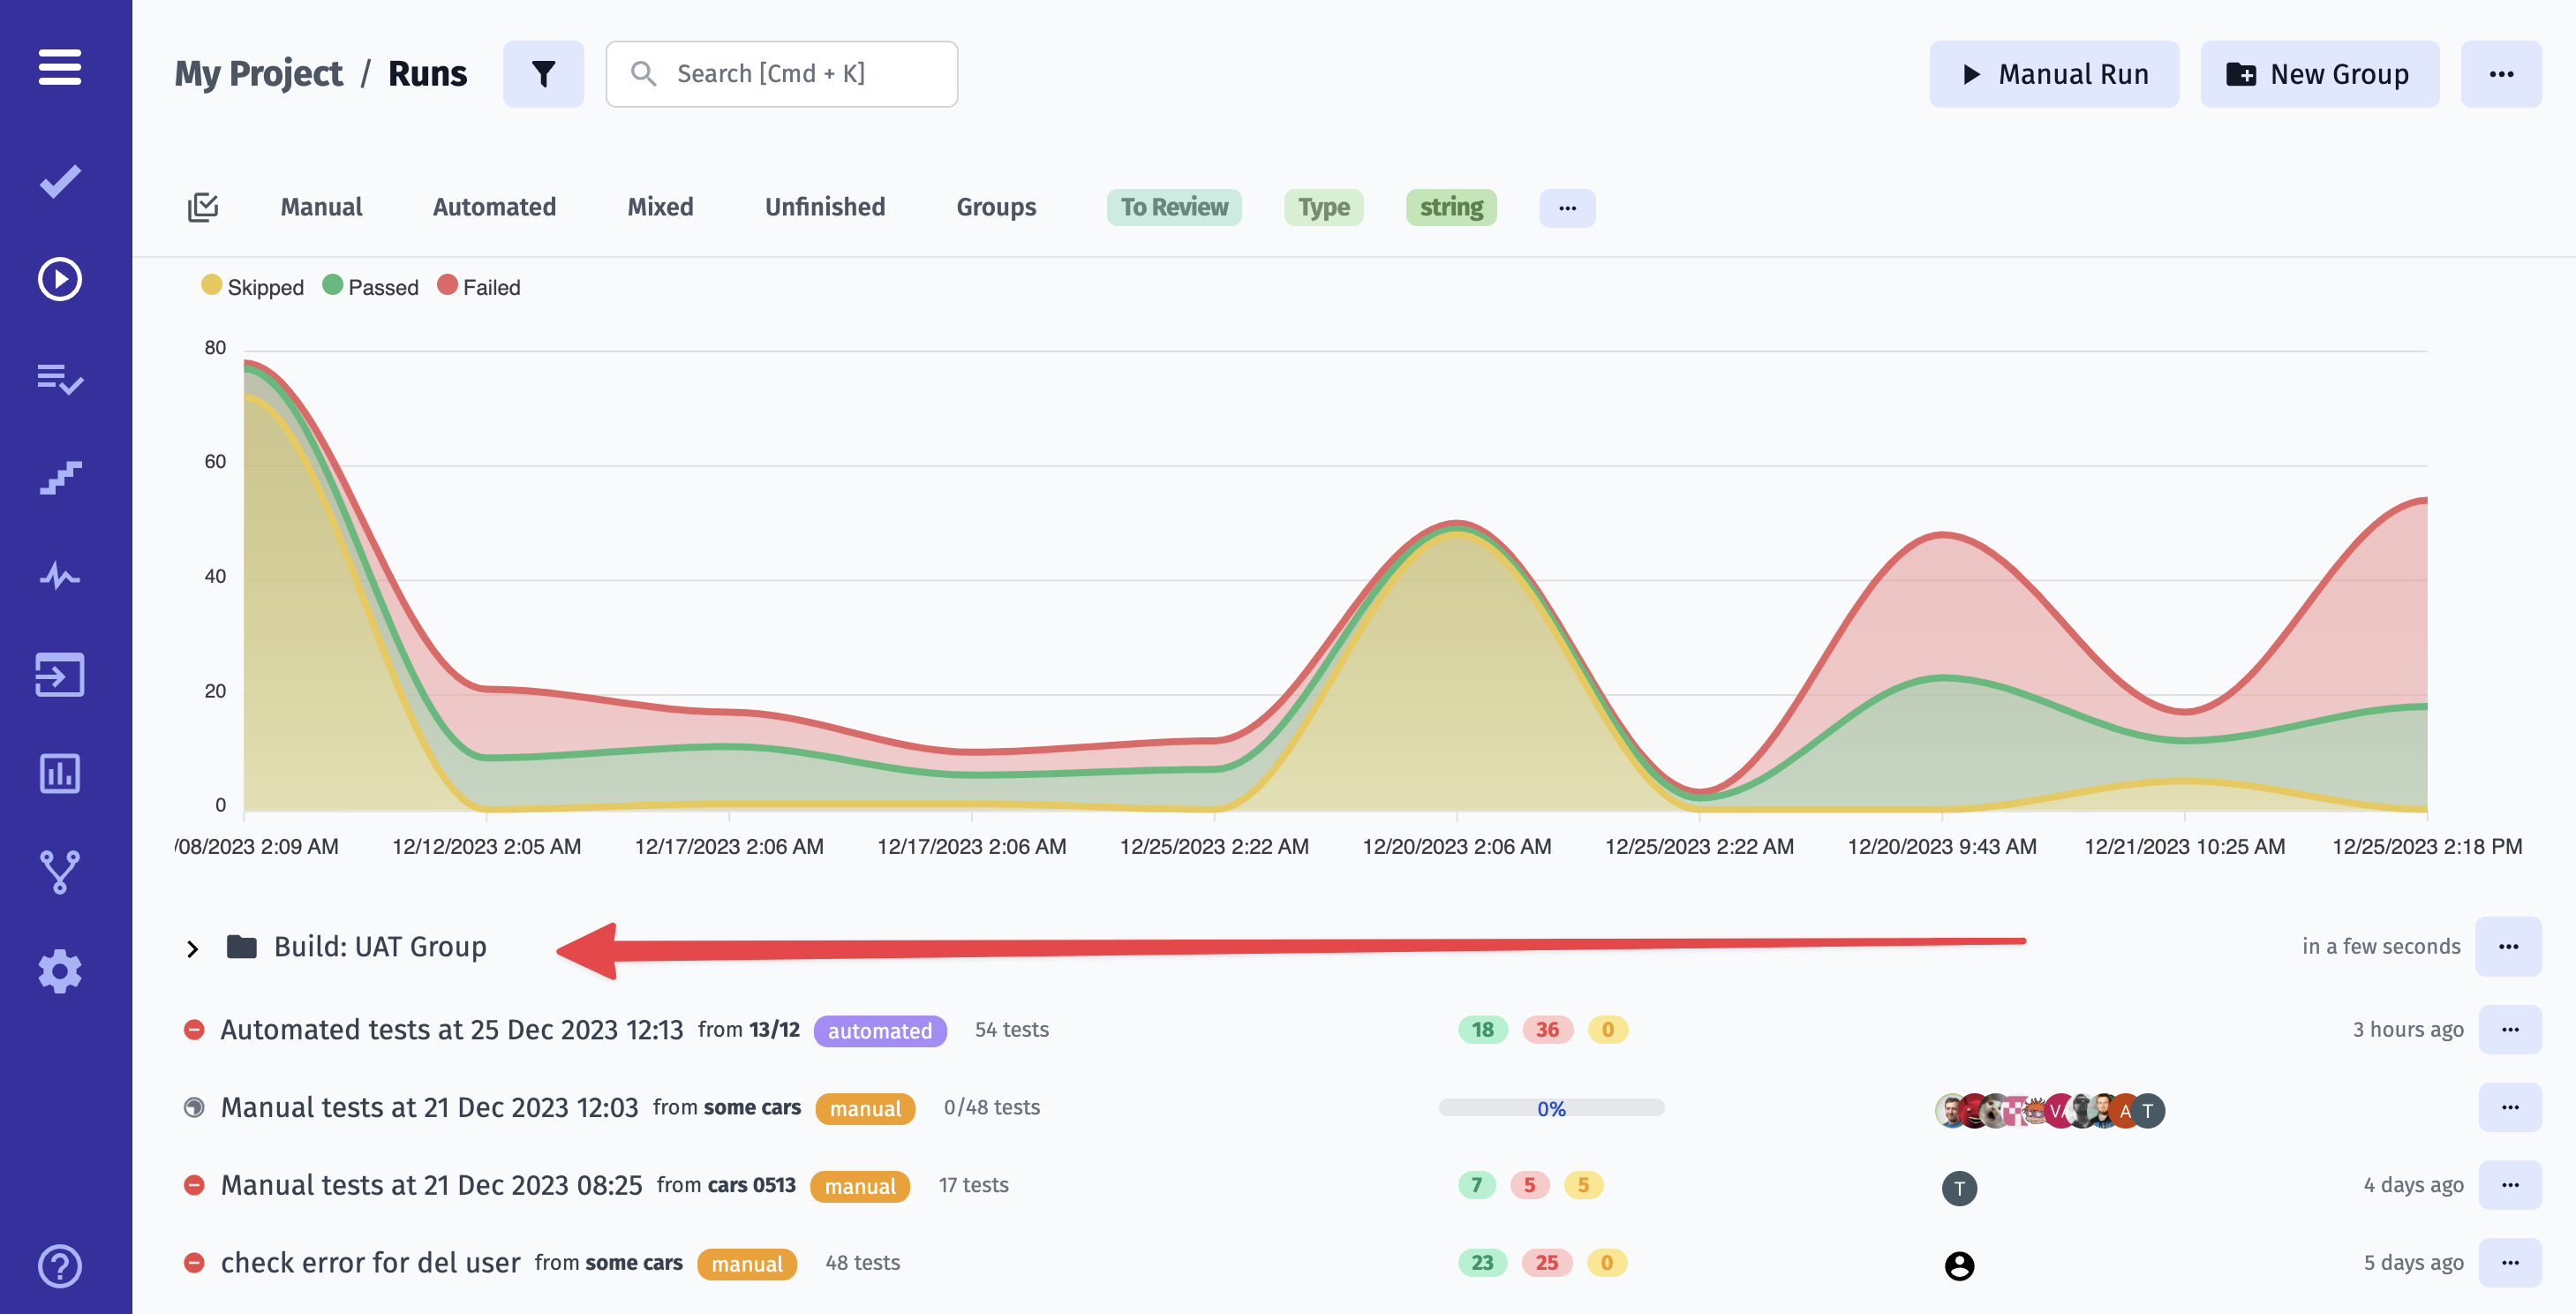
A New RunGroup will appear on Runs page
To put Manual Run to a RunGroup you need to open it and click on Add Manual Run button

To put an Automated Run to a RunGroup you need to execute your tests with Testomat.io providing TESTOMATIO_RUNGROUP_TITLE=“Build ${BUILD_ID}”.
Now you can see Test Runs in a created RunGroup
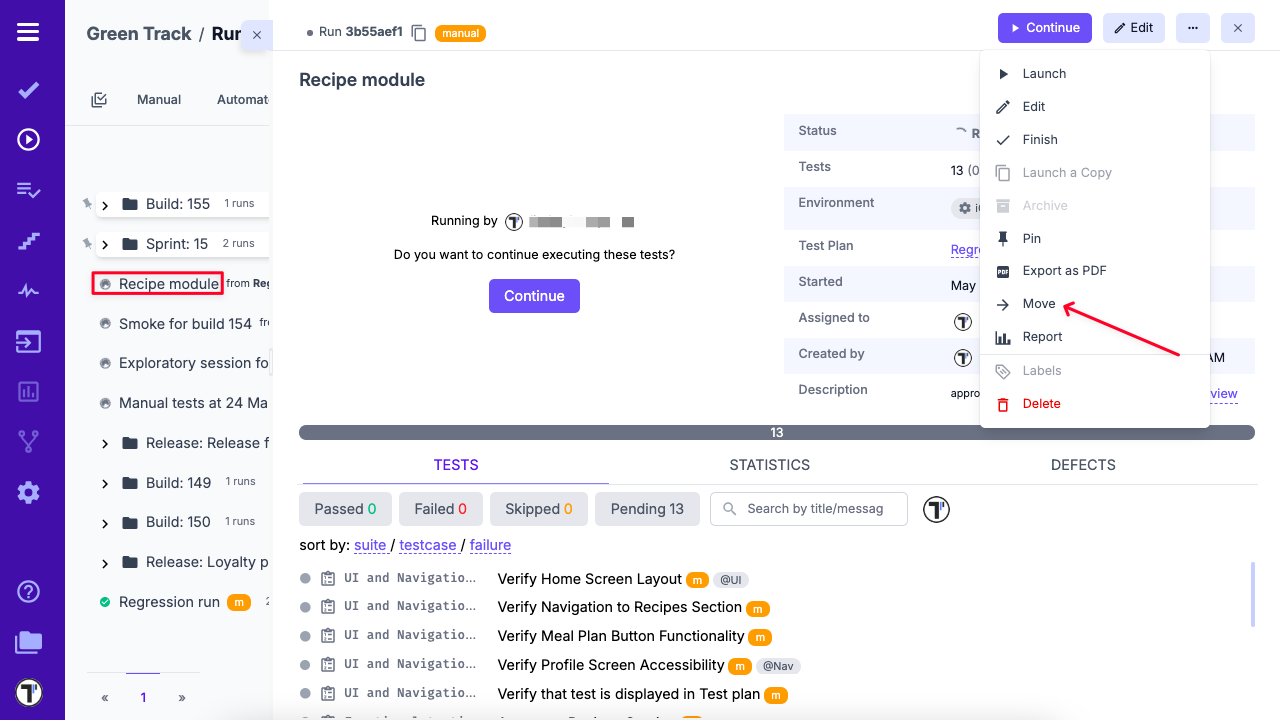
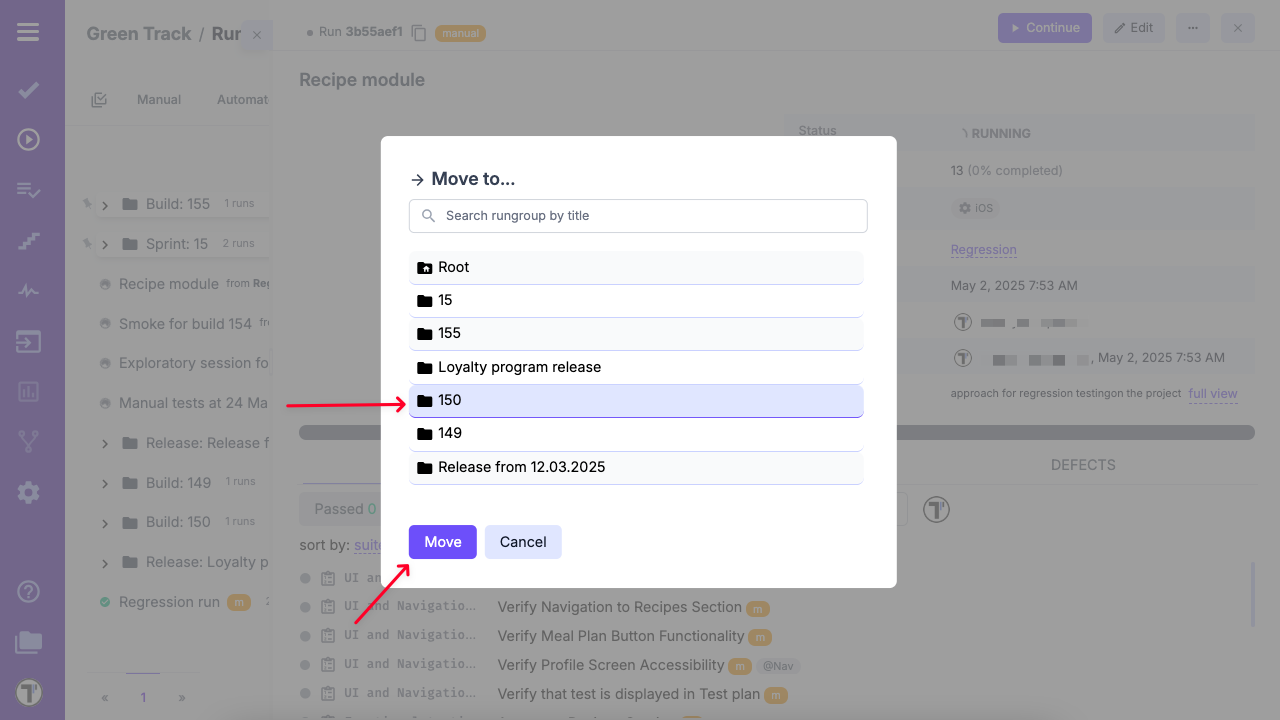
How to Move a Run to a RunGroup
Section titled “How to Move a Run to a RunGroup”You may need to move a Run to a specific RunGroup—for example, to associate it with a particular release or build. To do this, use the Move functionality.
- Navigate to the Runs section.
- Select the Run you want to move.
- Click the three-dot menu (…) next to the Edit button.
- Select Move from the dropdown menu.
- In the pop-up window, choose the destination RunGroup.
- Click Move to confirm.
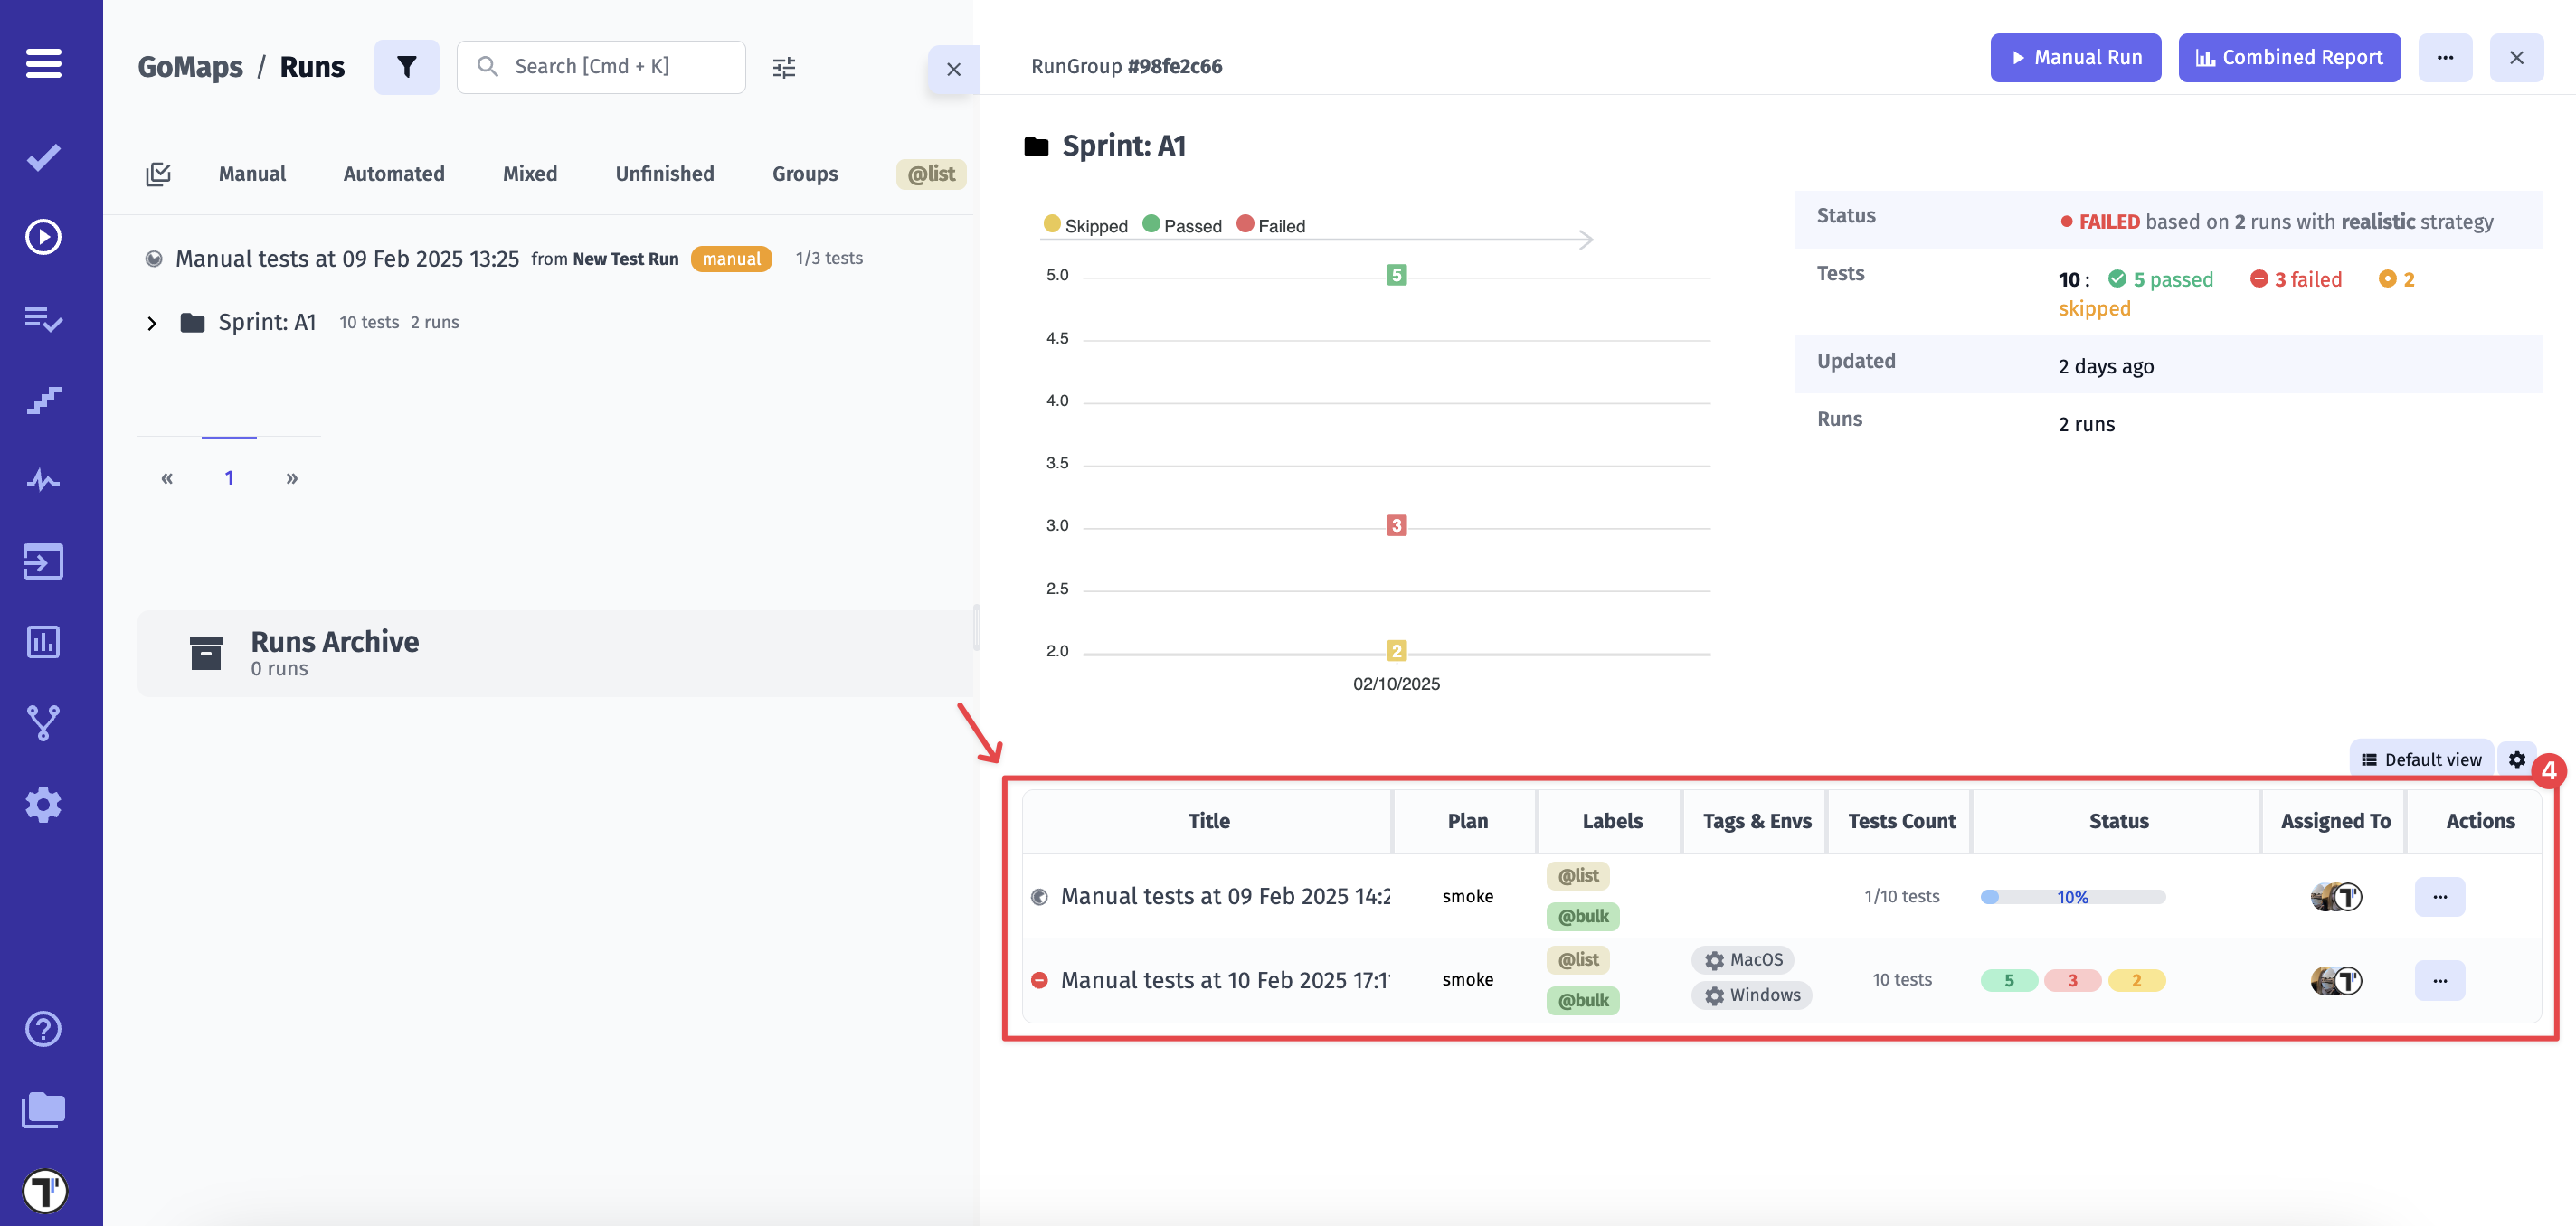
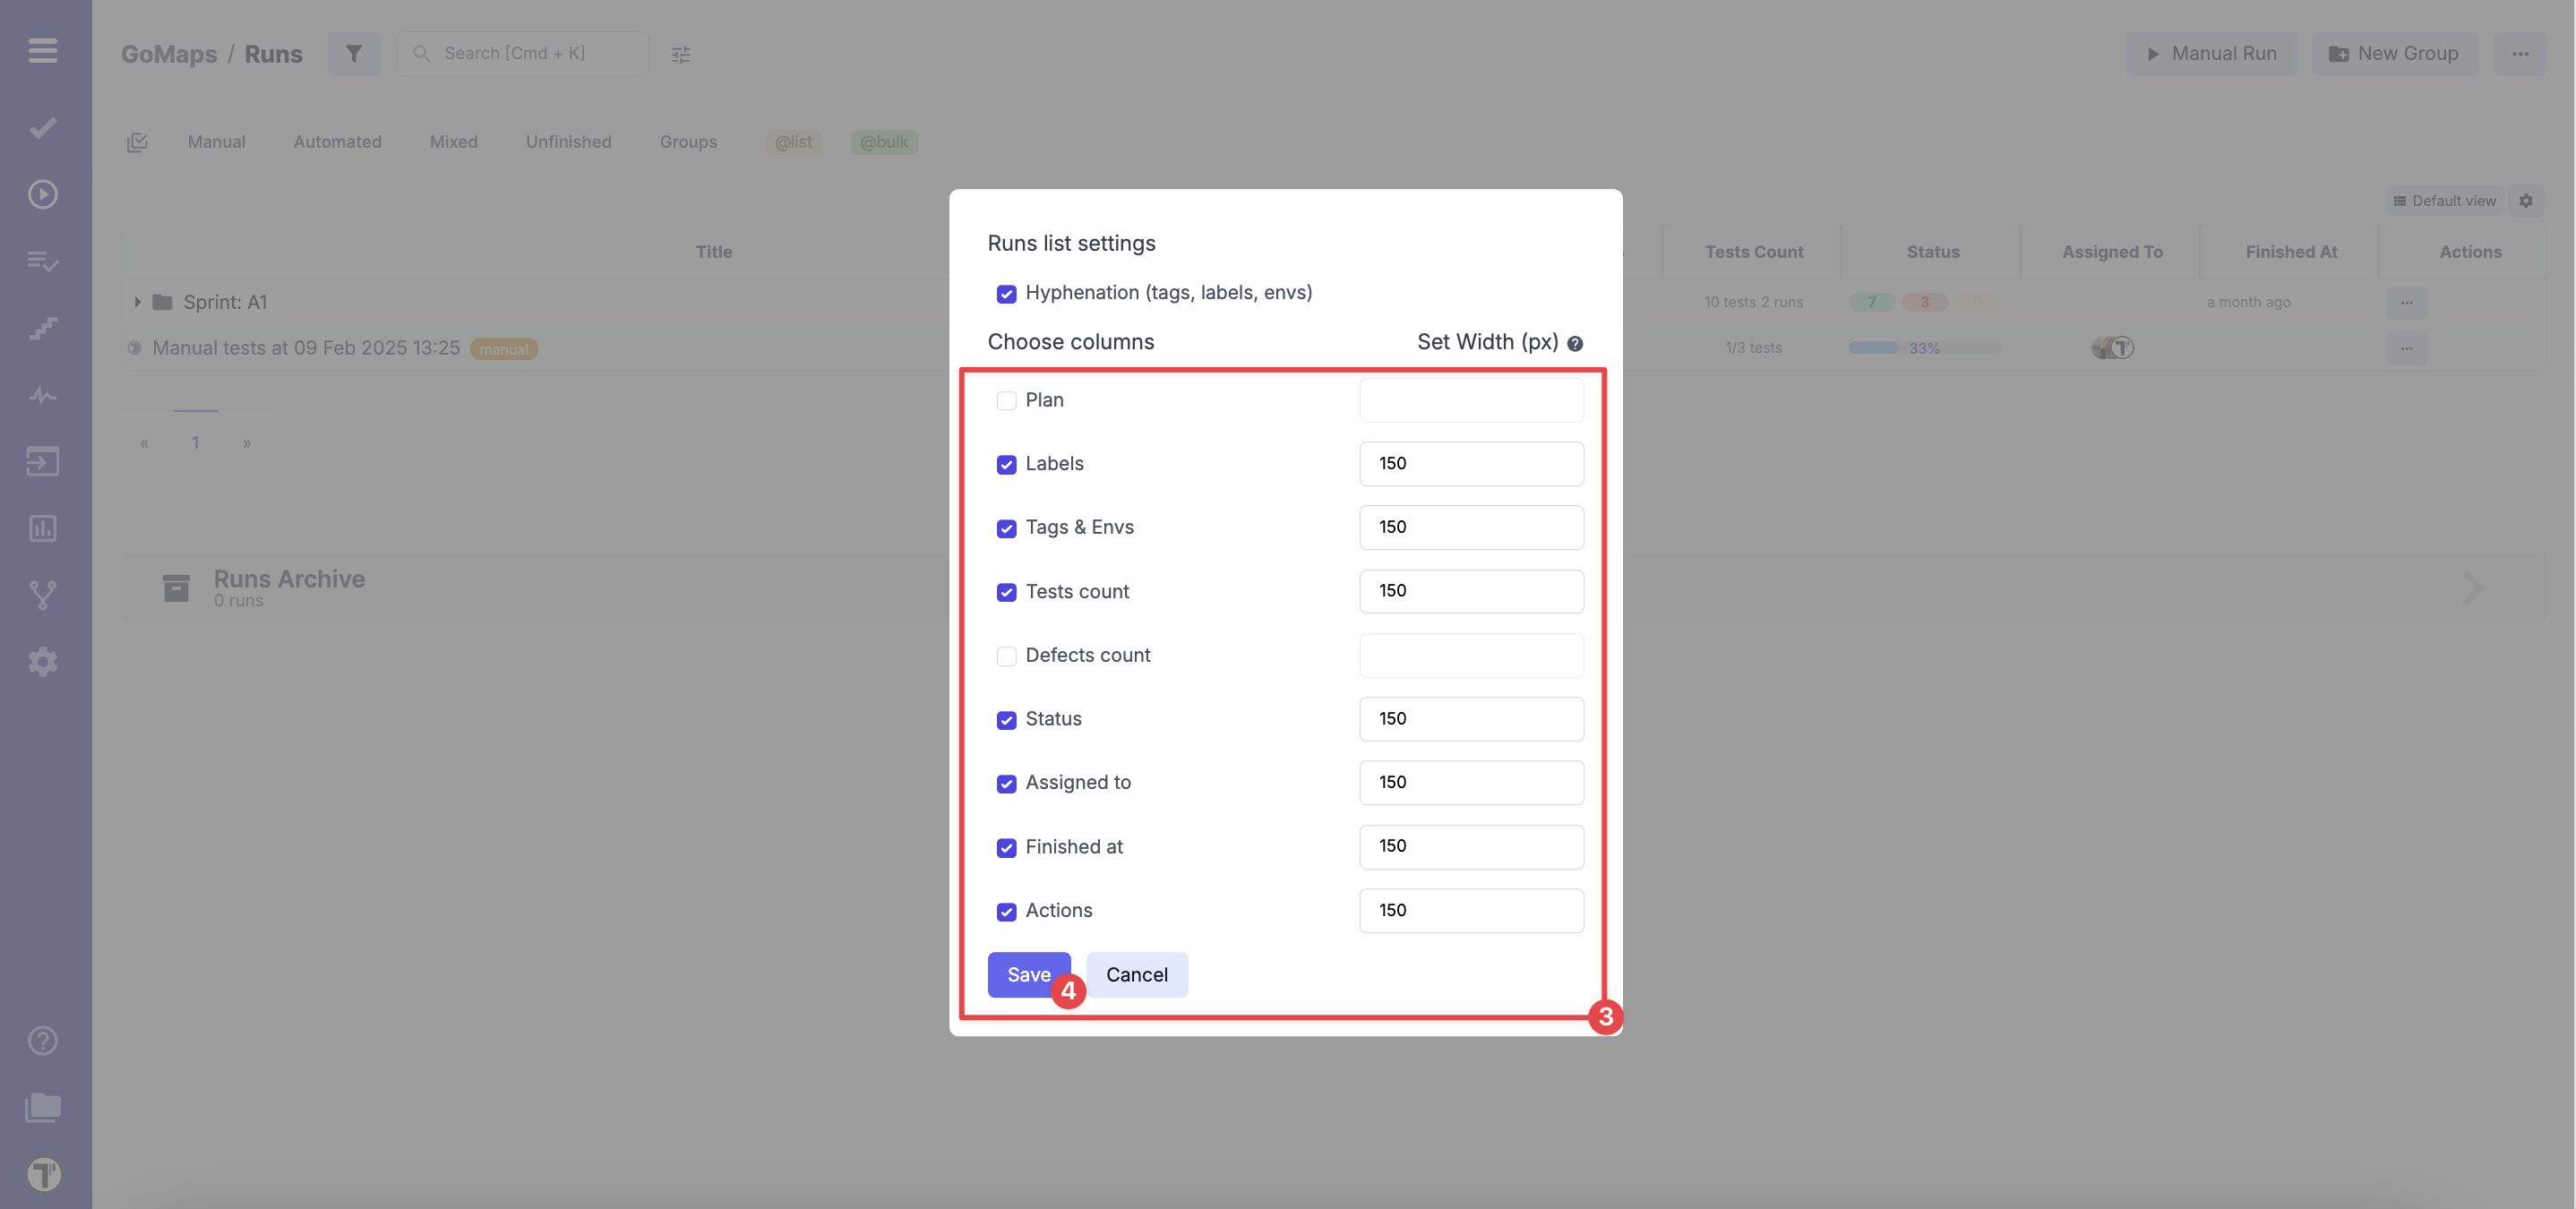
How to Customize Your Runs List View
Section titled “How to Customize Your Runs List View”When working with test runs in RunGroup or Runs Dashboard Flow, you can adjust the table layout to fit your needs. Instead of using the default view, you can customize the table by following these simple steps:
RunGroup Flow
- Click the Runs button in the sidebar
- Select RunGroup
- Click the Custom view button
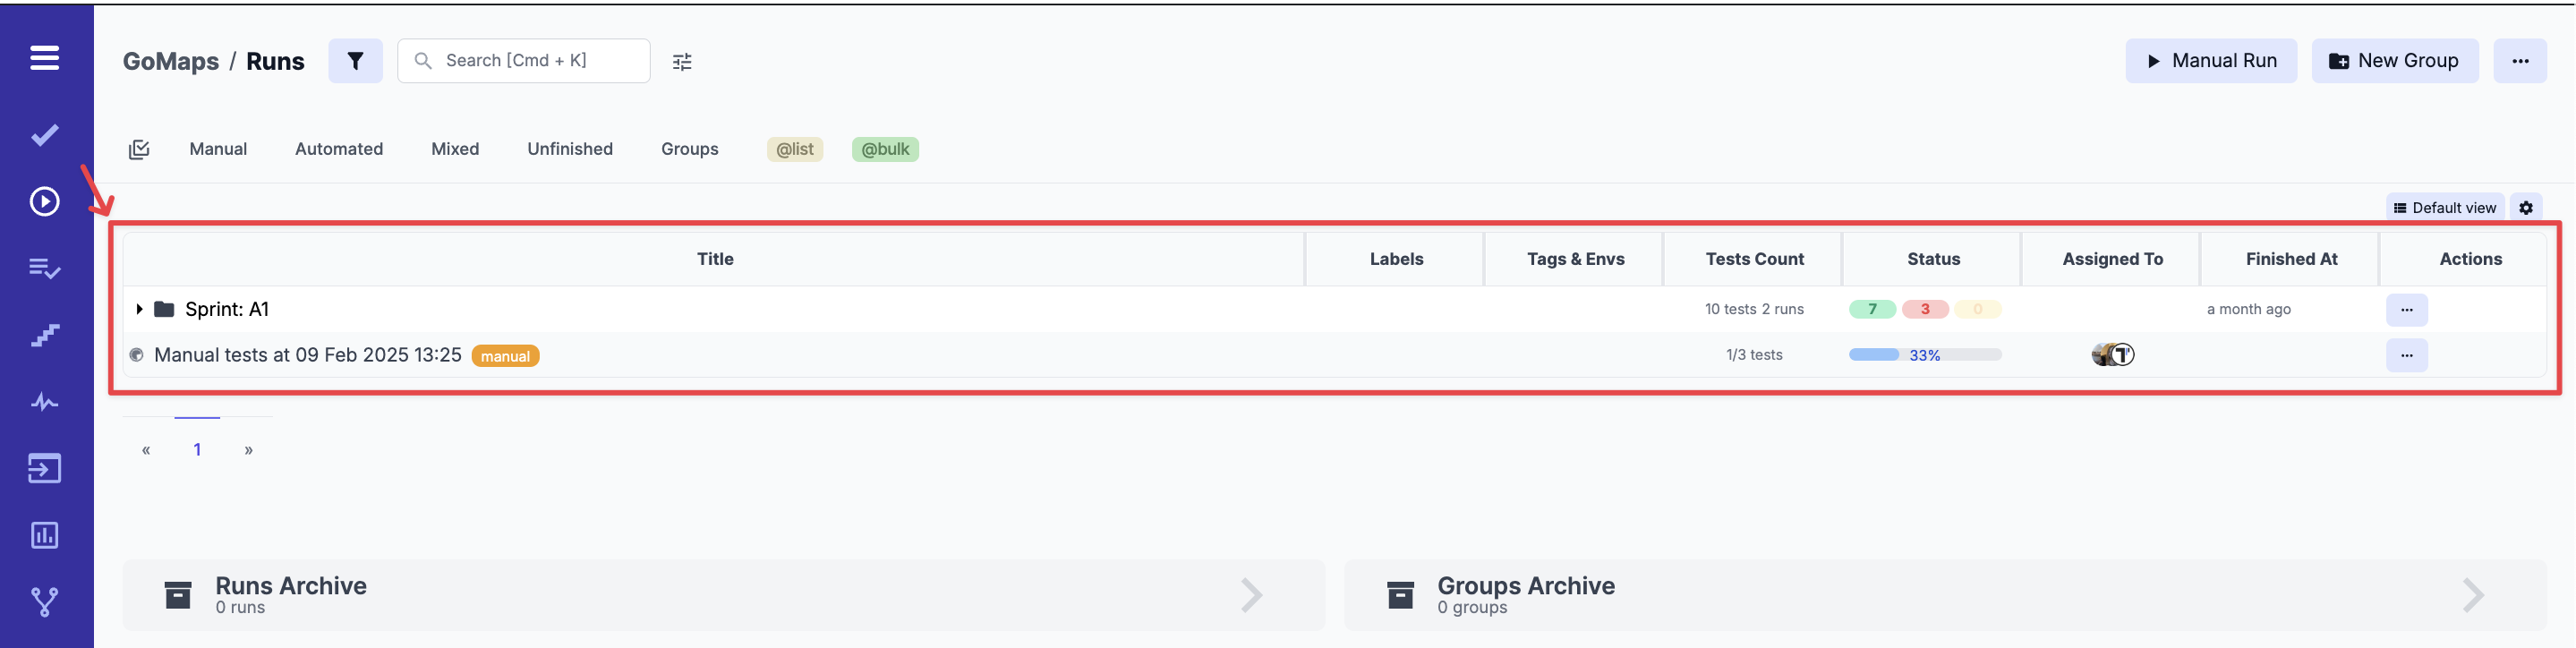
Let’s check how a table with a custom view looks like.
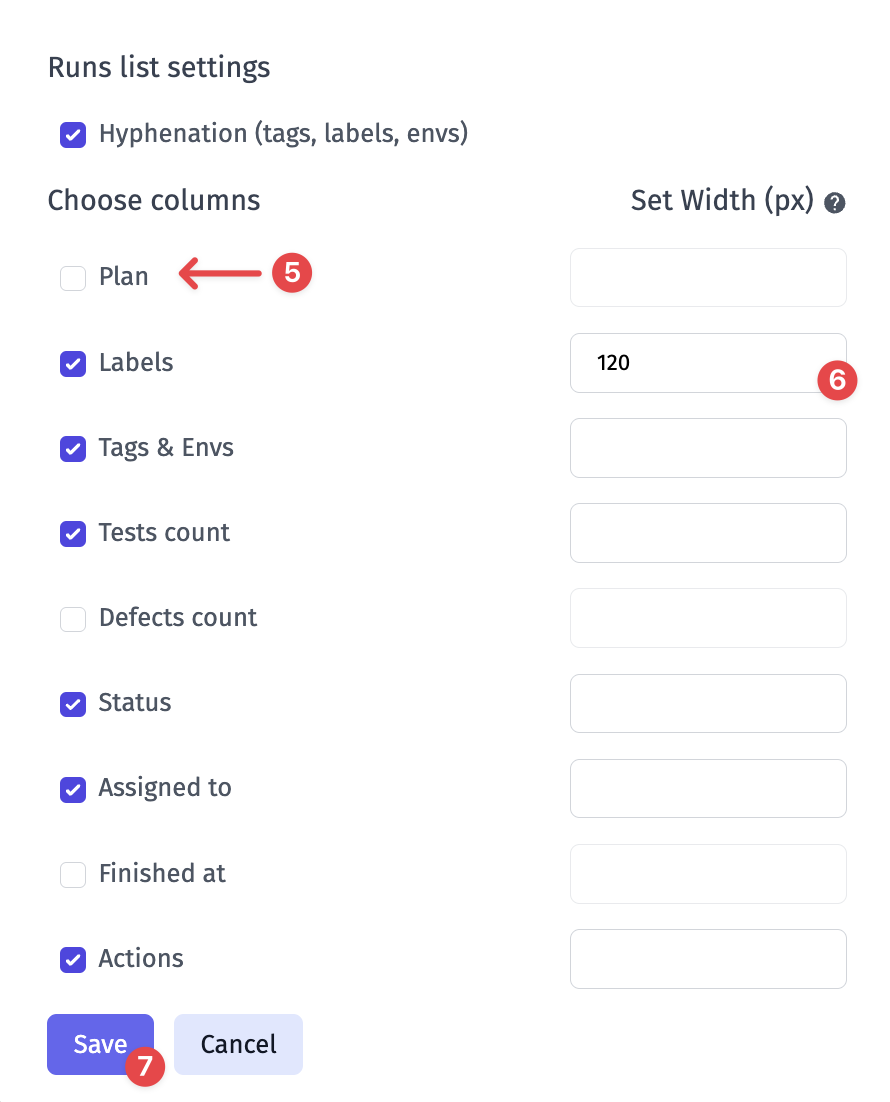
- Click the Settings icon to access Runs List Settings.
Then, you can customize the table layout:
- Select or deselect columns to show only the data you need
- Set the column width (px) if needed to improve readability
- Click the Save button to apply your changes
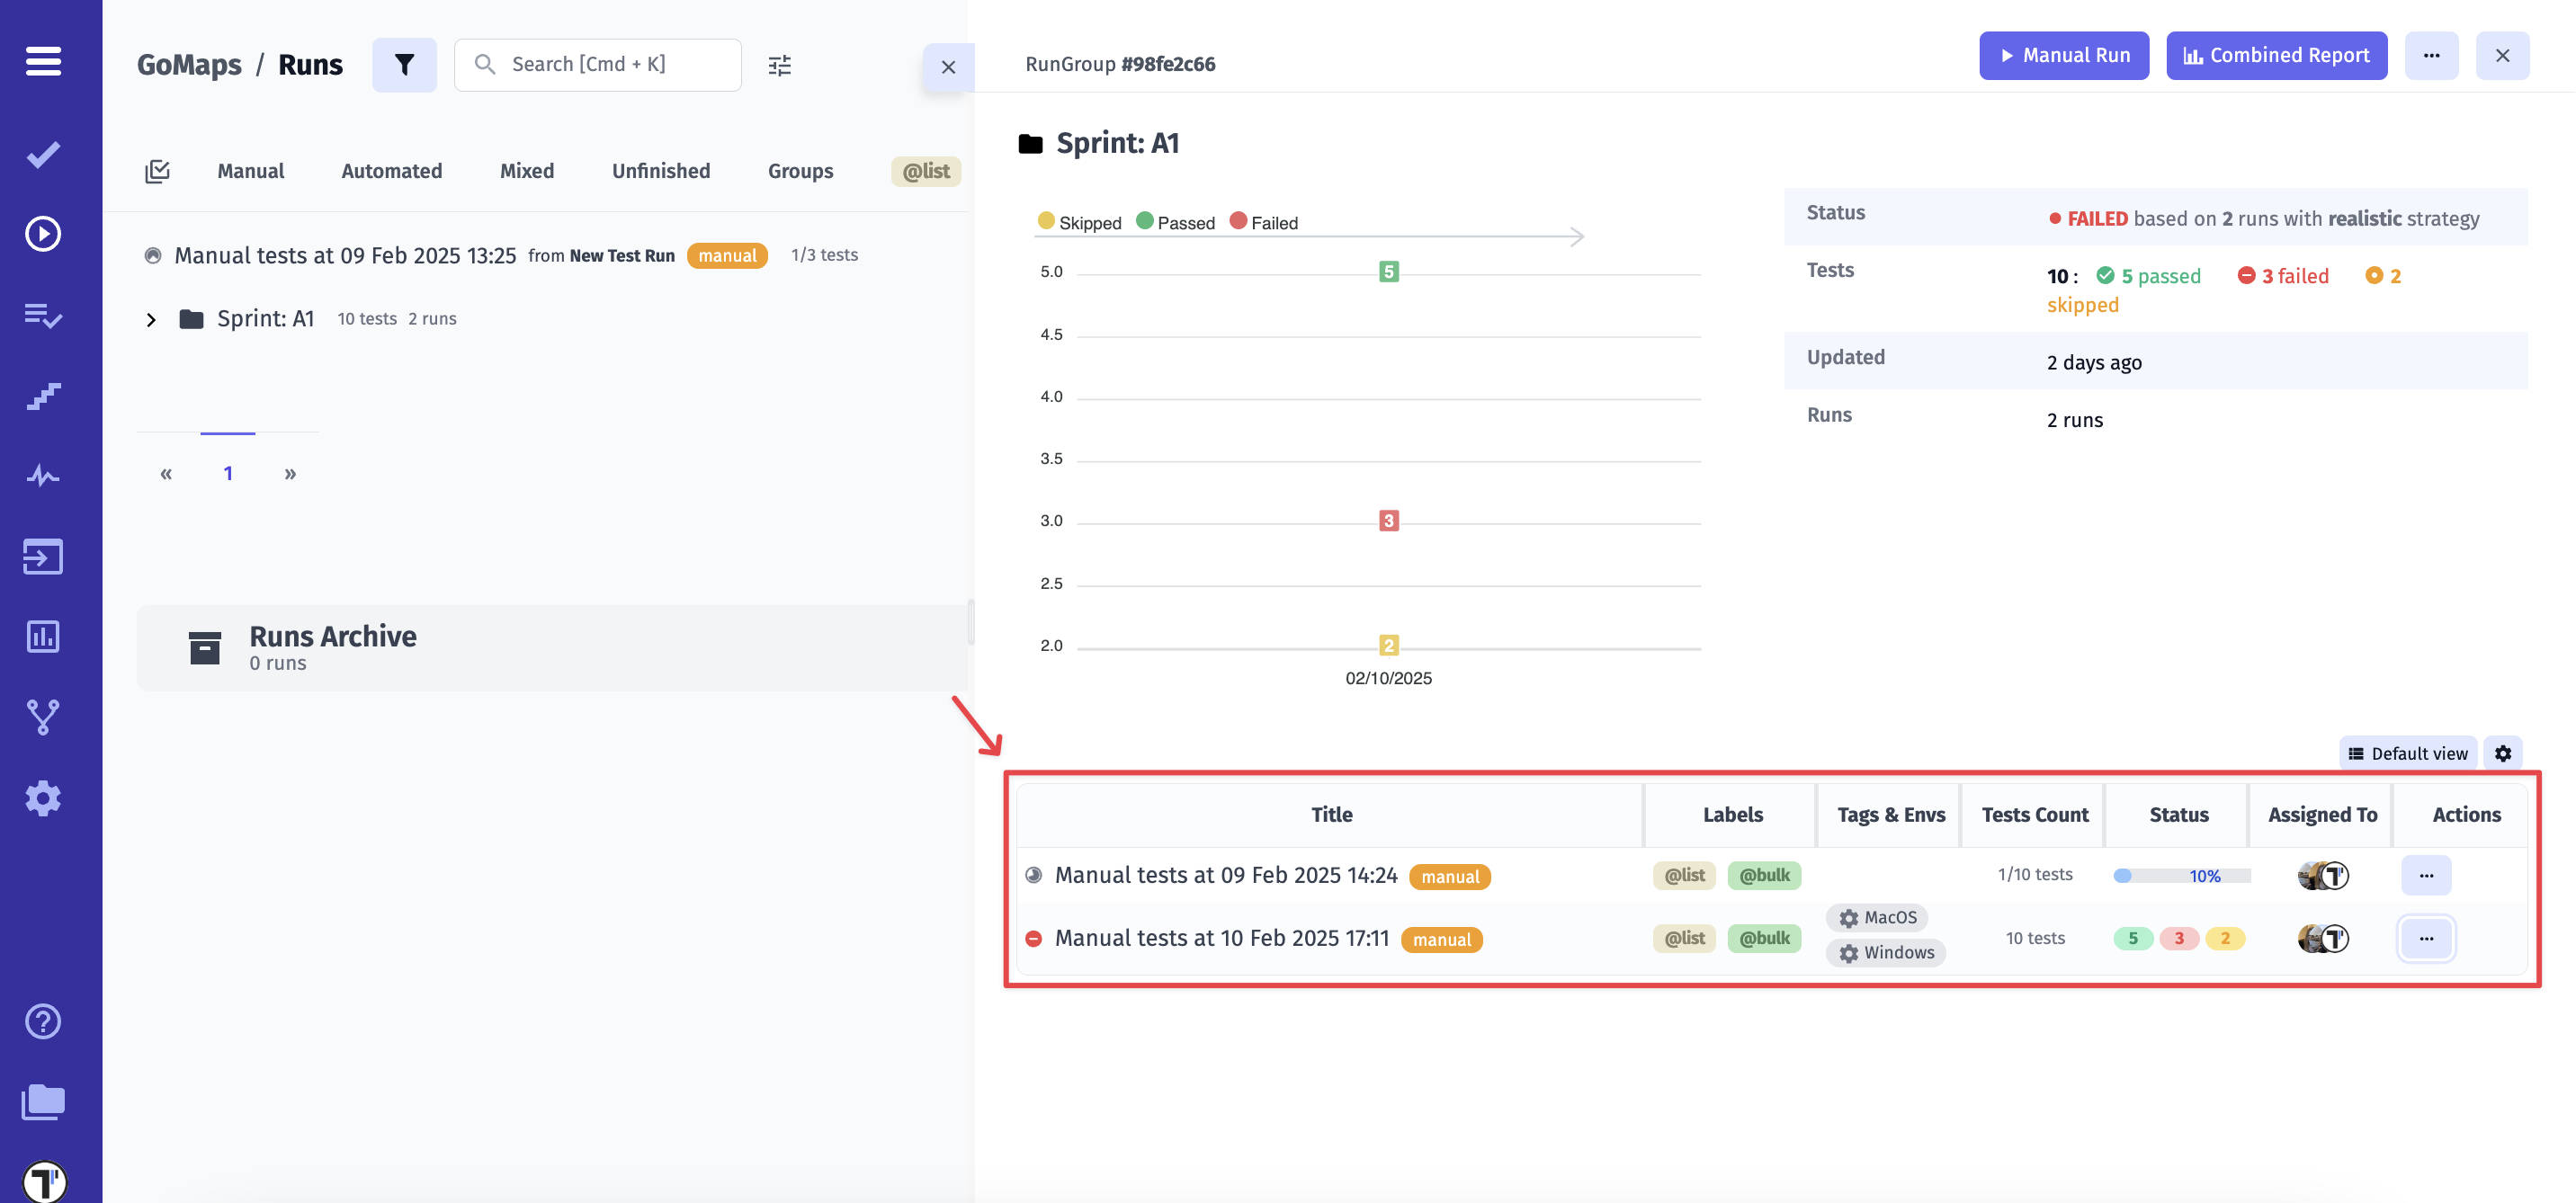
Here’s how your customized table in RunGroup will appear.
Runs Dashboard Flow
Similarly, you can customize the view in the Runs Dashboard Flow by following these steps:
- Click the Runs button in the sidebar
- Click the Custom view button
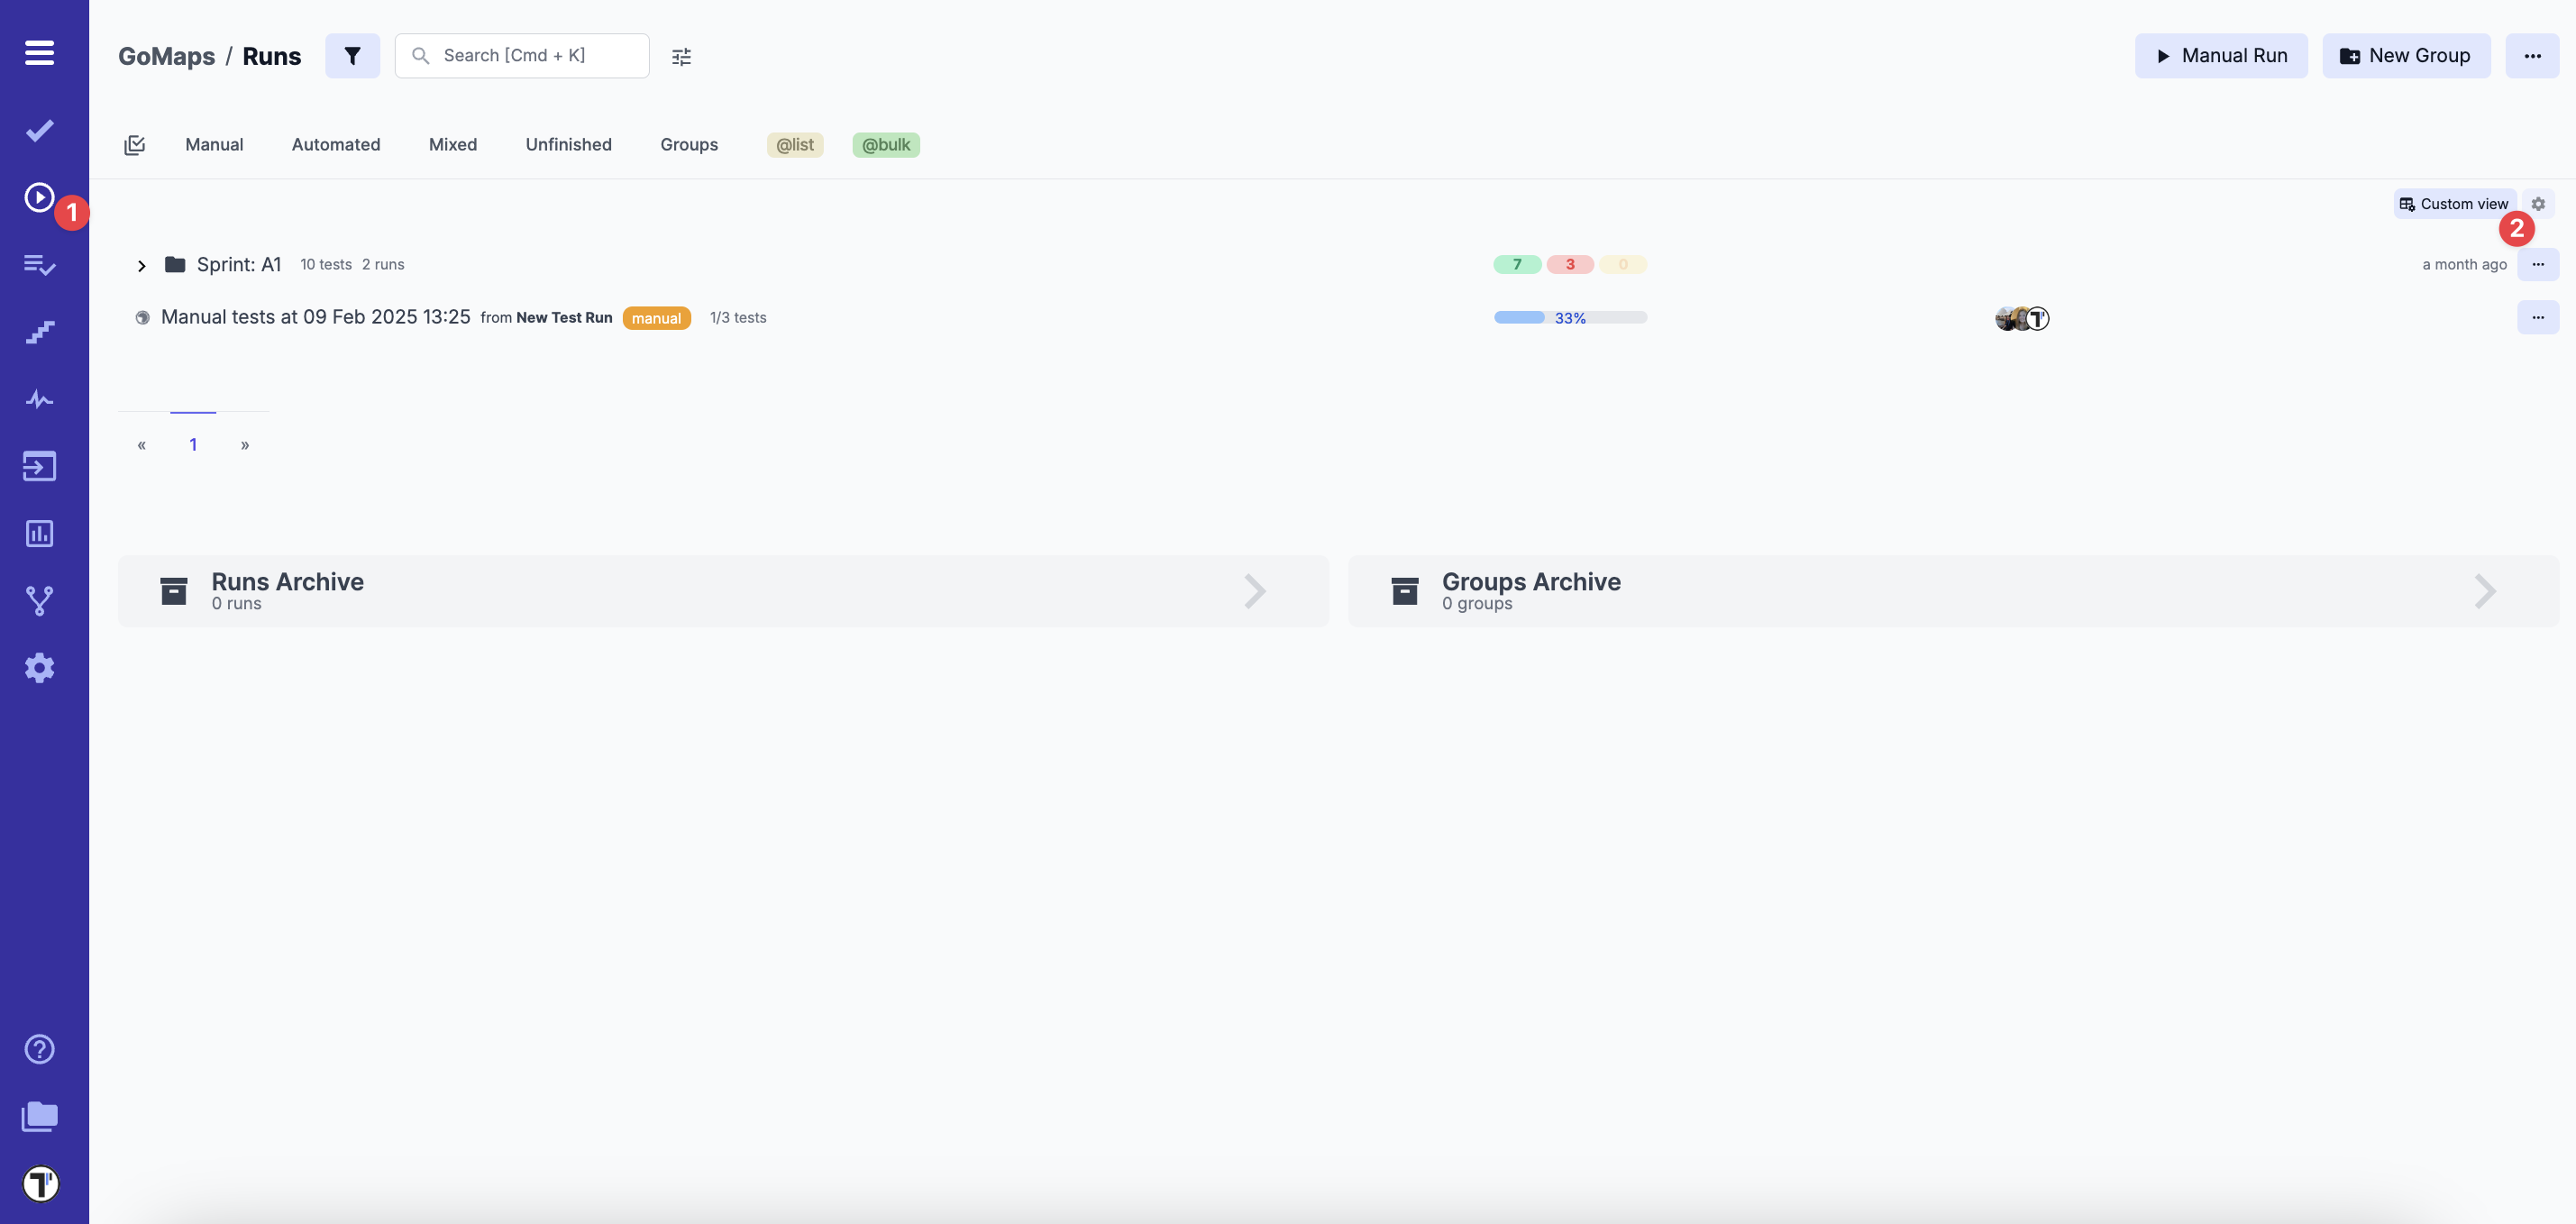
- Customize your view in the Runs list settings
- Click the Save button to apply your changes
Here’s how your customized table will appear.
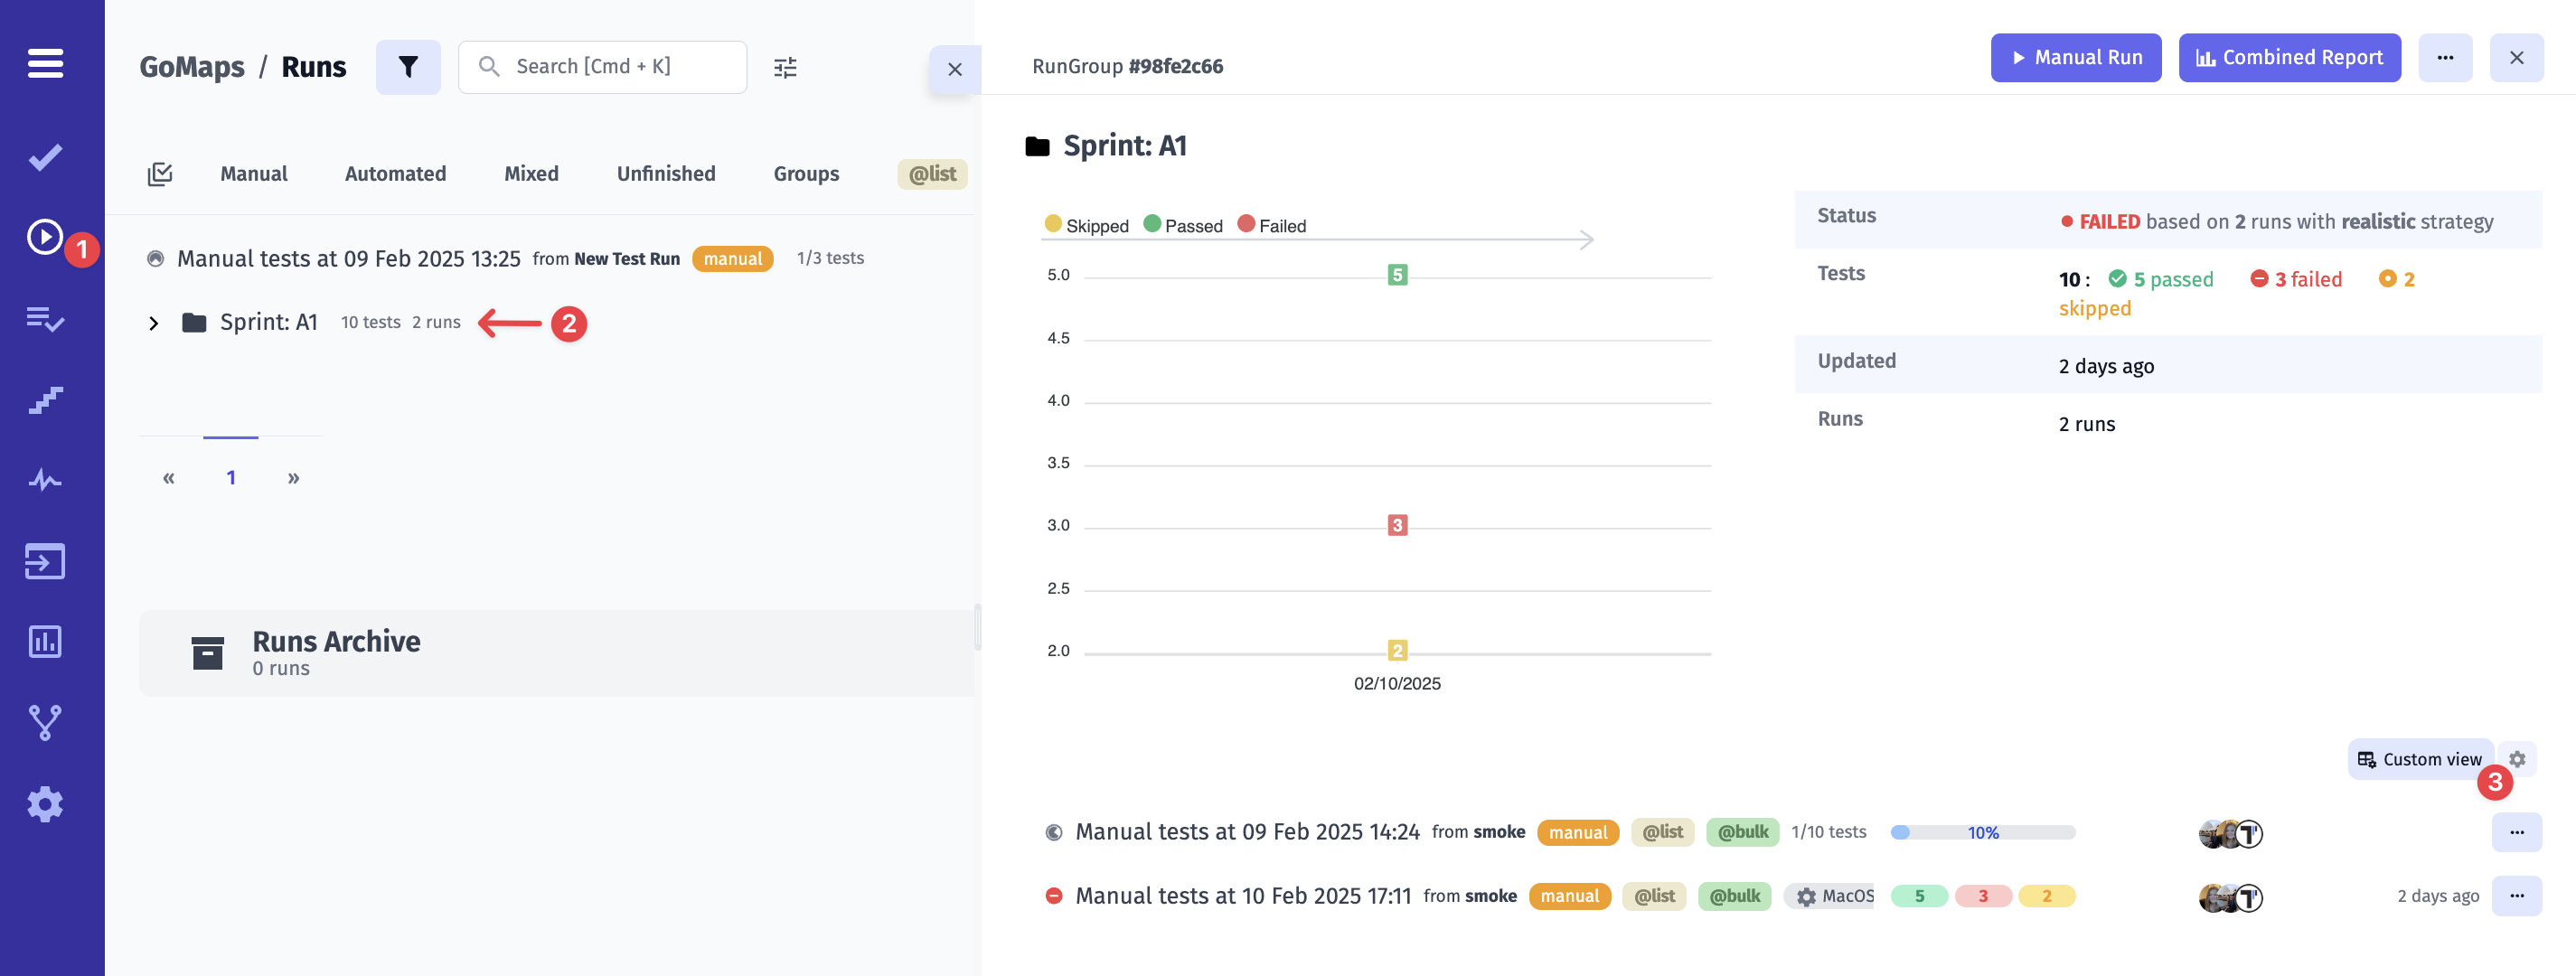
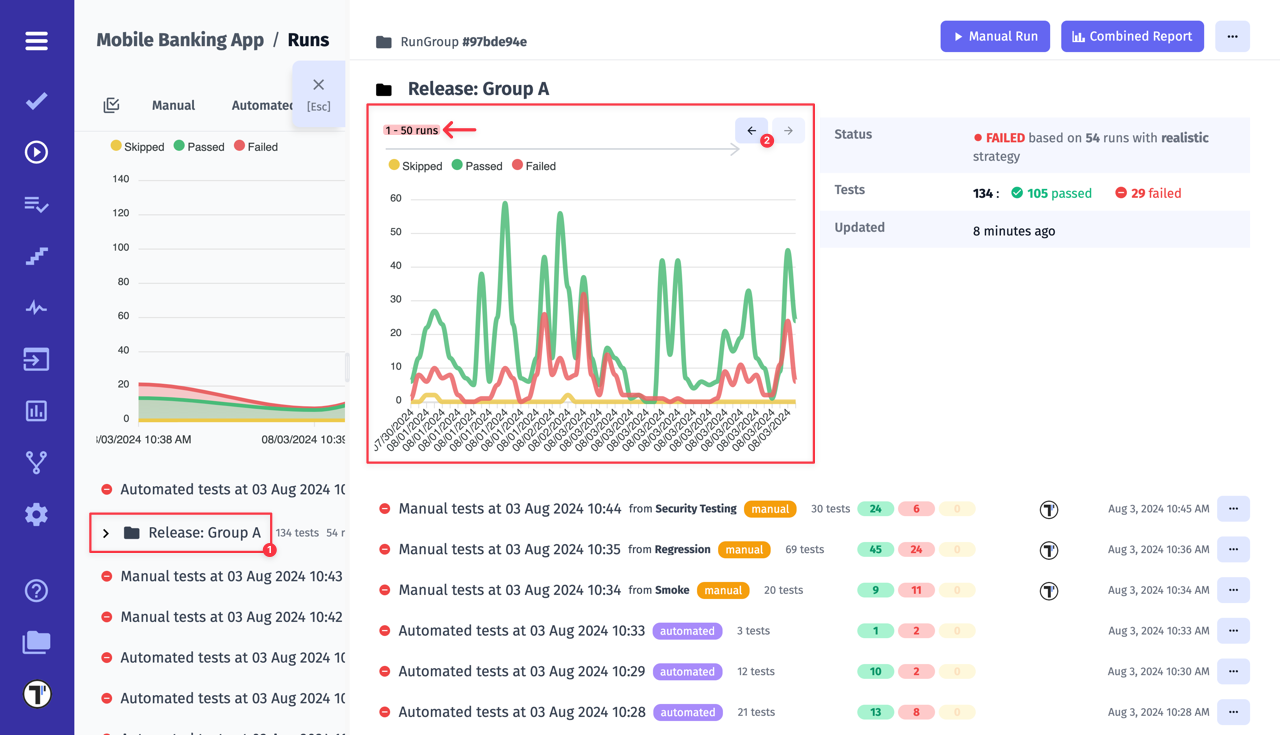
RunGroup Chart
Section titled “RunGroup Chart”The chart displays up to 50 of the latest test runs belonging to the group. If you have more, use the pagination arrows, to view the results of the previous runs.
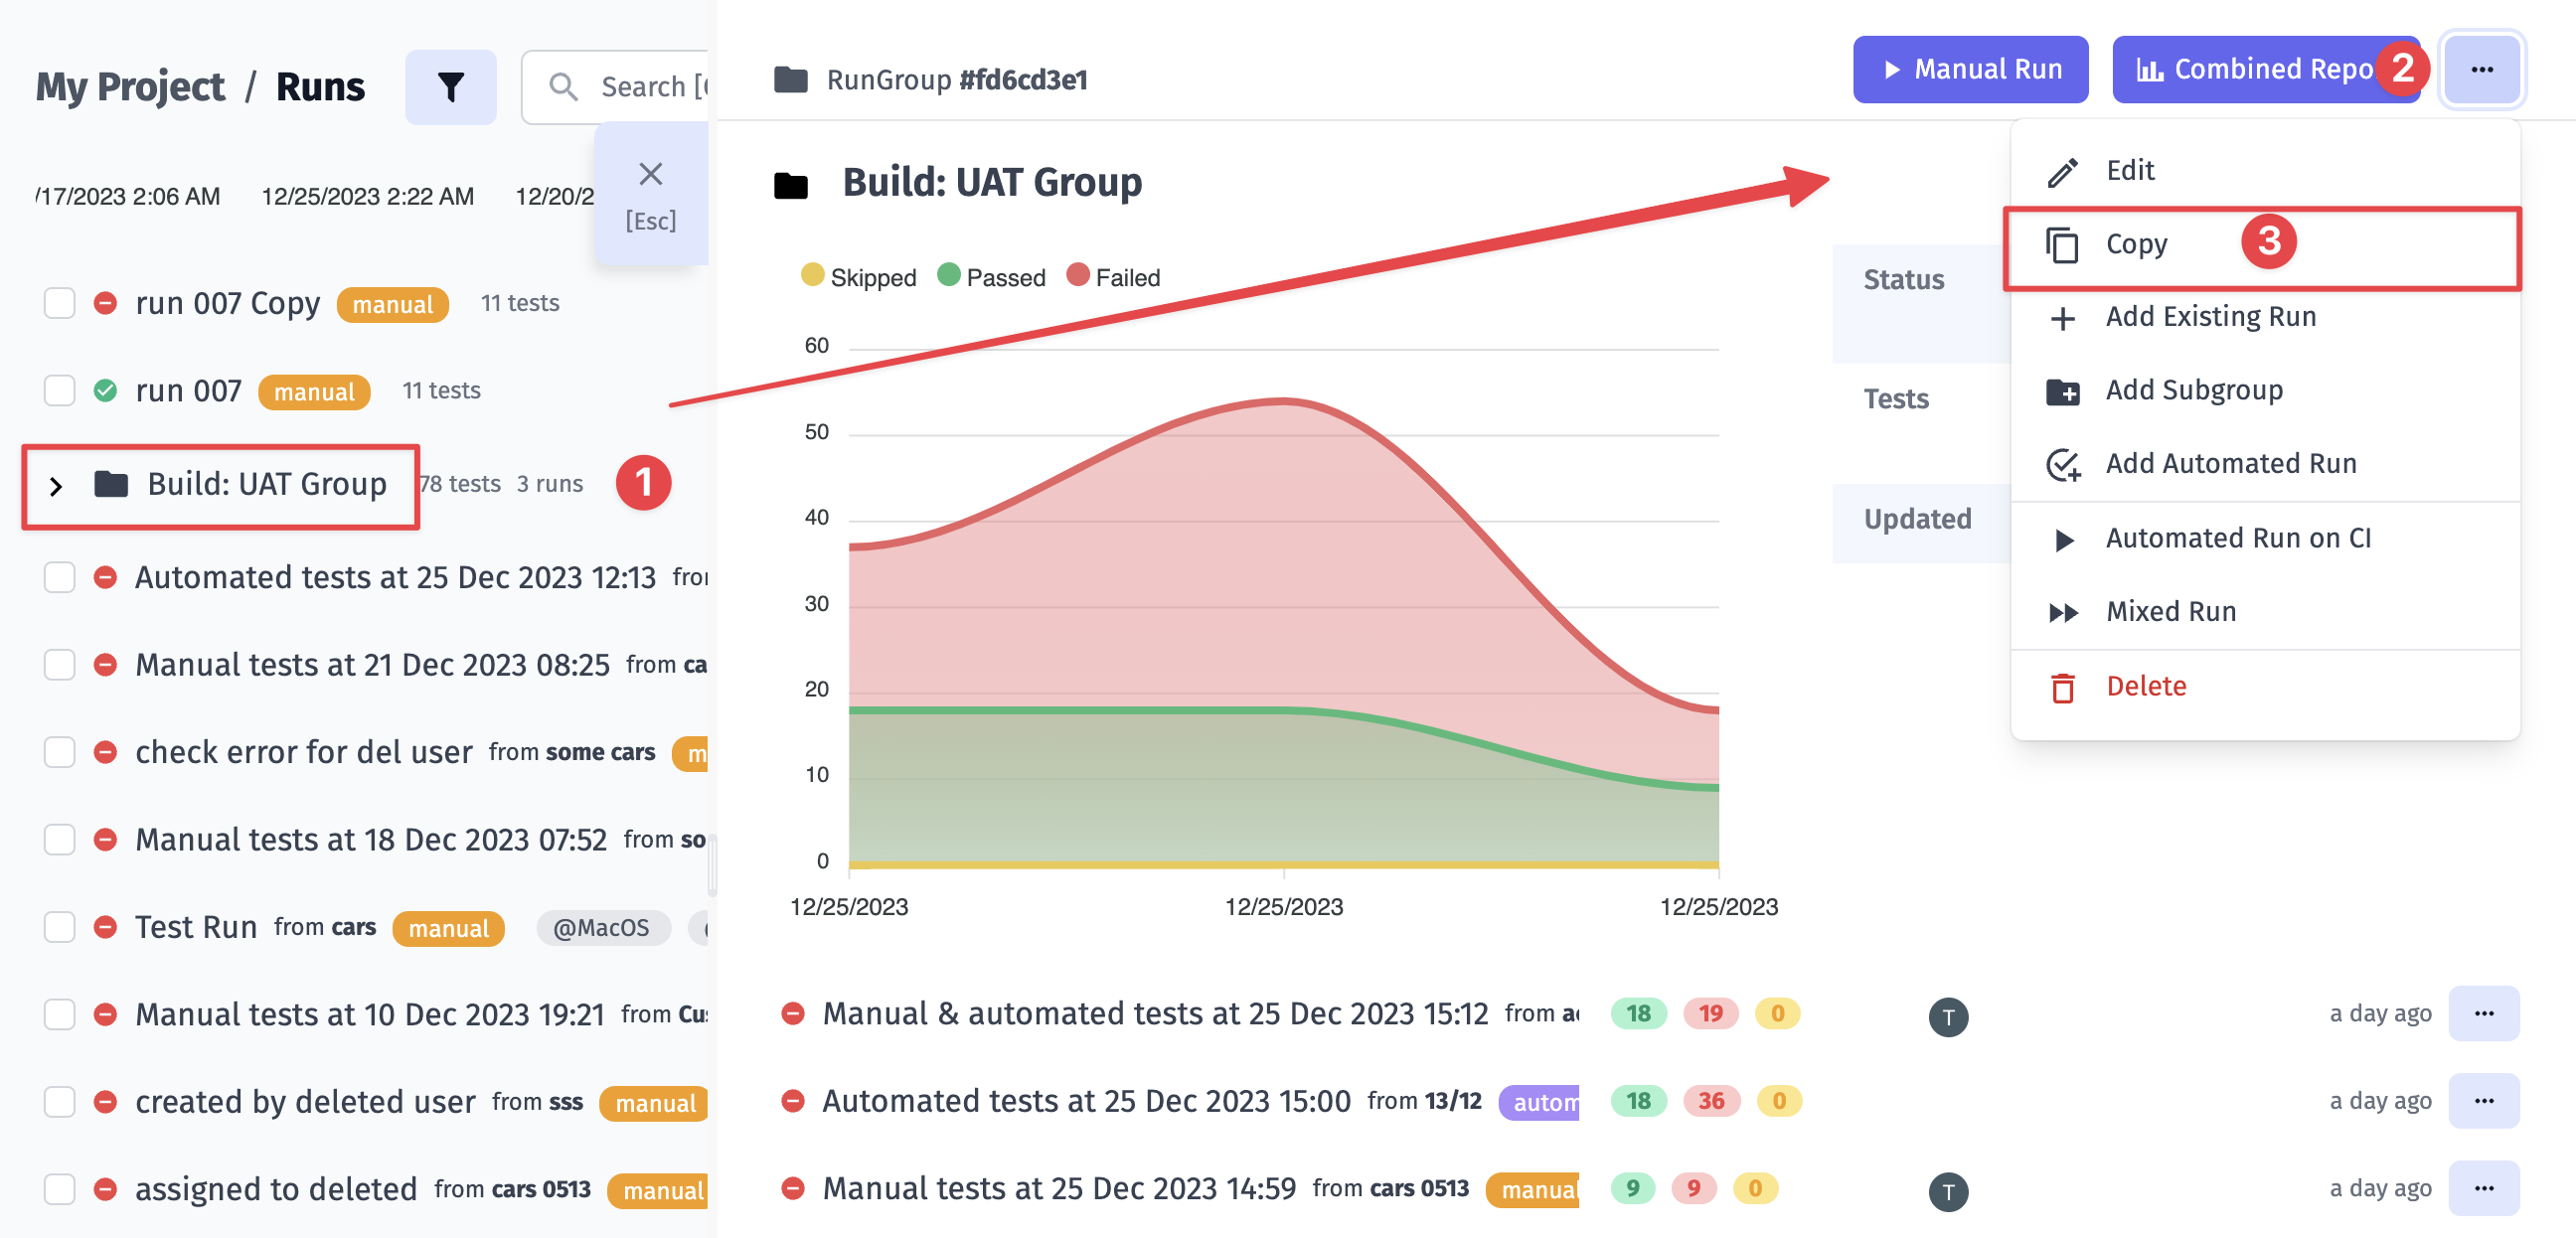
Copy RunGroup
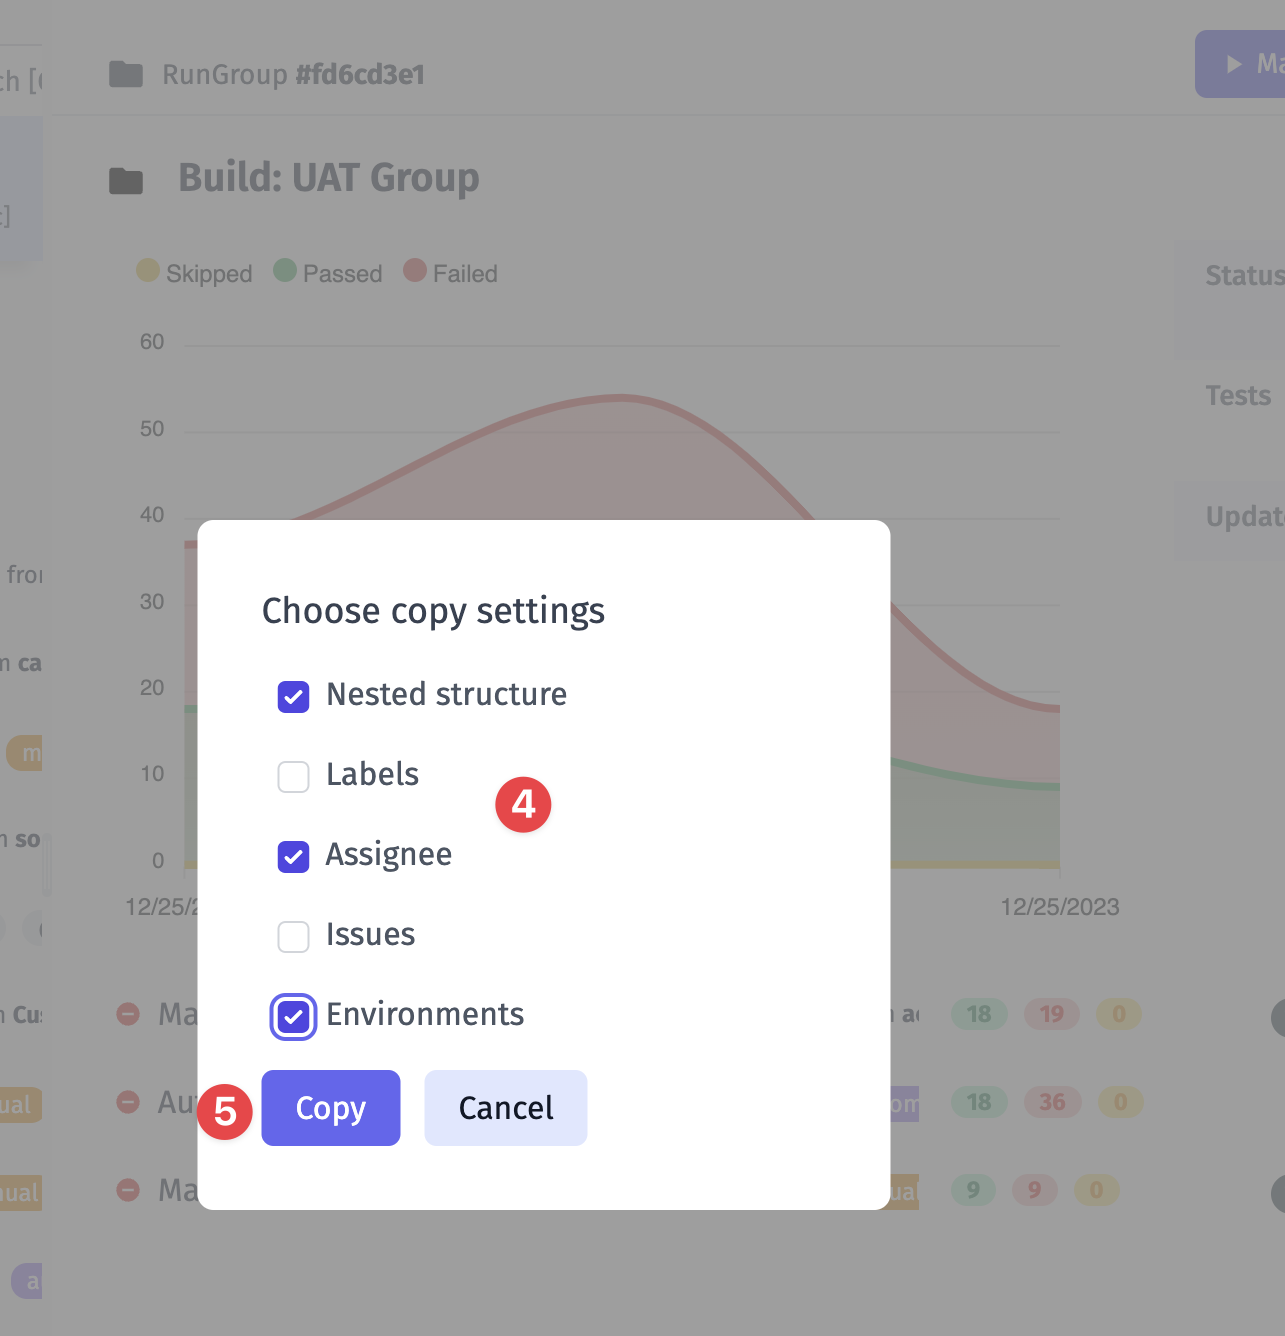
Section titled “Copy RunGroup”You can easily create a new RunGroup, completely independent of any previous runs, by copying all relevant tests exactly as they are. You can configure what data should be copied, namely:
Assignee: Define assignee details separately, preventing them from being copied.
Issues: Choose whether to include or exclude linked issues in the duplication process
Labels: Decide whether labels should be duplicated or omitted in the new test run
Environments: Control the duplication of environment settings based on your requirements.
Nested Structure: Preserve or exclude the nested structure of your test groups as you duplicate them.
Here are steps: 1. Open RunGroup 2. Click Extra menu 3. Click Copy 4. Pick configurations 5. Save 6. See RunGroup created.

Merge Strategies
Section titled “Merge Strategies”Testomat.io provides different ‘Merge Strategies’ to aggregate the results of the individual test runs within a Run Group. This is crucial when you have multiple executions of the same tests (e.g., retries, parallel execution, runs on different environments) and want a single, representative status for the tests within the group.
You need to select a Merge Strategy when you create a new Run Group:
- Go to Runs.
- Click on ‘New Group’ button.

- Select Merge strategy.
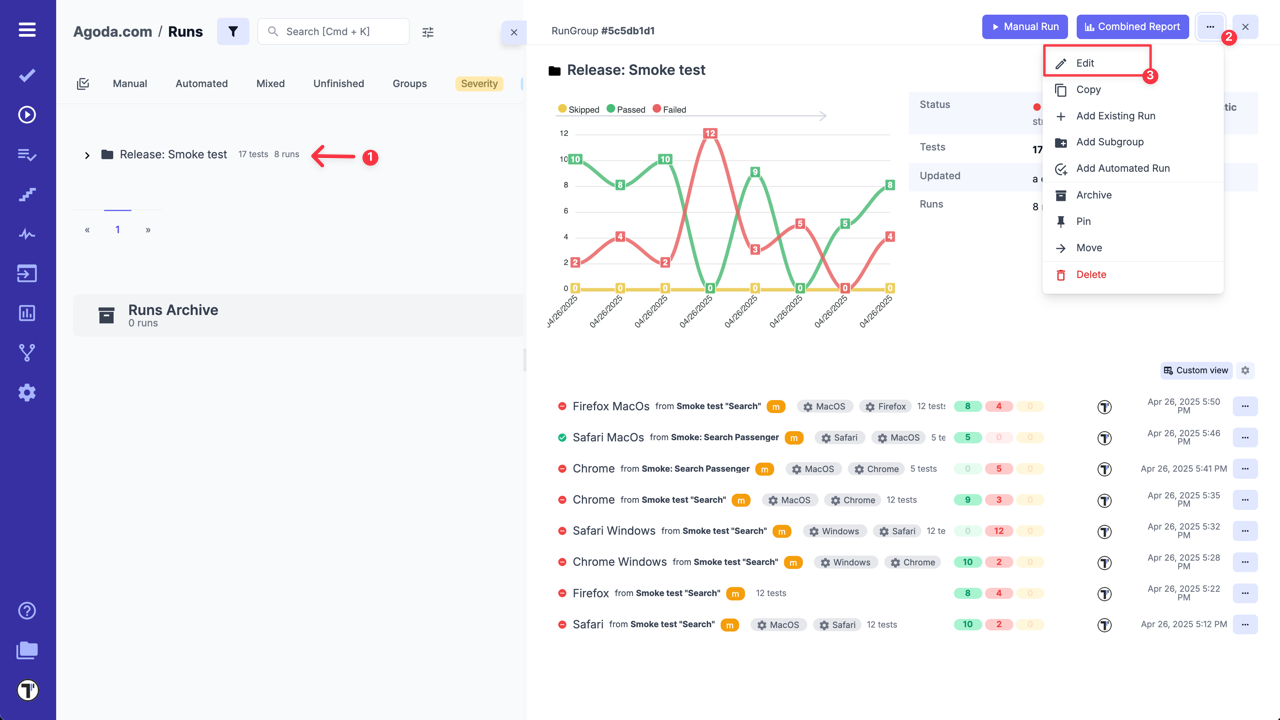
To change the Merge Strategy:
- Select the Run Group.
- Click on ‘Extra menu’ button.
- Click on ‘Edit’ option.
You also need to select the Merge Strategy when merging multiple runs into one:
- Go to Runs.
- Click on ‘Multi-select’ icon.
- Select a few runs that you want to merge.
- Click on ‘Extra menu’ button at the bottom menu.
- Select ‘Merge’ option.
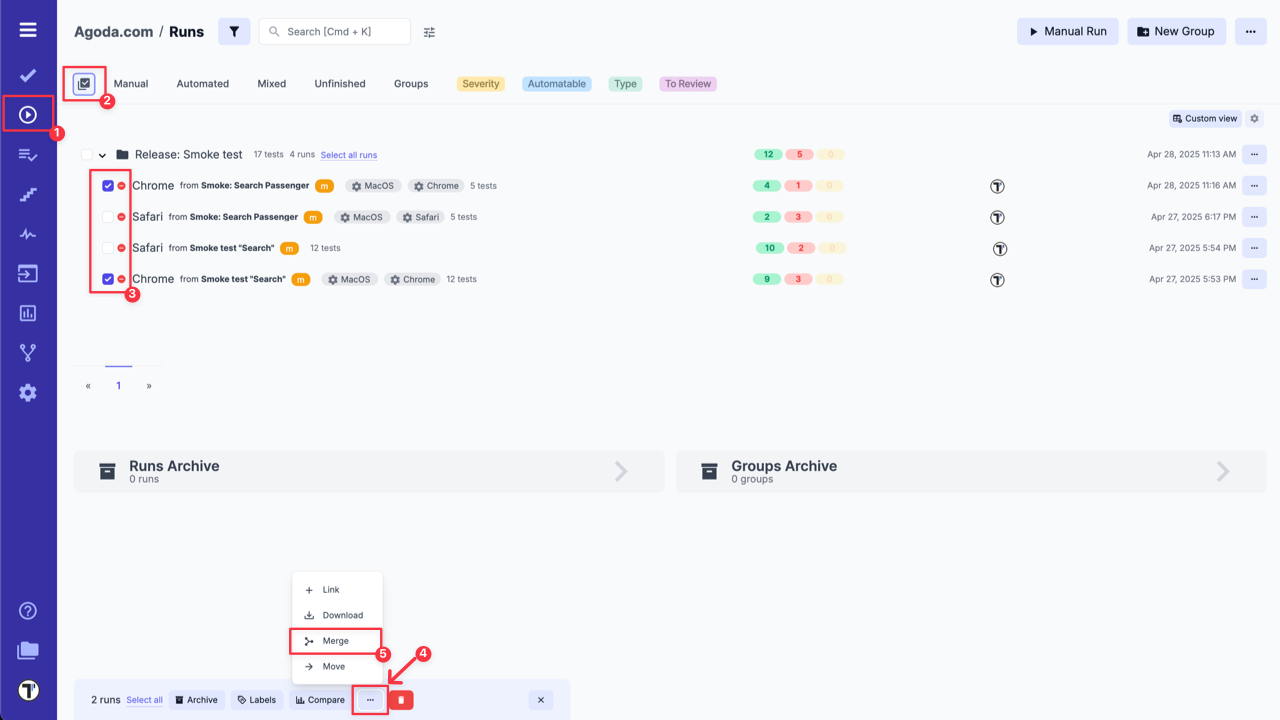
- Select Merge Strategy.
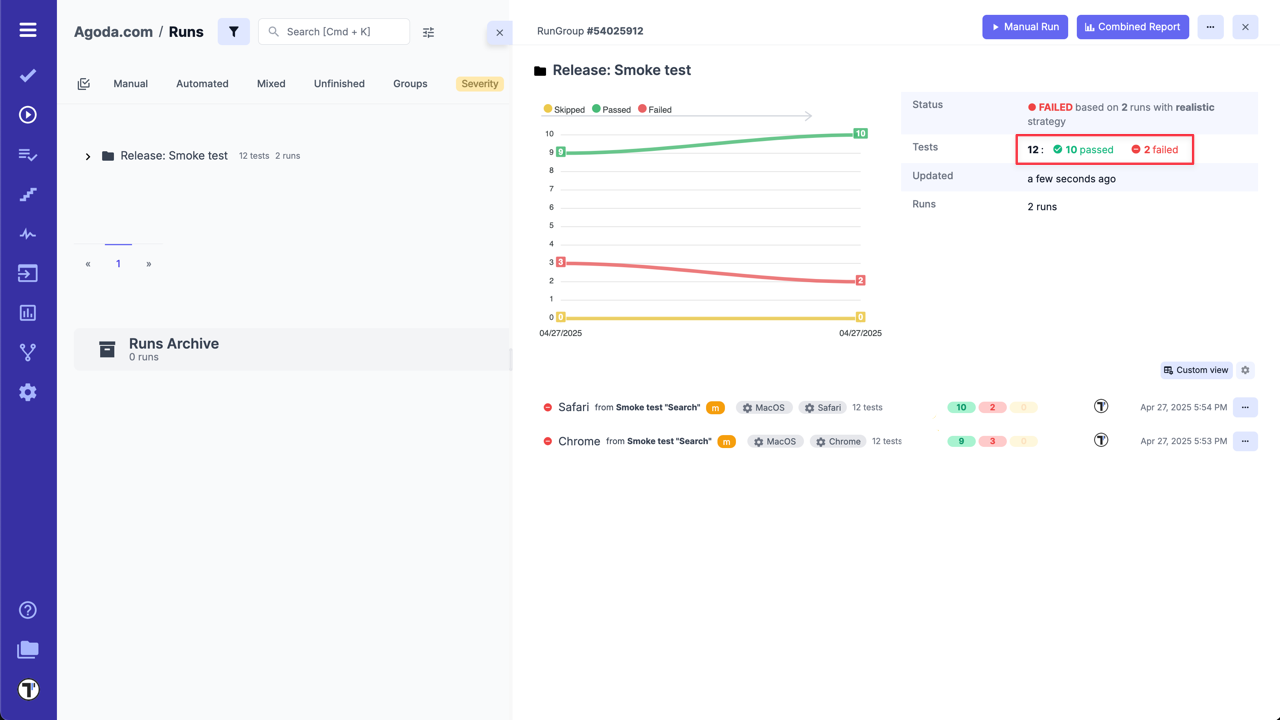
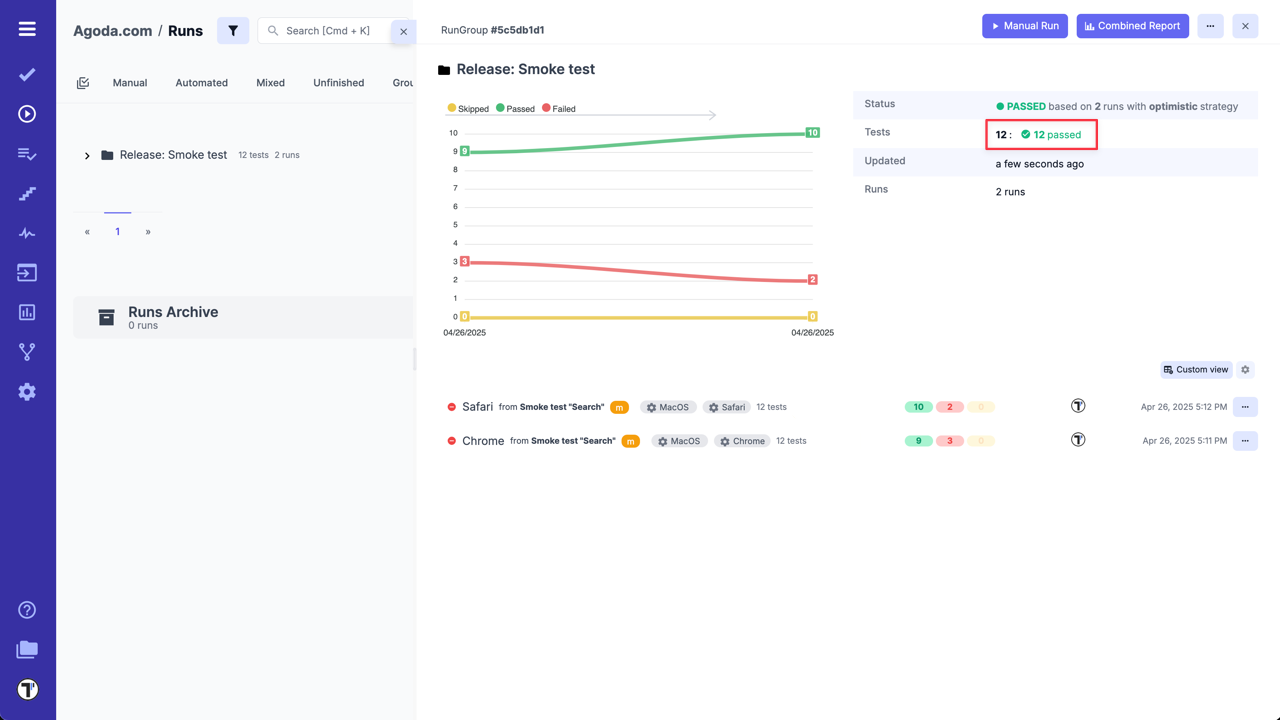
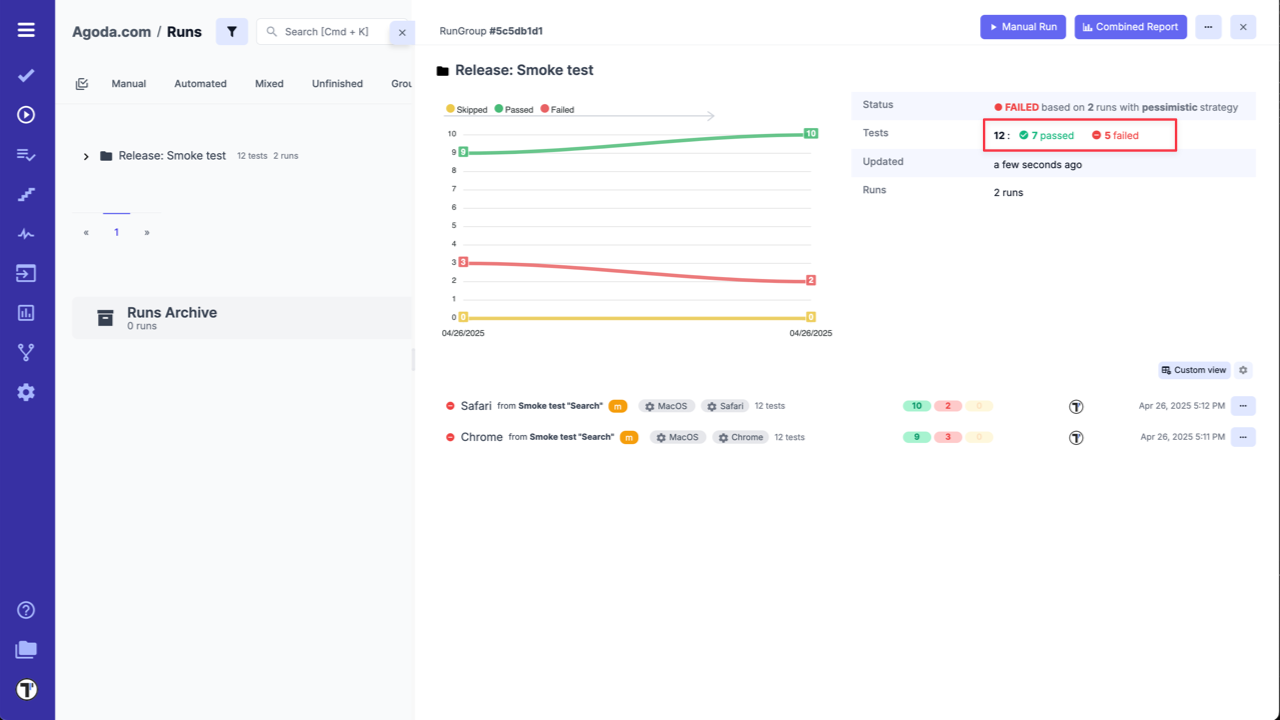
Testomat.io offers you three different Merge strategies:
For instance, let’s say we have 2 runs inside a Rungroup with the same tests A and B:
- Run 1: A - failed, B - failed
- Run 2: A - passed, B - passed
What counter numbers should contain Rungroup? Both answers: “Passed: 2, Failed: 0” or “Failed 2, Passed 0” are absolutely valid depending on how you calculate those numbers. That’s why Testomat.io provides customizable Merge strategies:
-
Realistic: this strategy is based on test results from the last executed run (excluding skipped tests). If your Run Group includes test runs with different test cases, it will summarize and display the results from the last executed runs with unique test cases. In our example, results will be next: Passed: 2, Failed: 0, as Run 2 was added later.
-
Optimistic: this strategy will mark a test as passed if it passed in at least one of the runs within the group, even if it failed in others. This approach provides a more lenient view, focusing on the positive outcomes. In other words, it prefers passed tests over failed: Passed: 2, Failed: 0 in our example.
-
Pessimistic: unlike the optimistic strategy, this strategy will mark a test as failed if it failed in at least one of the runs within the group. It prioritizes identifying potential issues. Simply to say, it prefers failed tests over passed: Passed: 0, Failed: 2.
Merge Strategy Examples
Section titled “Merge Strategy Examples”Example #1:
Let’s imagine that you have 2 Test Runs with the same test cases for different environments. In one Test Run, the first 3 test cases failed while the others passed, and in another Test Run last 2 test cases failed and the others - passed. In this case, the results with the different strategies will be as follows:
- Realistic - the result will match the result of the last executed test run, in this case 2 test cases - failed, and others - passed.
- Optimistic - all test cases - passed, as each test case passed in at least one test run.
- Pessimistic - by this strategy 5 test cases - failed, because in total 5 unique test cases failed in these 2 test runs.
Example #2:
In this example, you added 2 more Test Runs with unique test cases (for instance, to test another feature in the module under test) to your previous 2 Test Runs. In one of the added Test Runs, the last 2 test cases failed, and in the other Test Run, the first 3 test cases failed. In these 2 runs, each test case failed and passed at least once. As a result, the outcome with the different strategies will be as follows:
- Realistic - 5 test cases - failed, as it will summarize the results of last two runs with unique test cases.

- Optimistic - all test cases - passed, as each test case passed in at least one test run.
- Pessimistic - by this strategy 10 test cases - failed, because in total 10 unique test cases failed in these 4 test runs.

As you can see, Merge Strategies for Run Groups in Testomat.io help you aggregate and analyze test results from multiple runs and how the system determines the final status of a test case within a Run Group, providing a unified view of your overall testing outcomes.
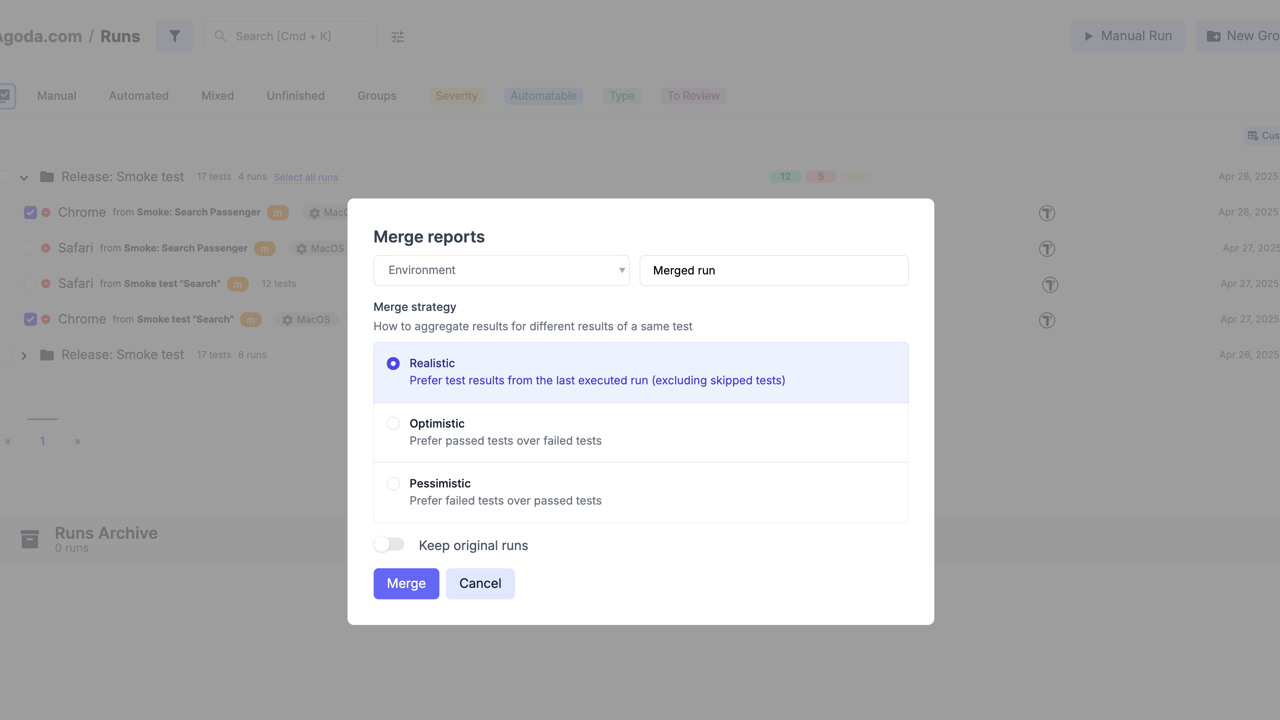
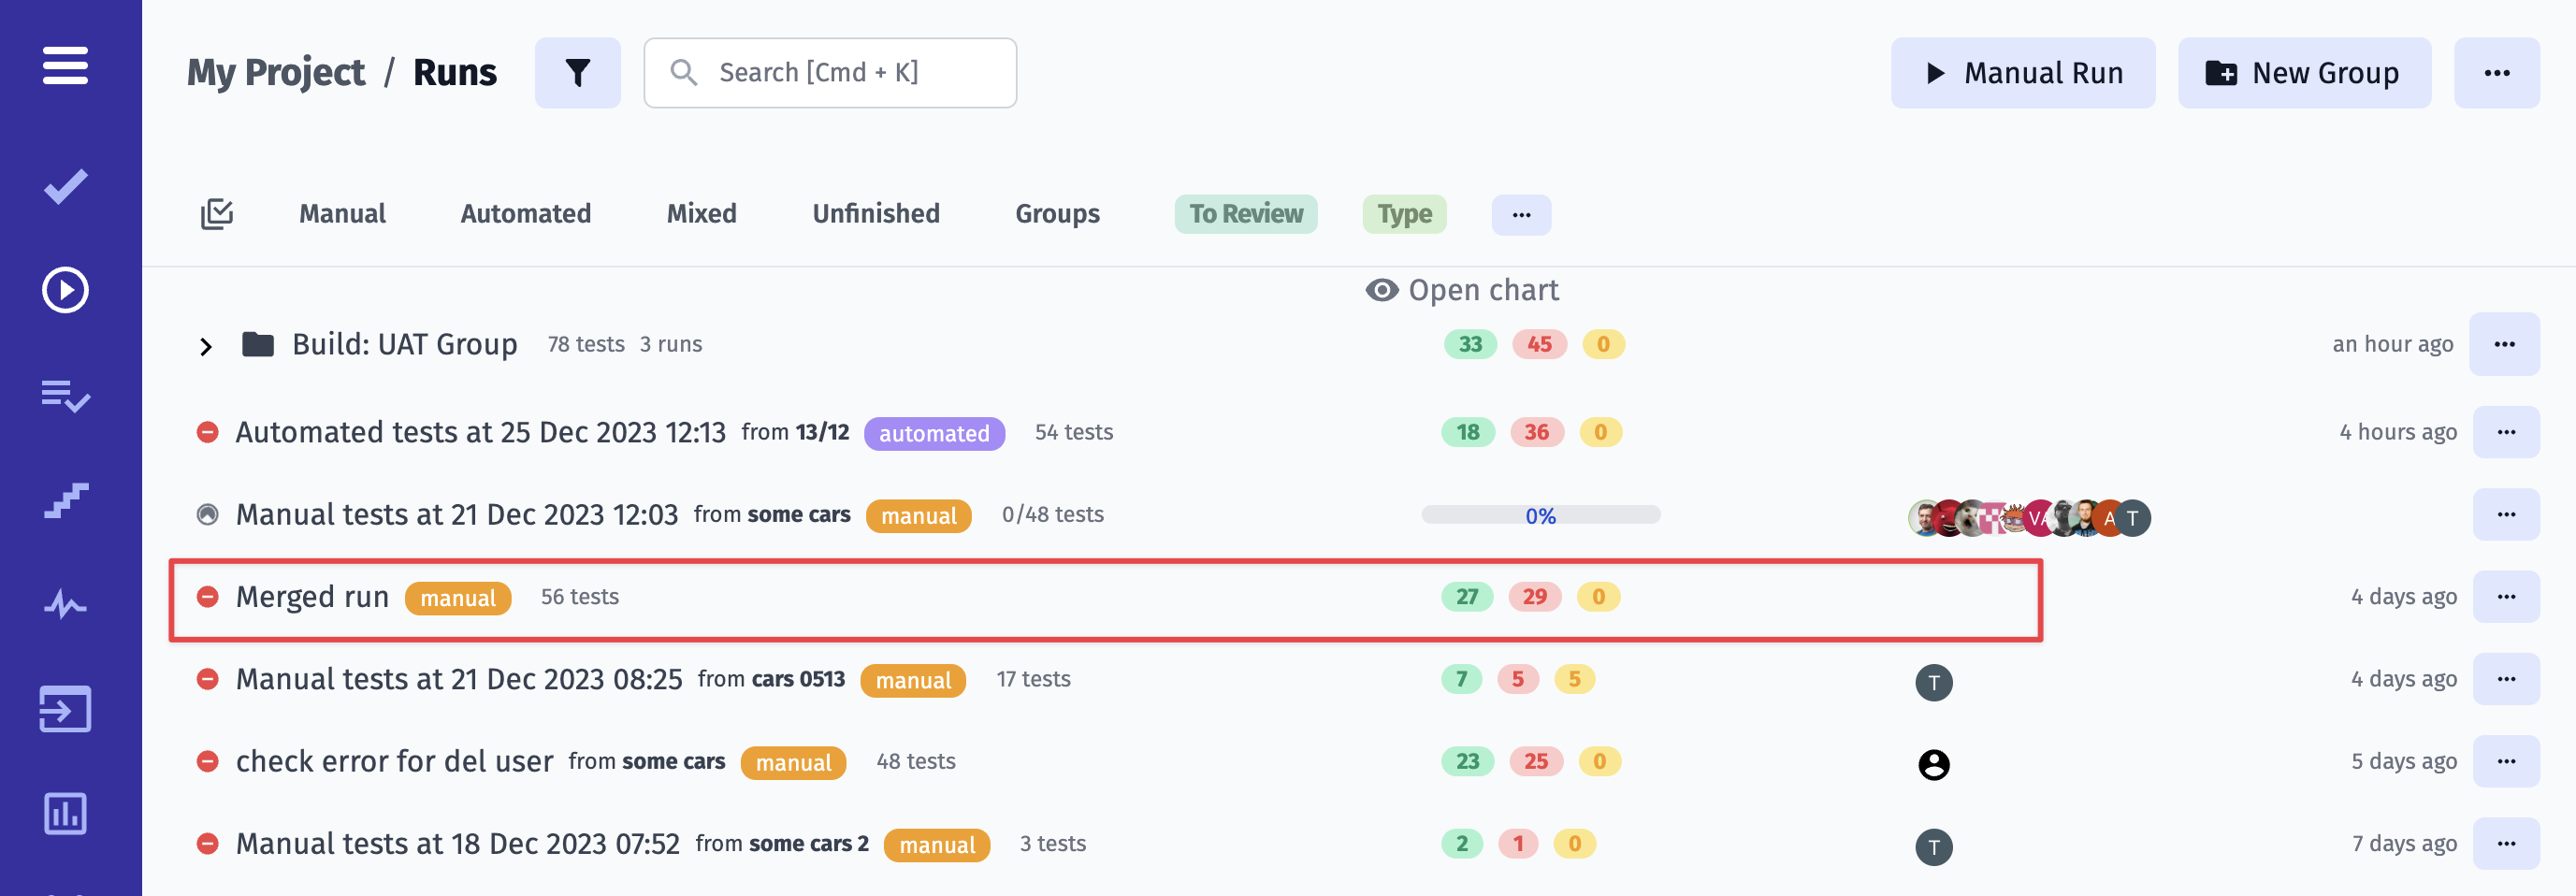
Merge Runs
Section titled “Merge Runs”With Testomat.io you can merge your Test Runs. To do this you need to enable multi-selection, choose the Test Runs you want to merge, and click on the Merge button at the bottom of the page

Here you will need to 1. Select testing Environment 2. Enter a name for merged run 3. Choose a Merging Strategy 4. Decide to keep original runs or not. 5. Click on Merge button
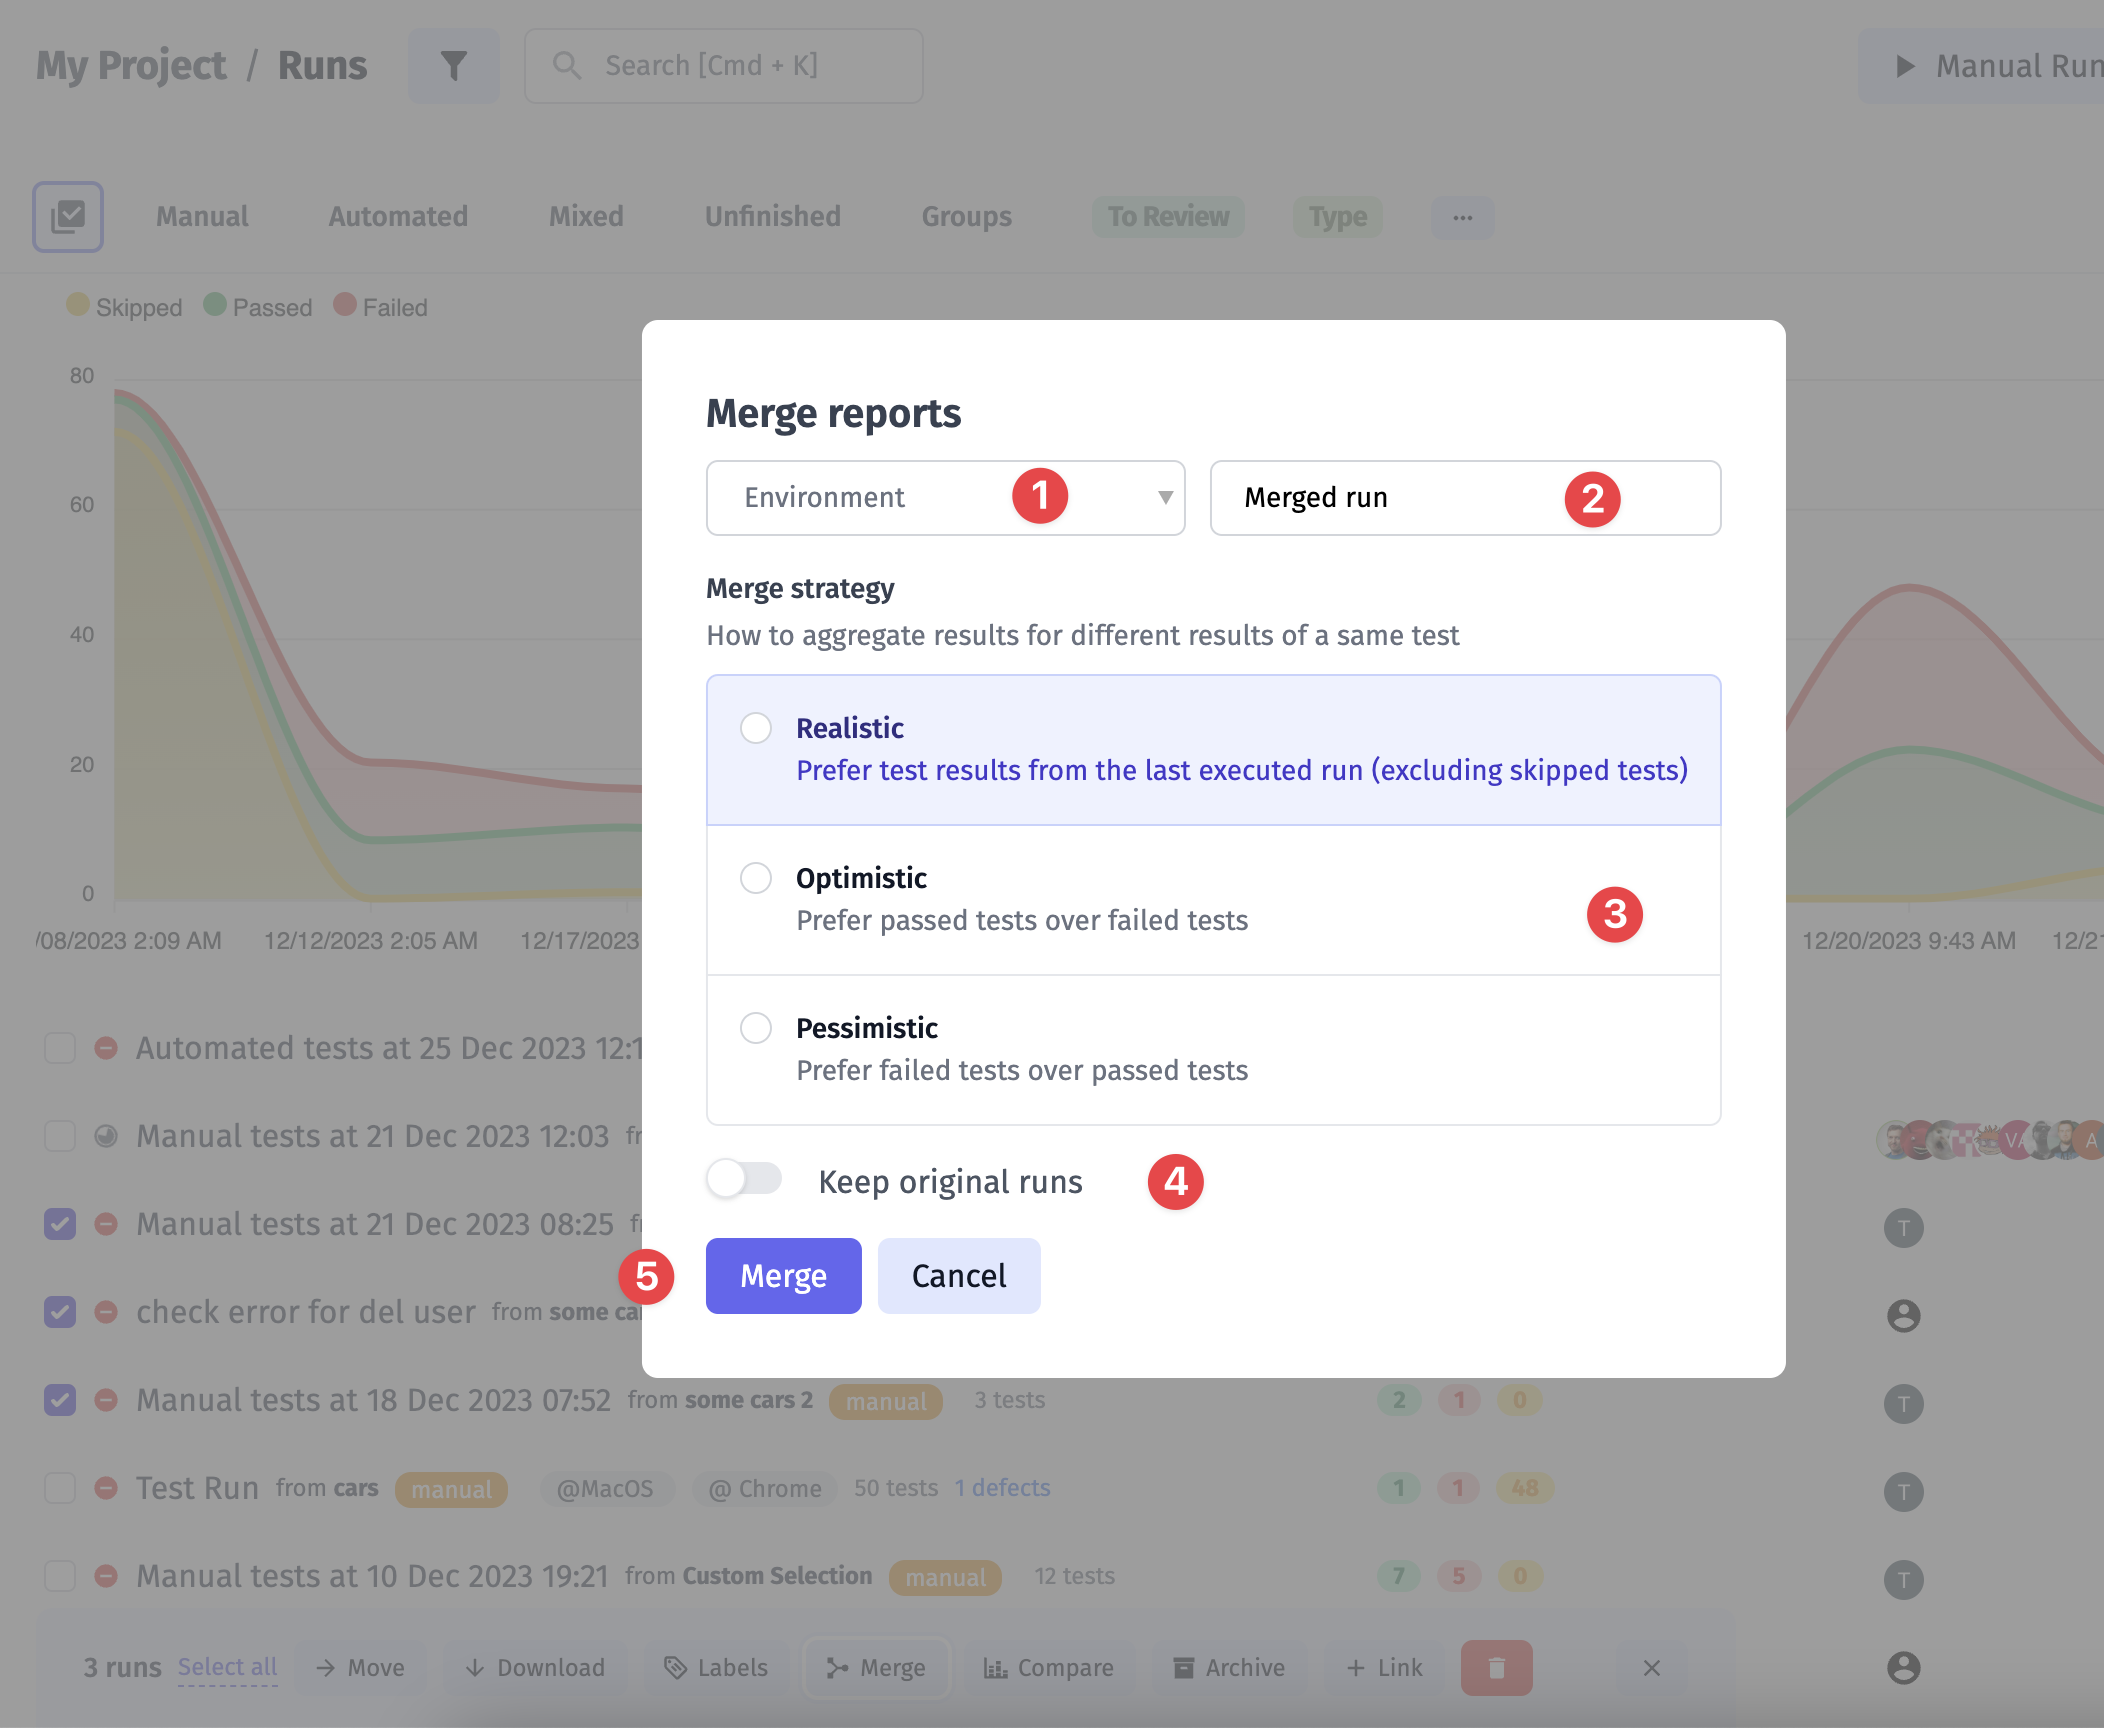
Your merged run will appear in the list of runs on the Runs page
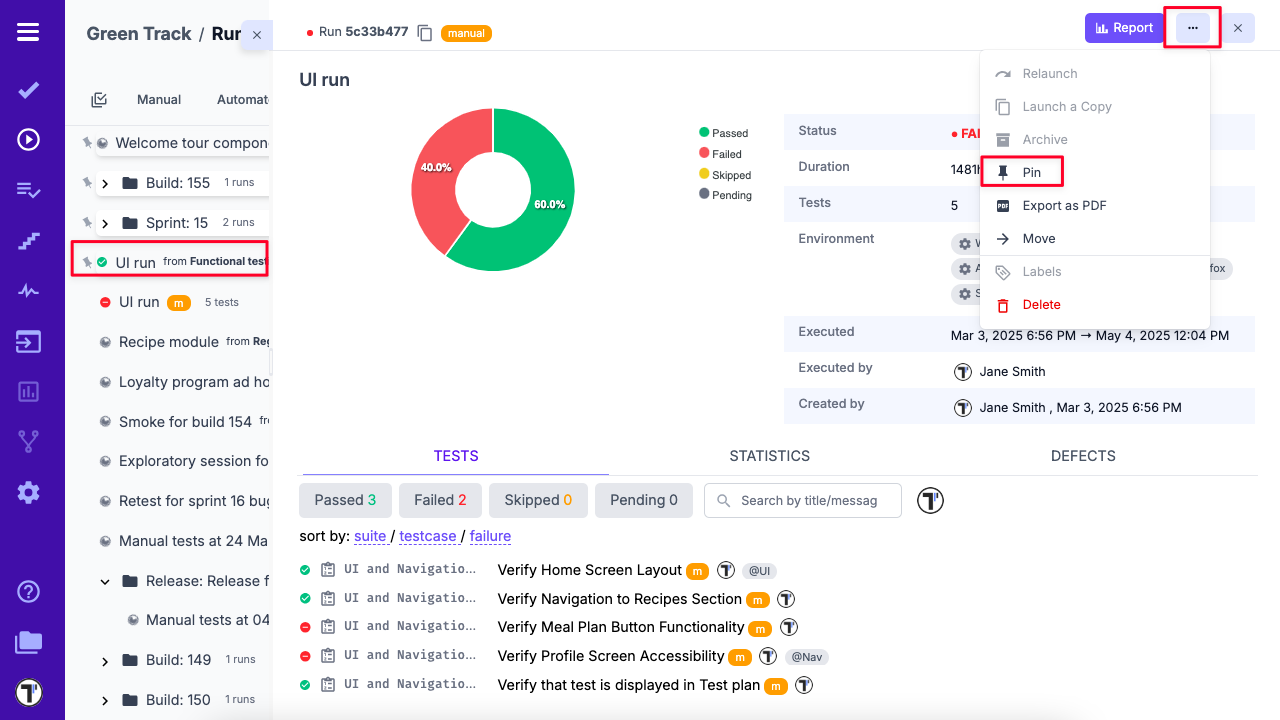
How to Pin a Run or Run Group
Section titled “How to Pin a Run or Run Group”Testomat.io allows users to pin Run Groups or individual Runs to the top of the Dashboard for quick access to critical or frequently used tests. This supports faster navigation, improved focus, and customizable workflows — ideal for monitoring regression tests, environment-specific runs, or production hotfixes.
- Go to the Runs tab.
- Find the Run or Run Group you want to pin.
- Click the three dots menu aligned next to the item.
- Choose “Pin” from the dropdown options.
- The selected Run or Run Group will now appear pinned at the top of the list for quick and easy access.
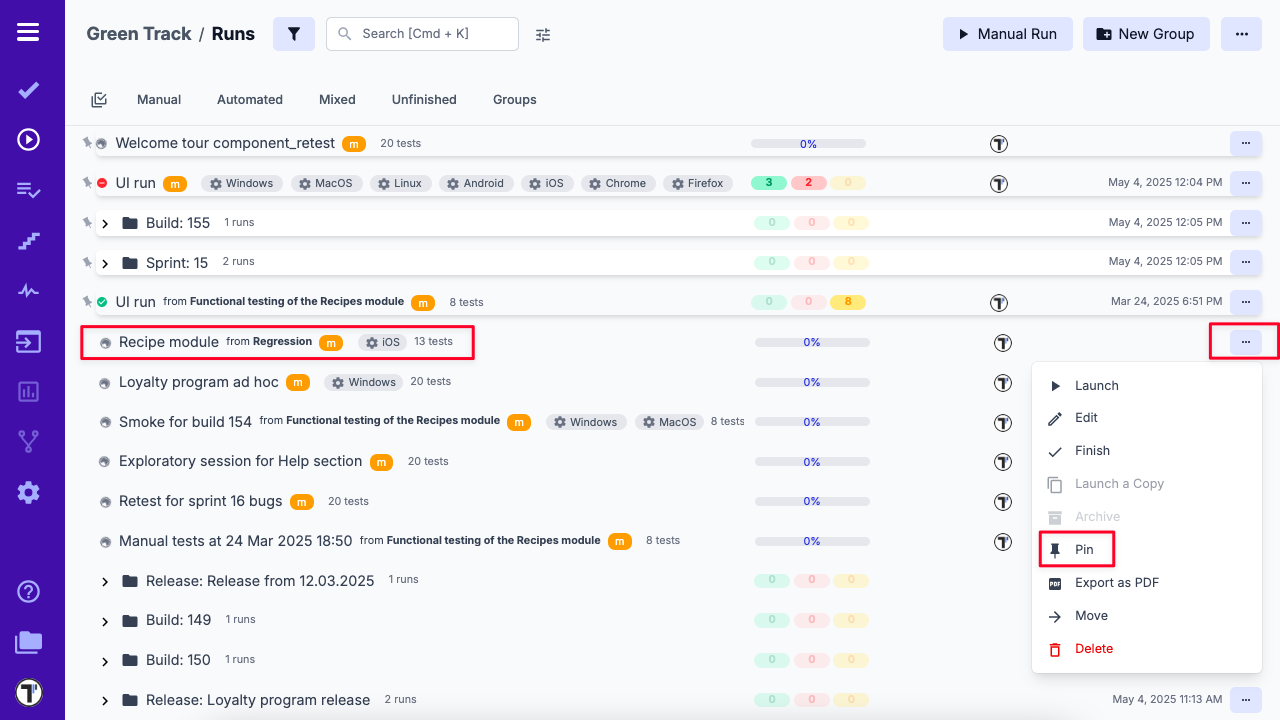
Pin option is also available in the detailed view menu.
Relaunch Runs
Section titled “Relaunch Runs”For some reason, you may need to re-check some tests in your Run manually. You can use Relaunch Run options for such cases. To do this you need to 1. click on the menu button and 2. click on Relaunch manually button
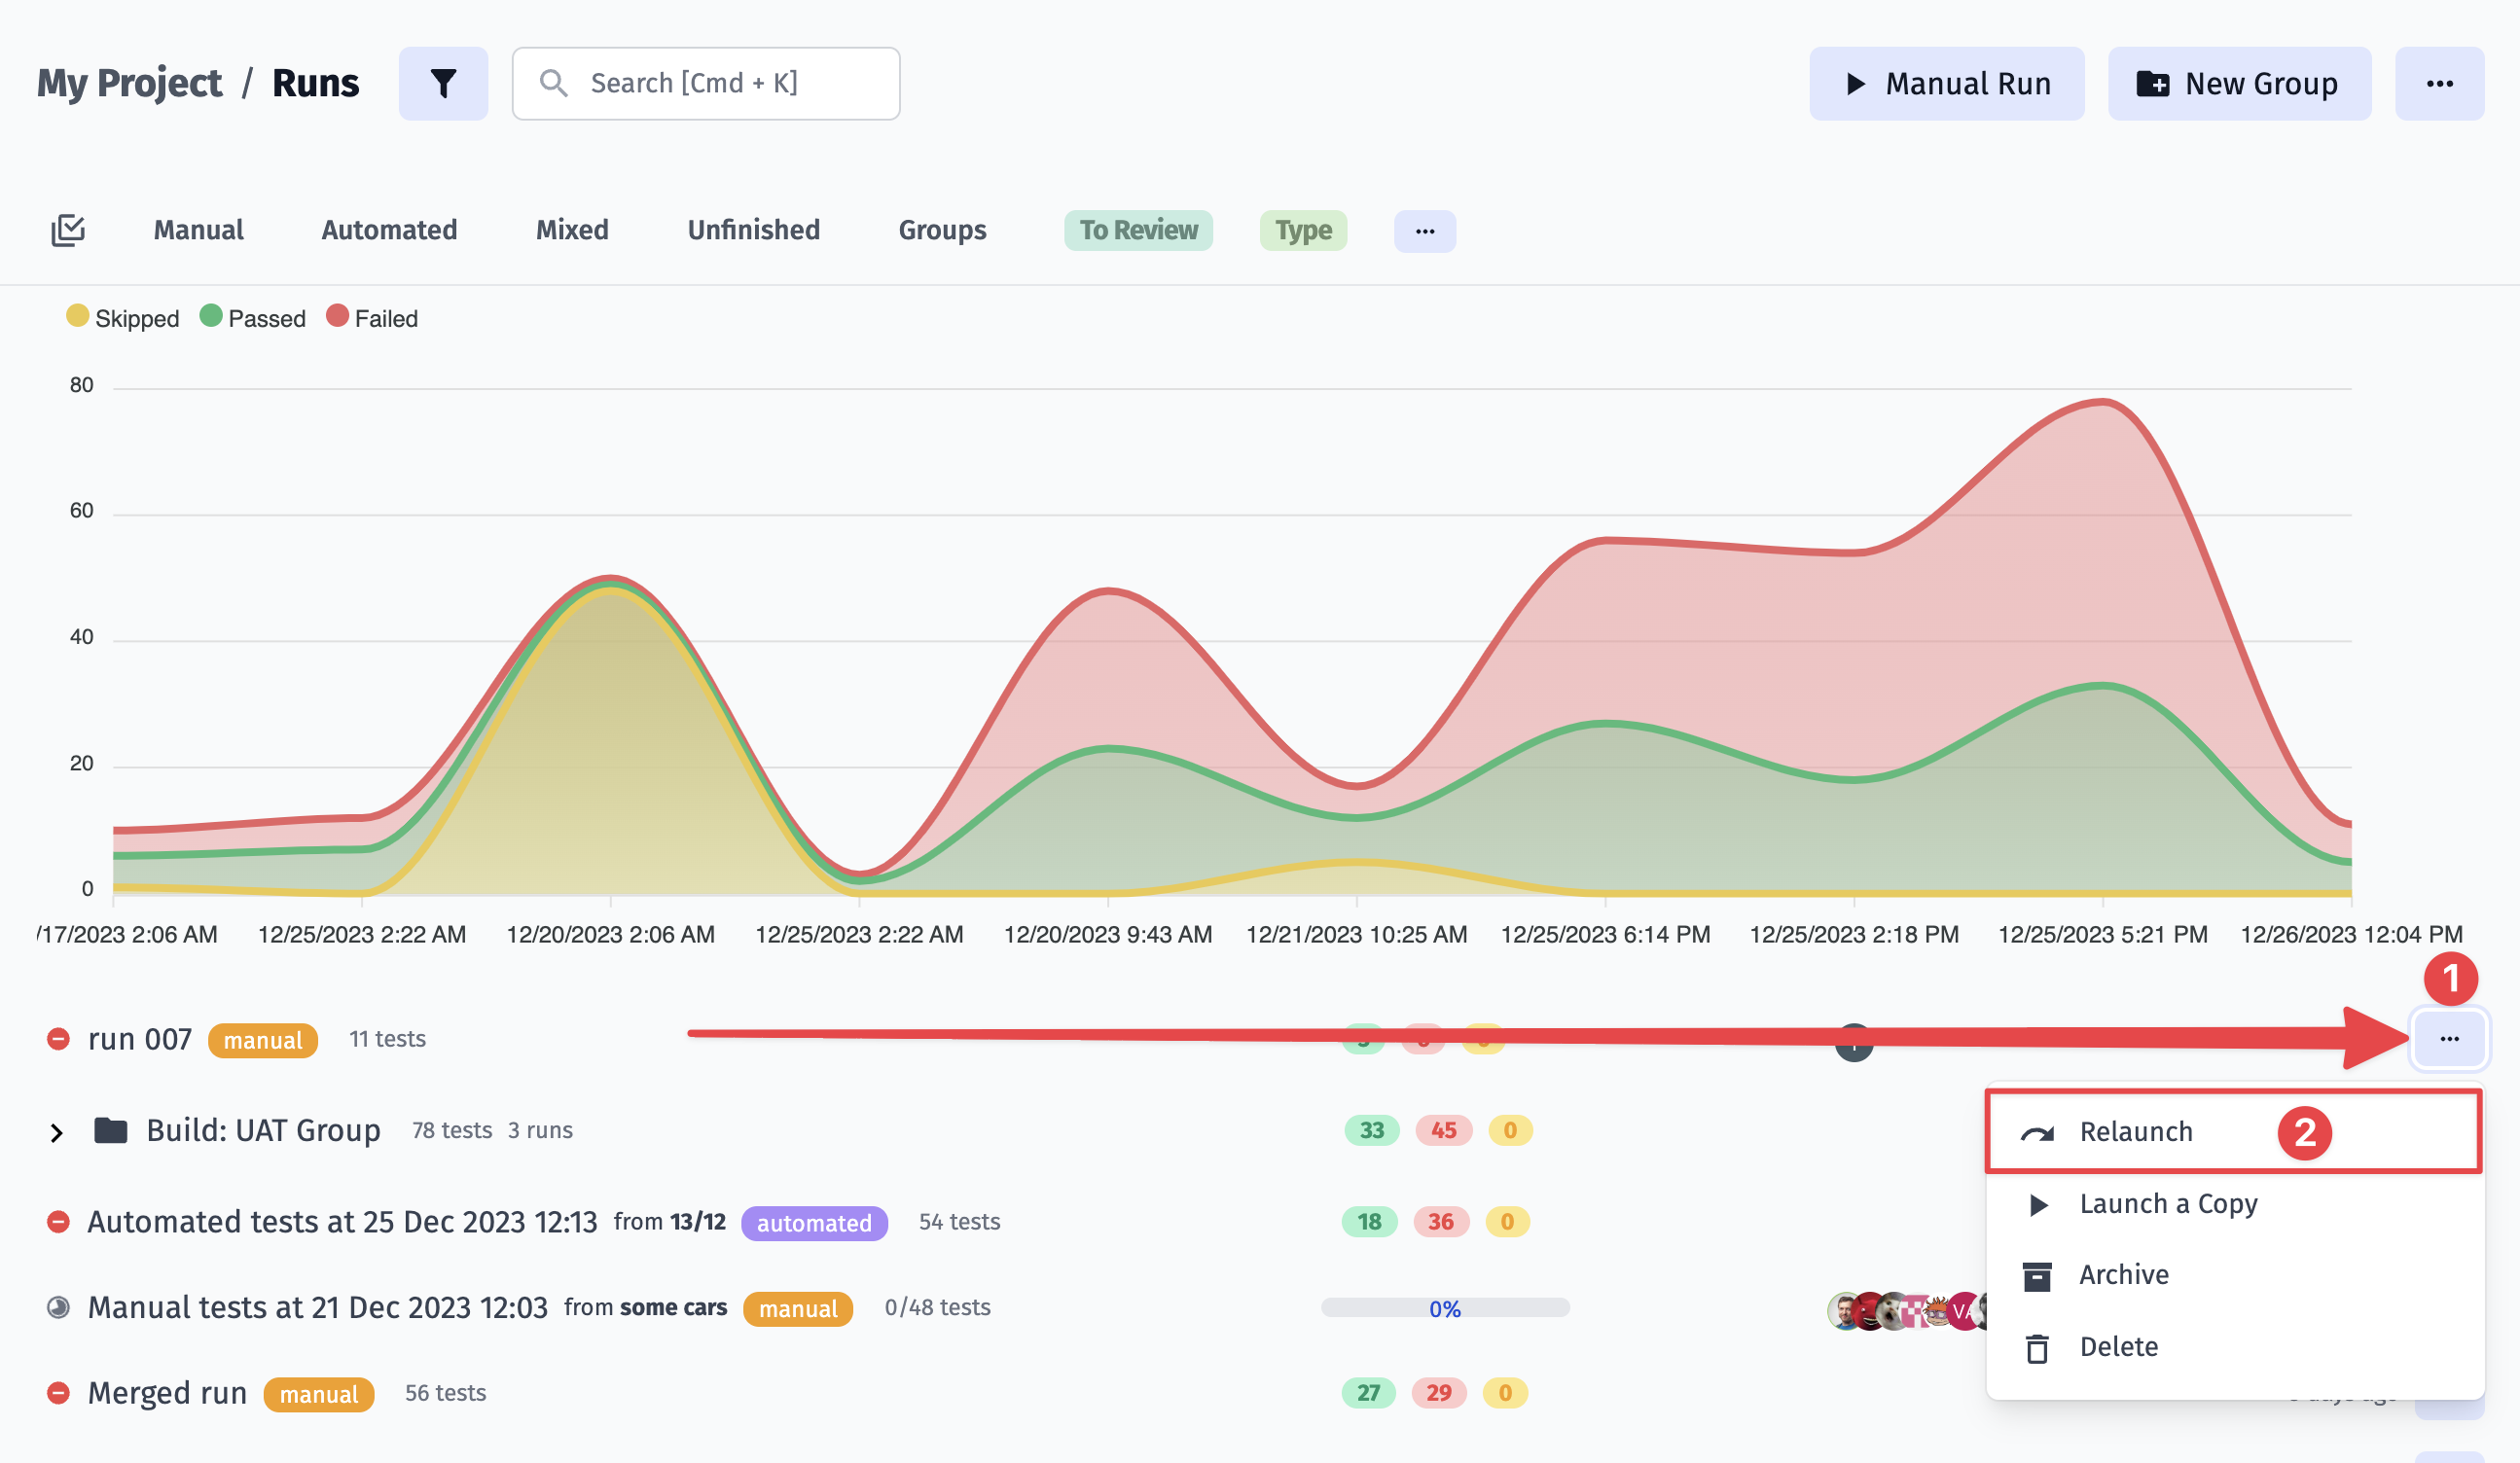
Your Test Run will open in Manual Run window and you will be able to re-check tests and change their status:
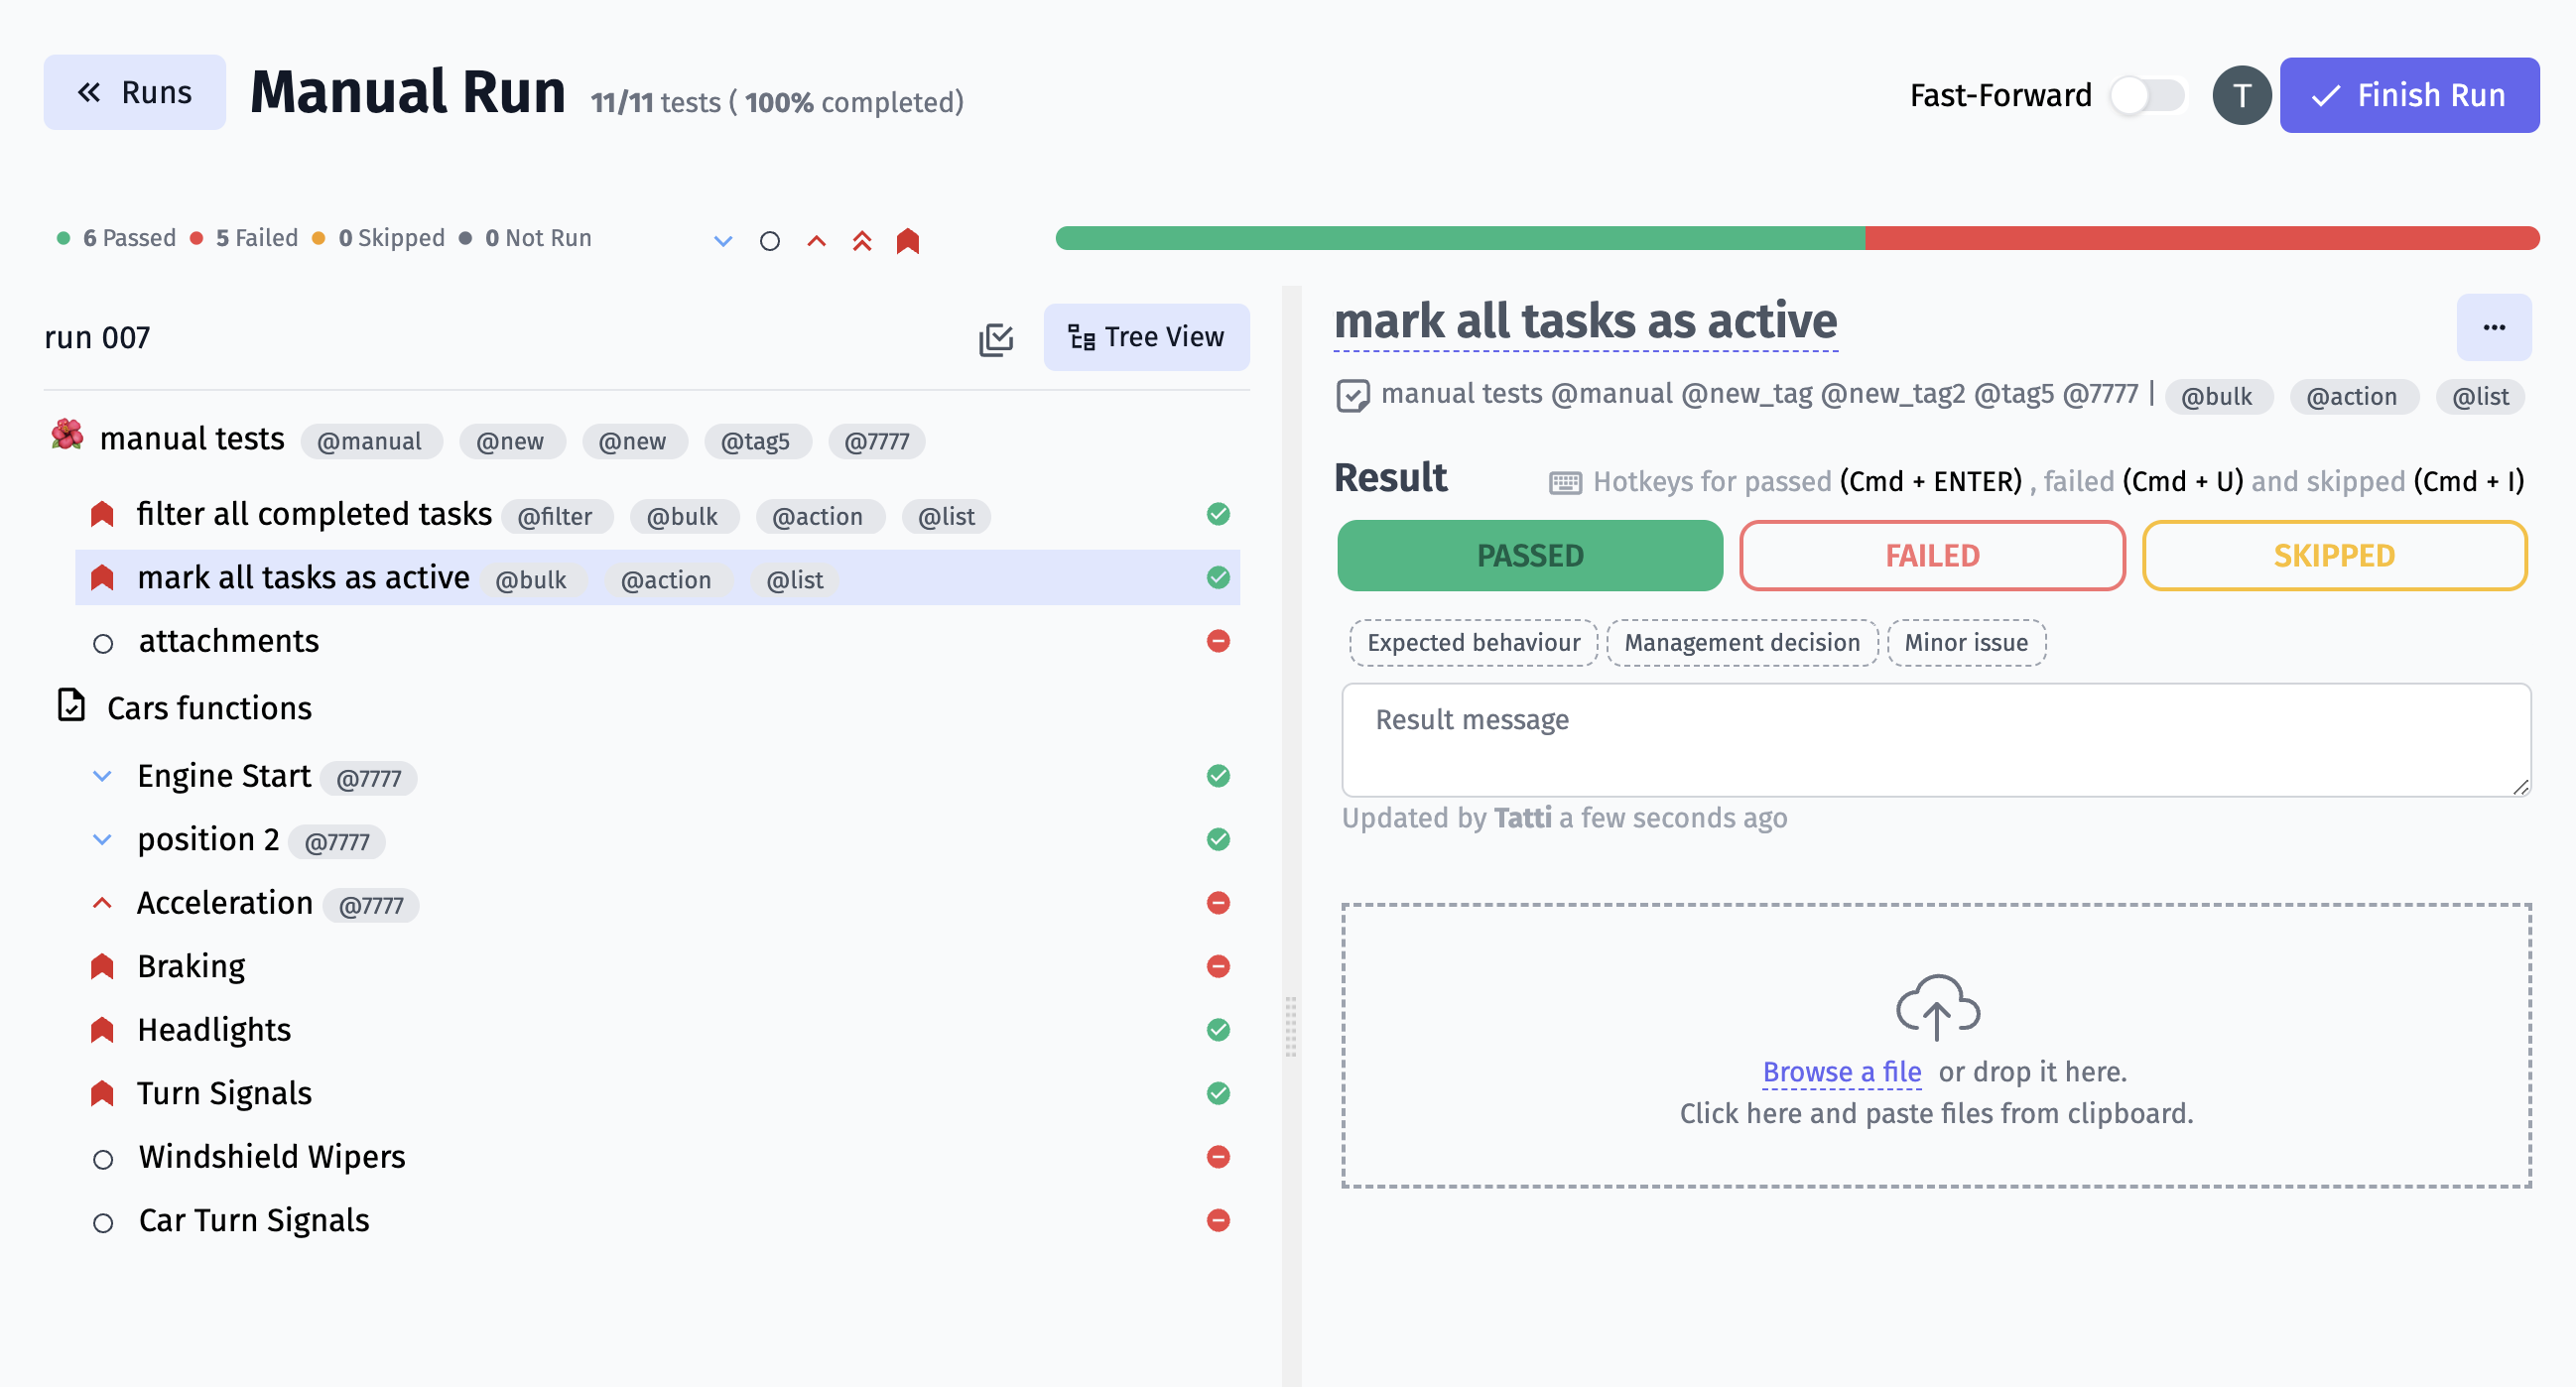
When you finish you need to click on Finish button. You will see tests with new status and new Run Status
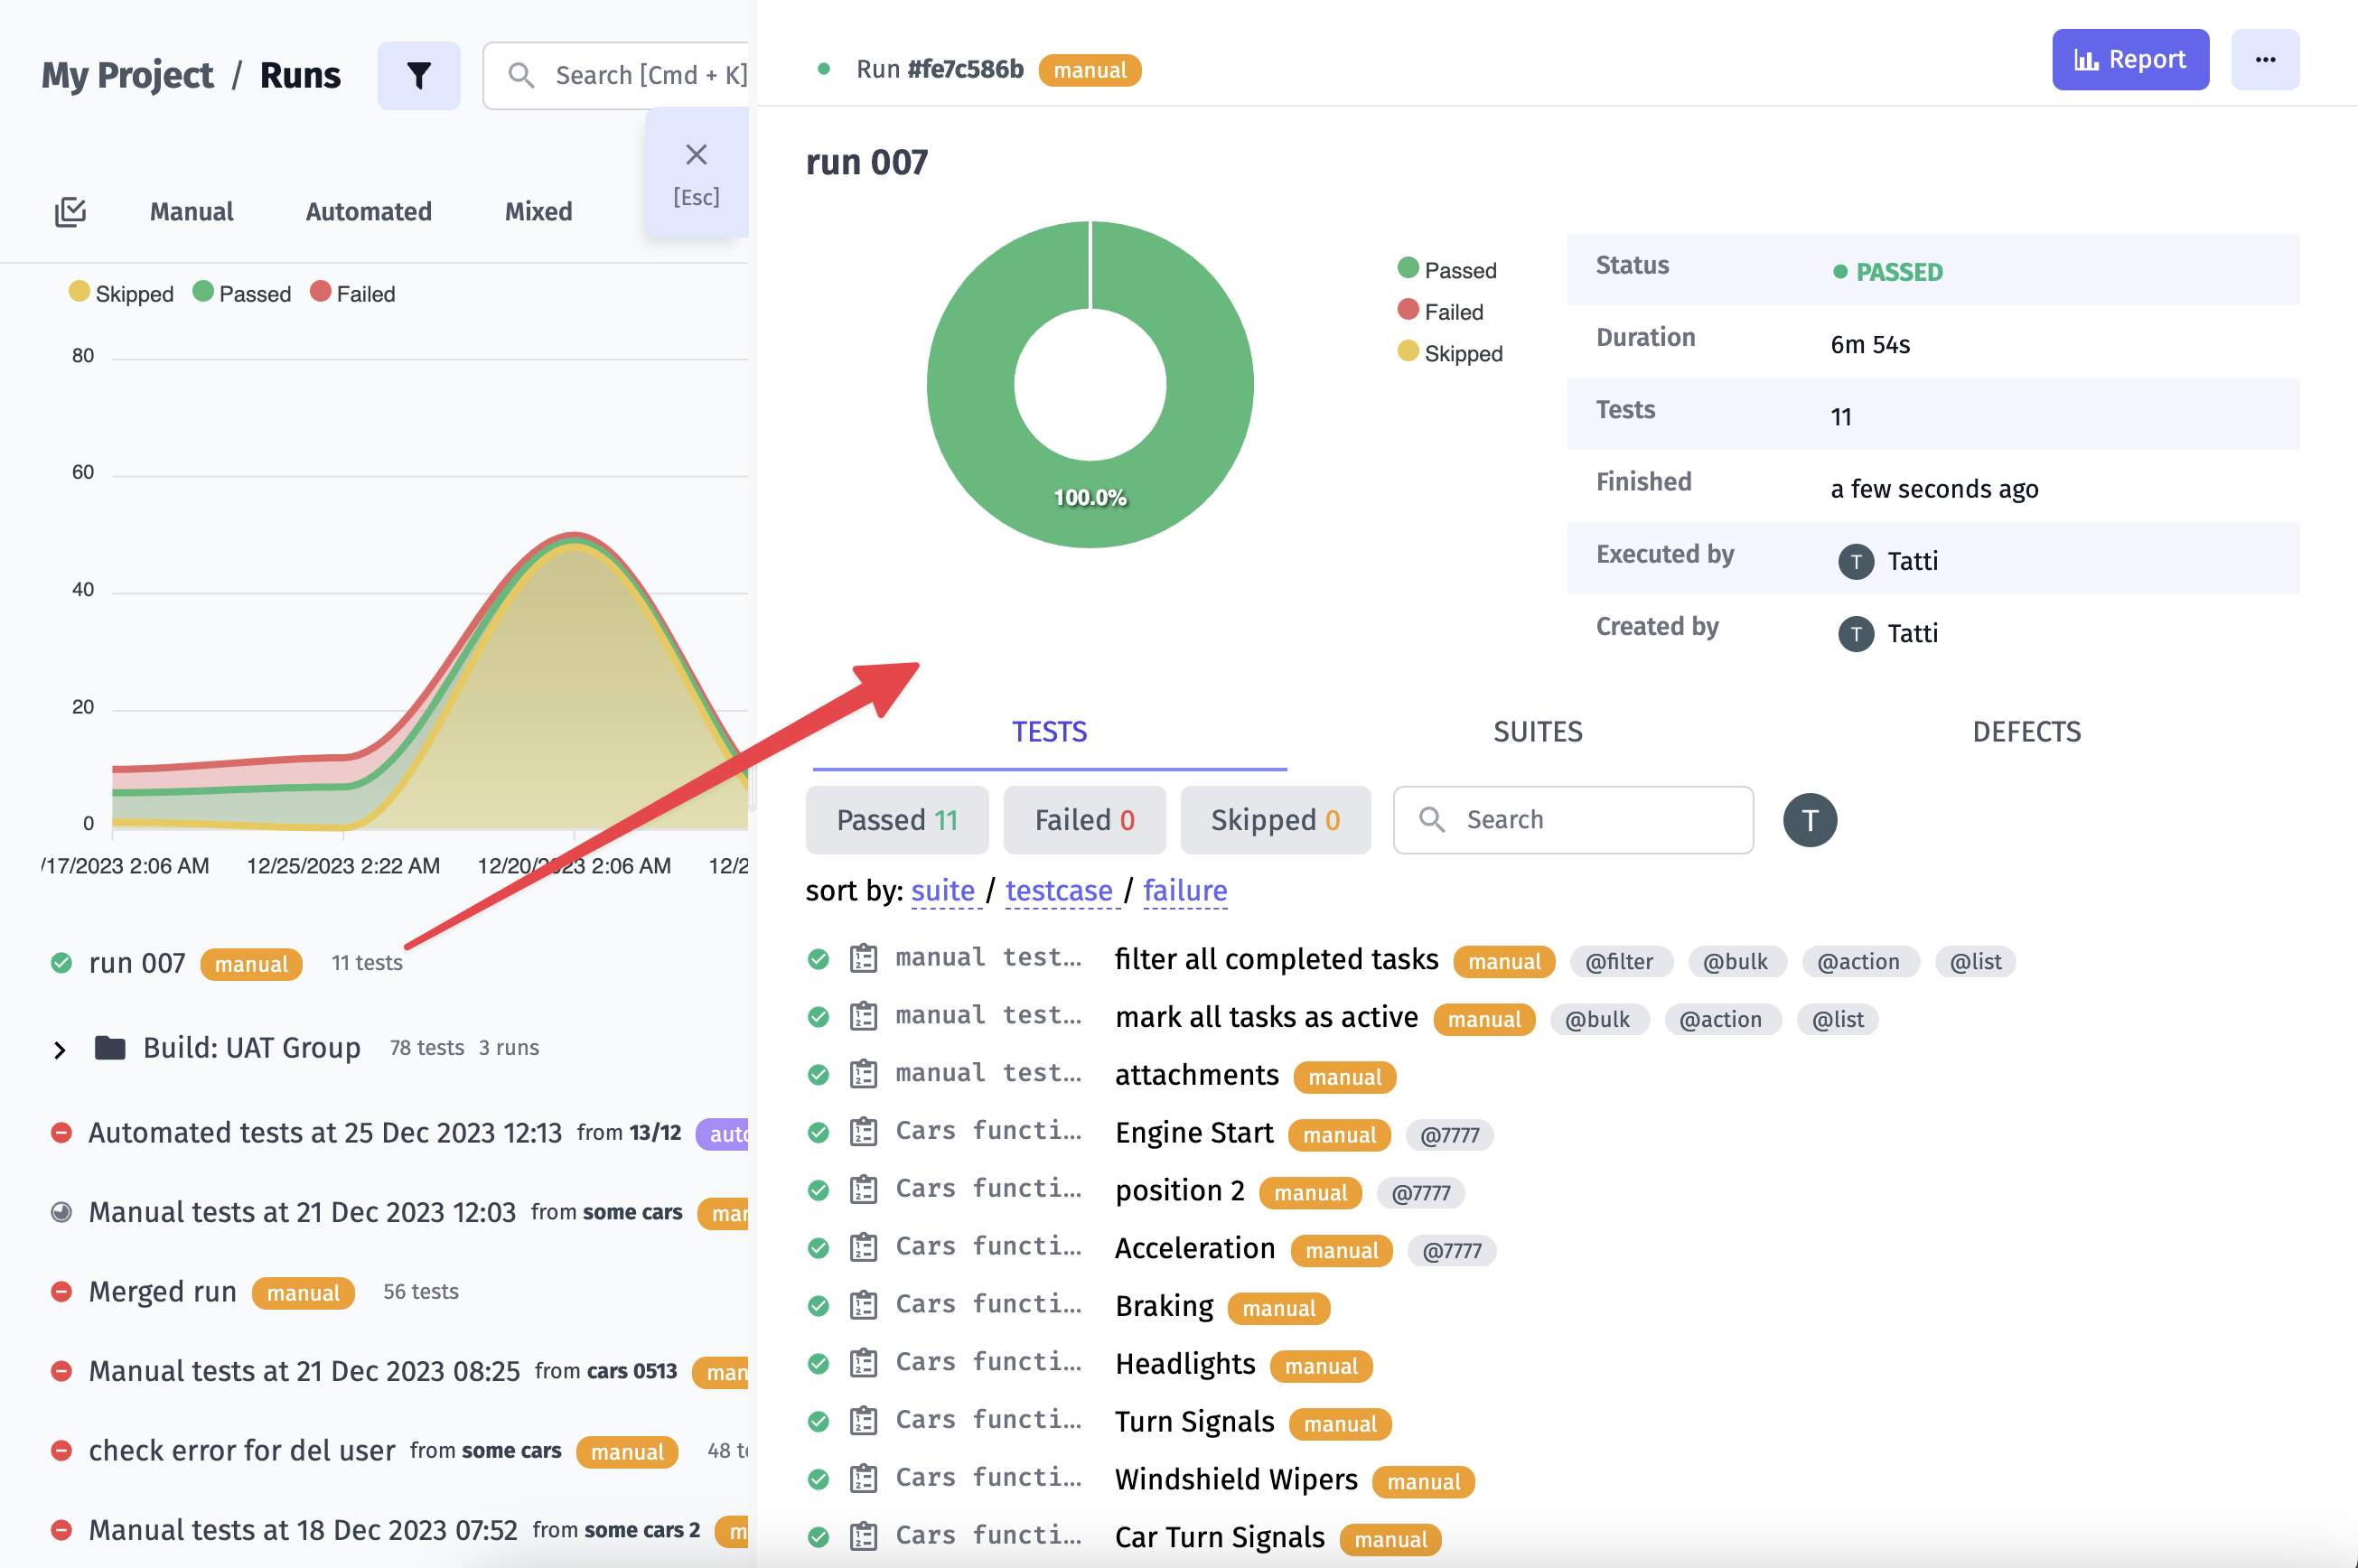
Also, your Test Run will contain updated information on its results: You will see a changed tag and Run status.
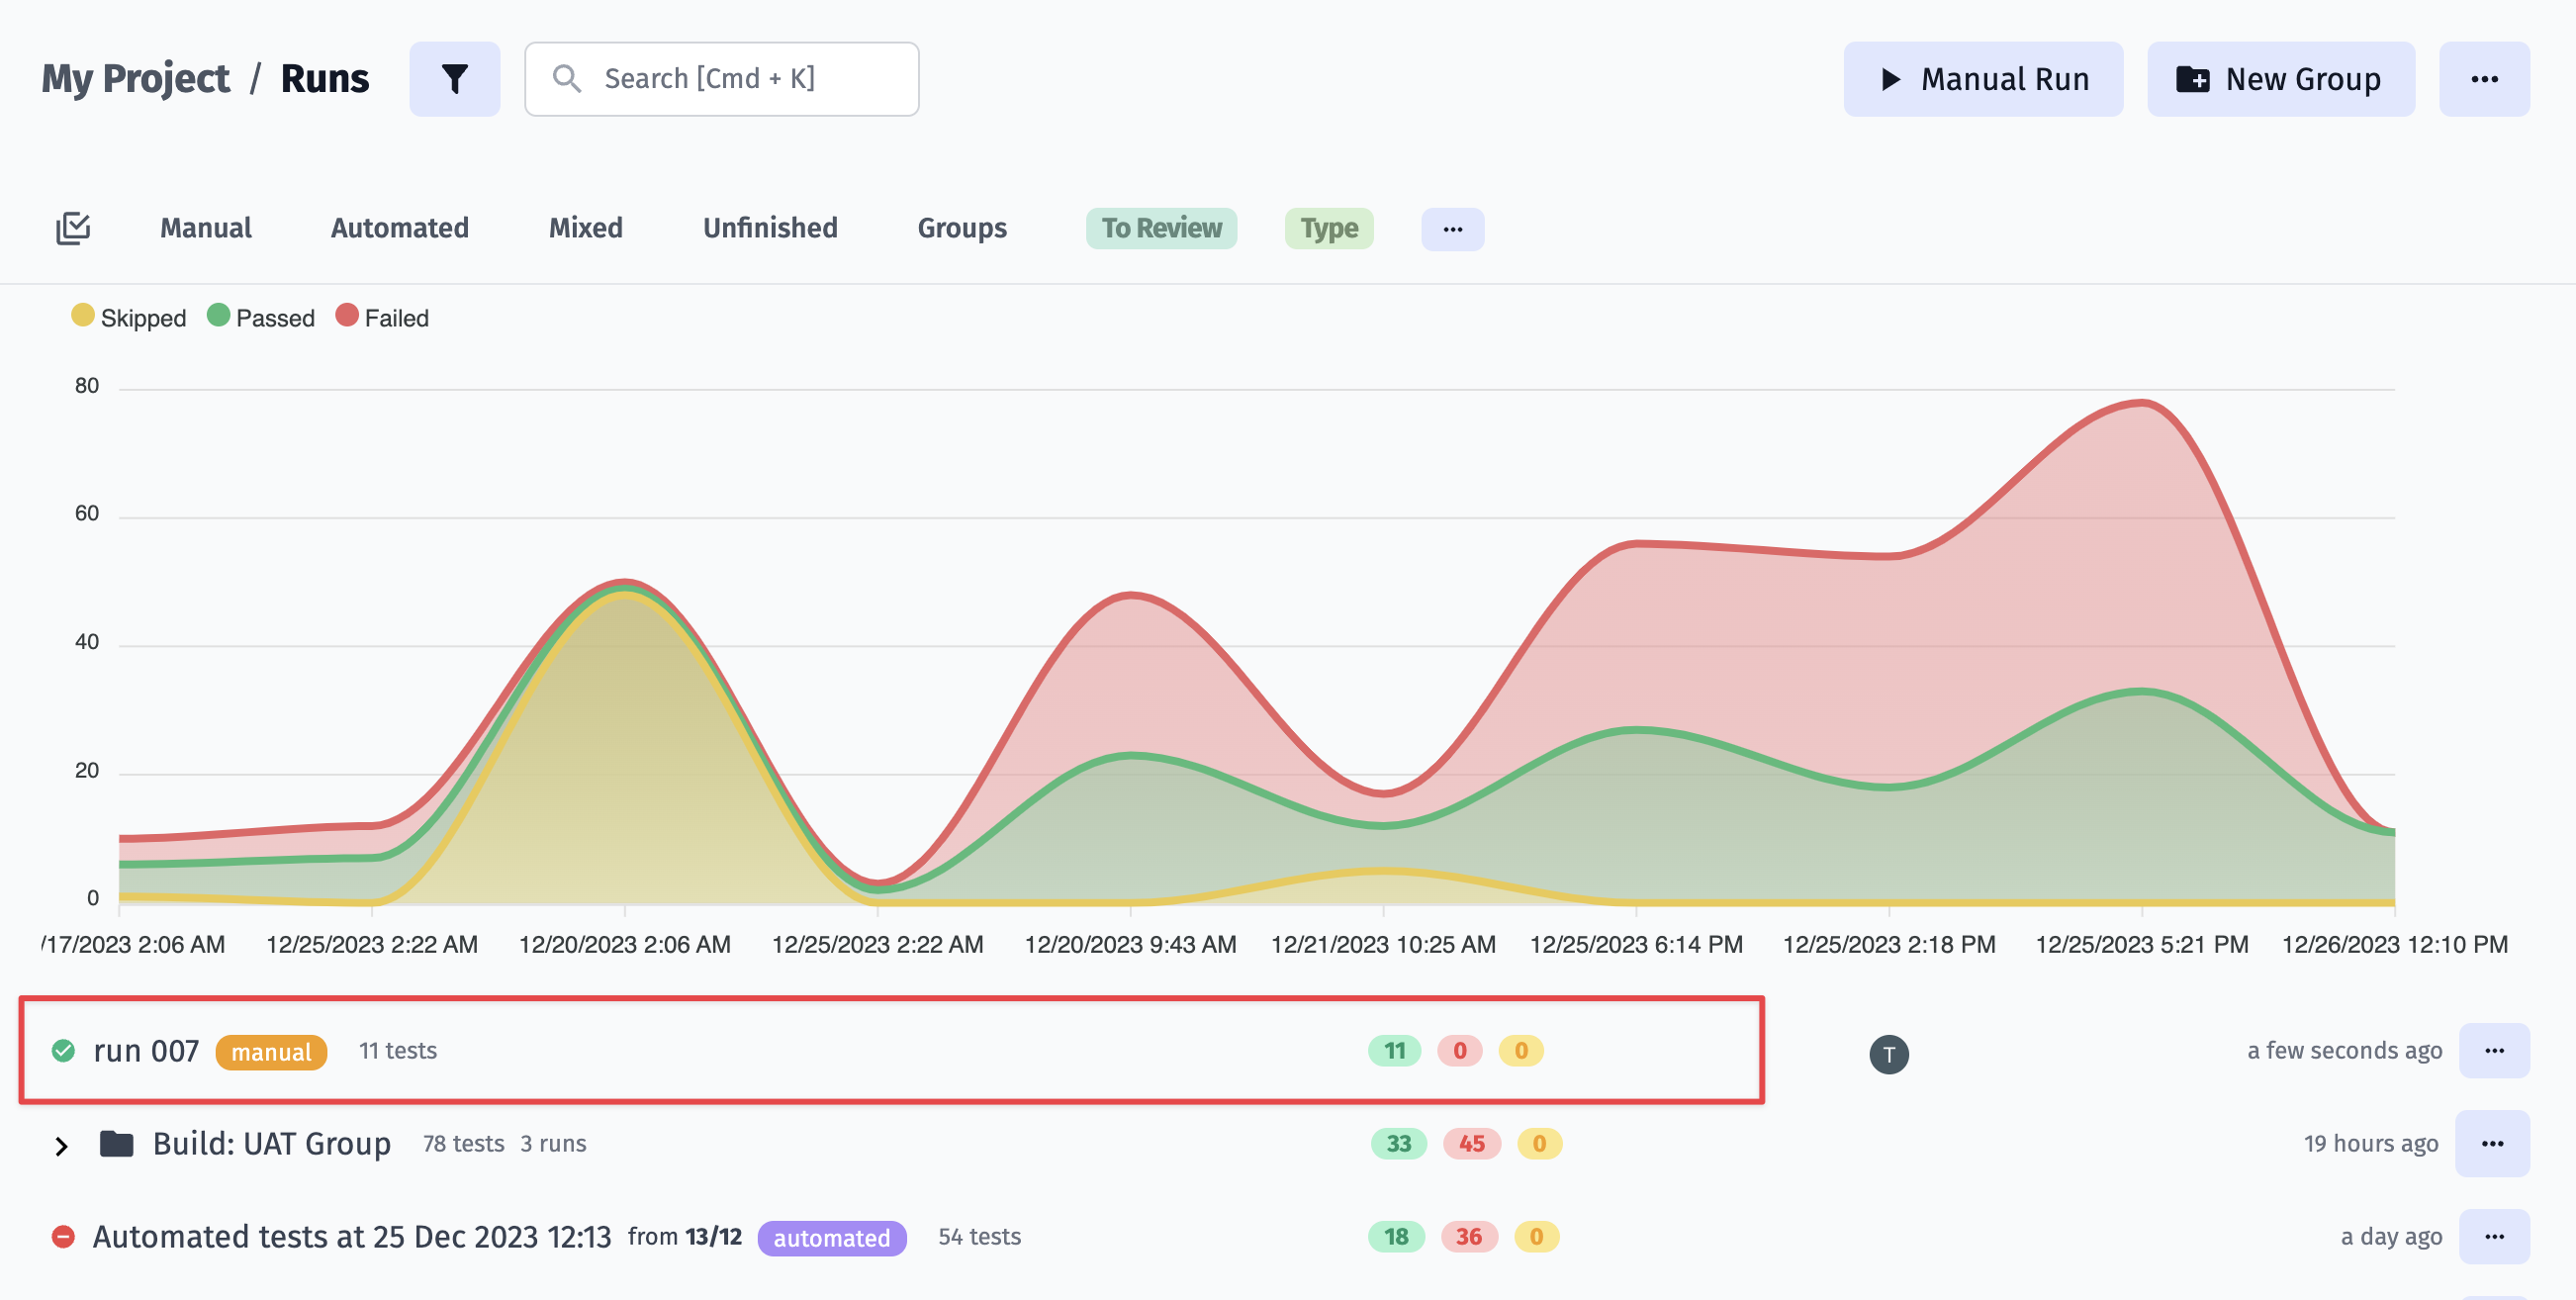
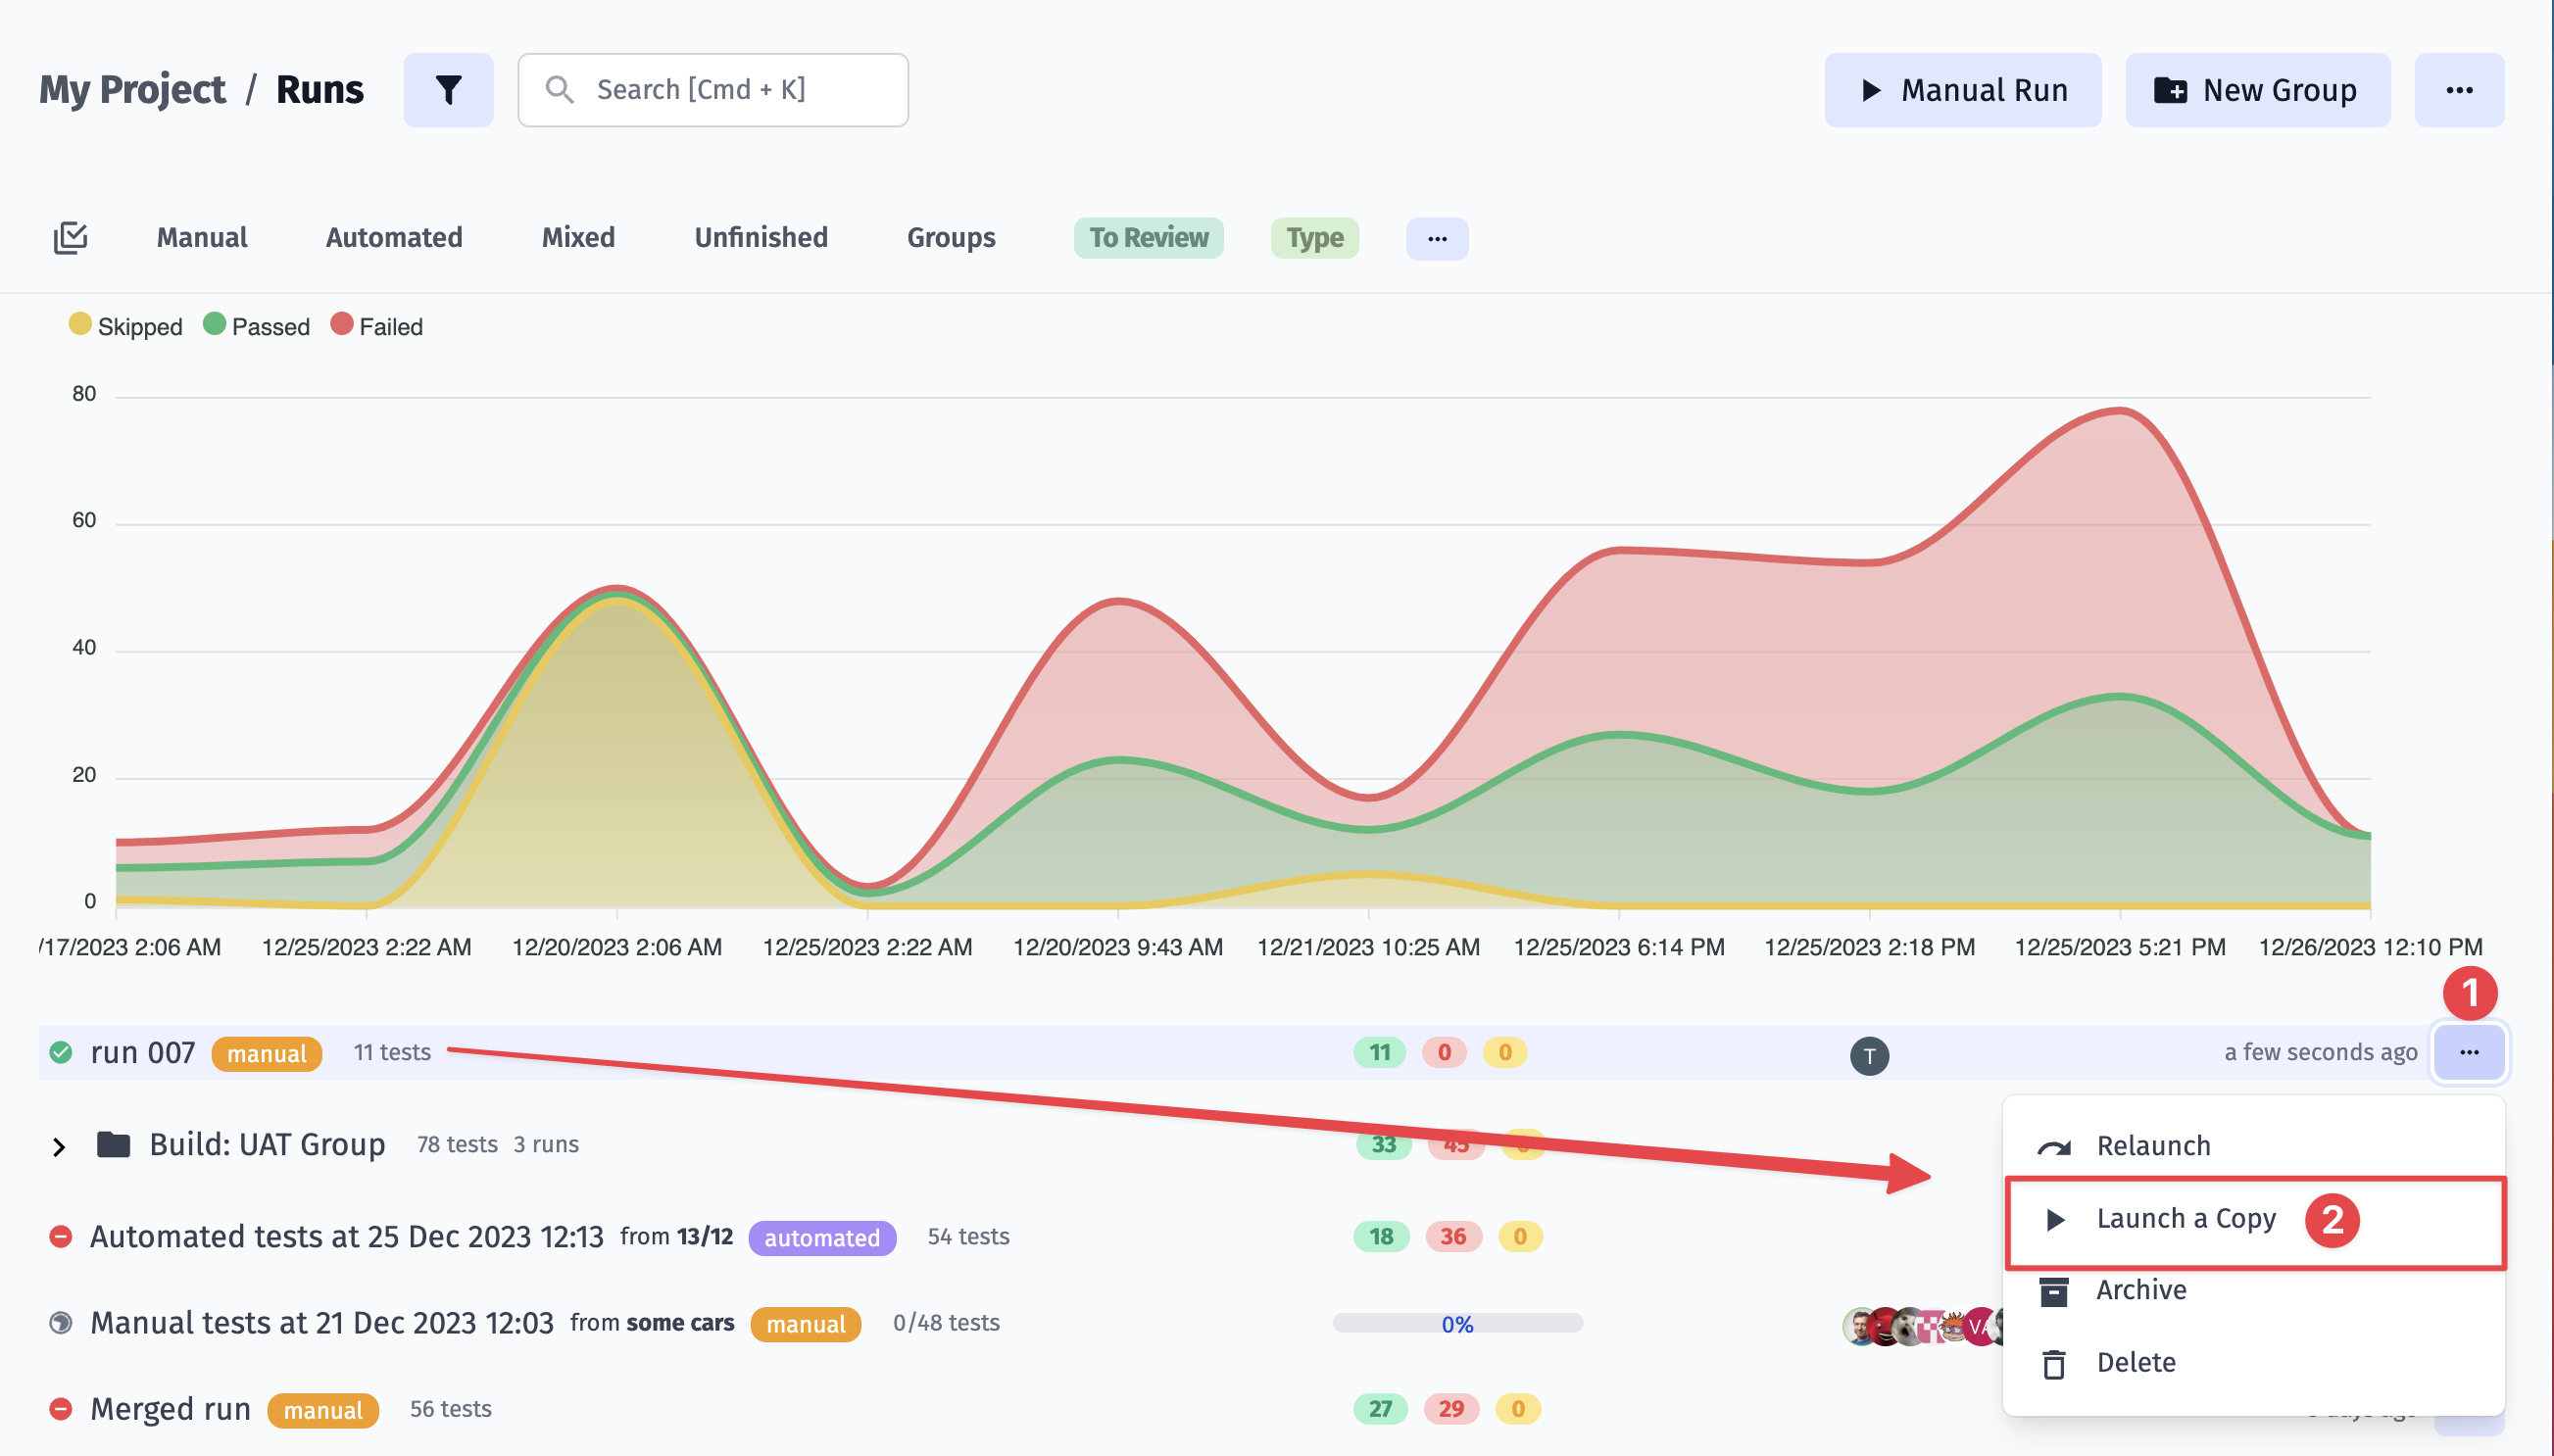
Launch a Copy
Section titled “Launch a Copy”If you need need to re-check some tests in your Run manually, but for some reason, you want to save this Test Run you can use Launch a copy option. To do this you need to 1. click on the menu button and 2. click on Launch a Copy button.
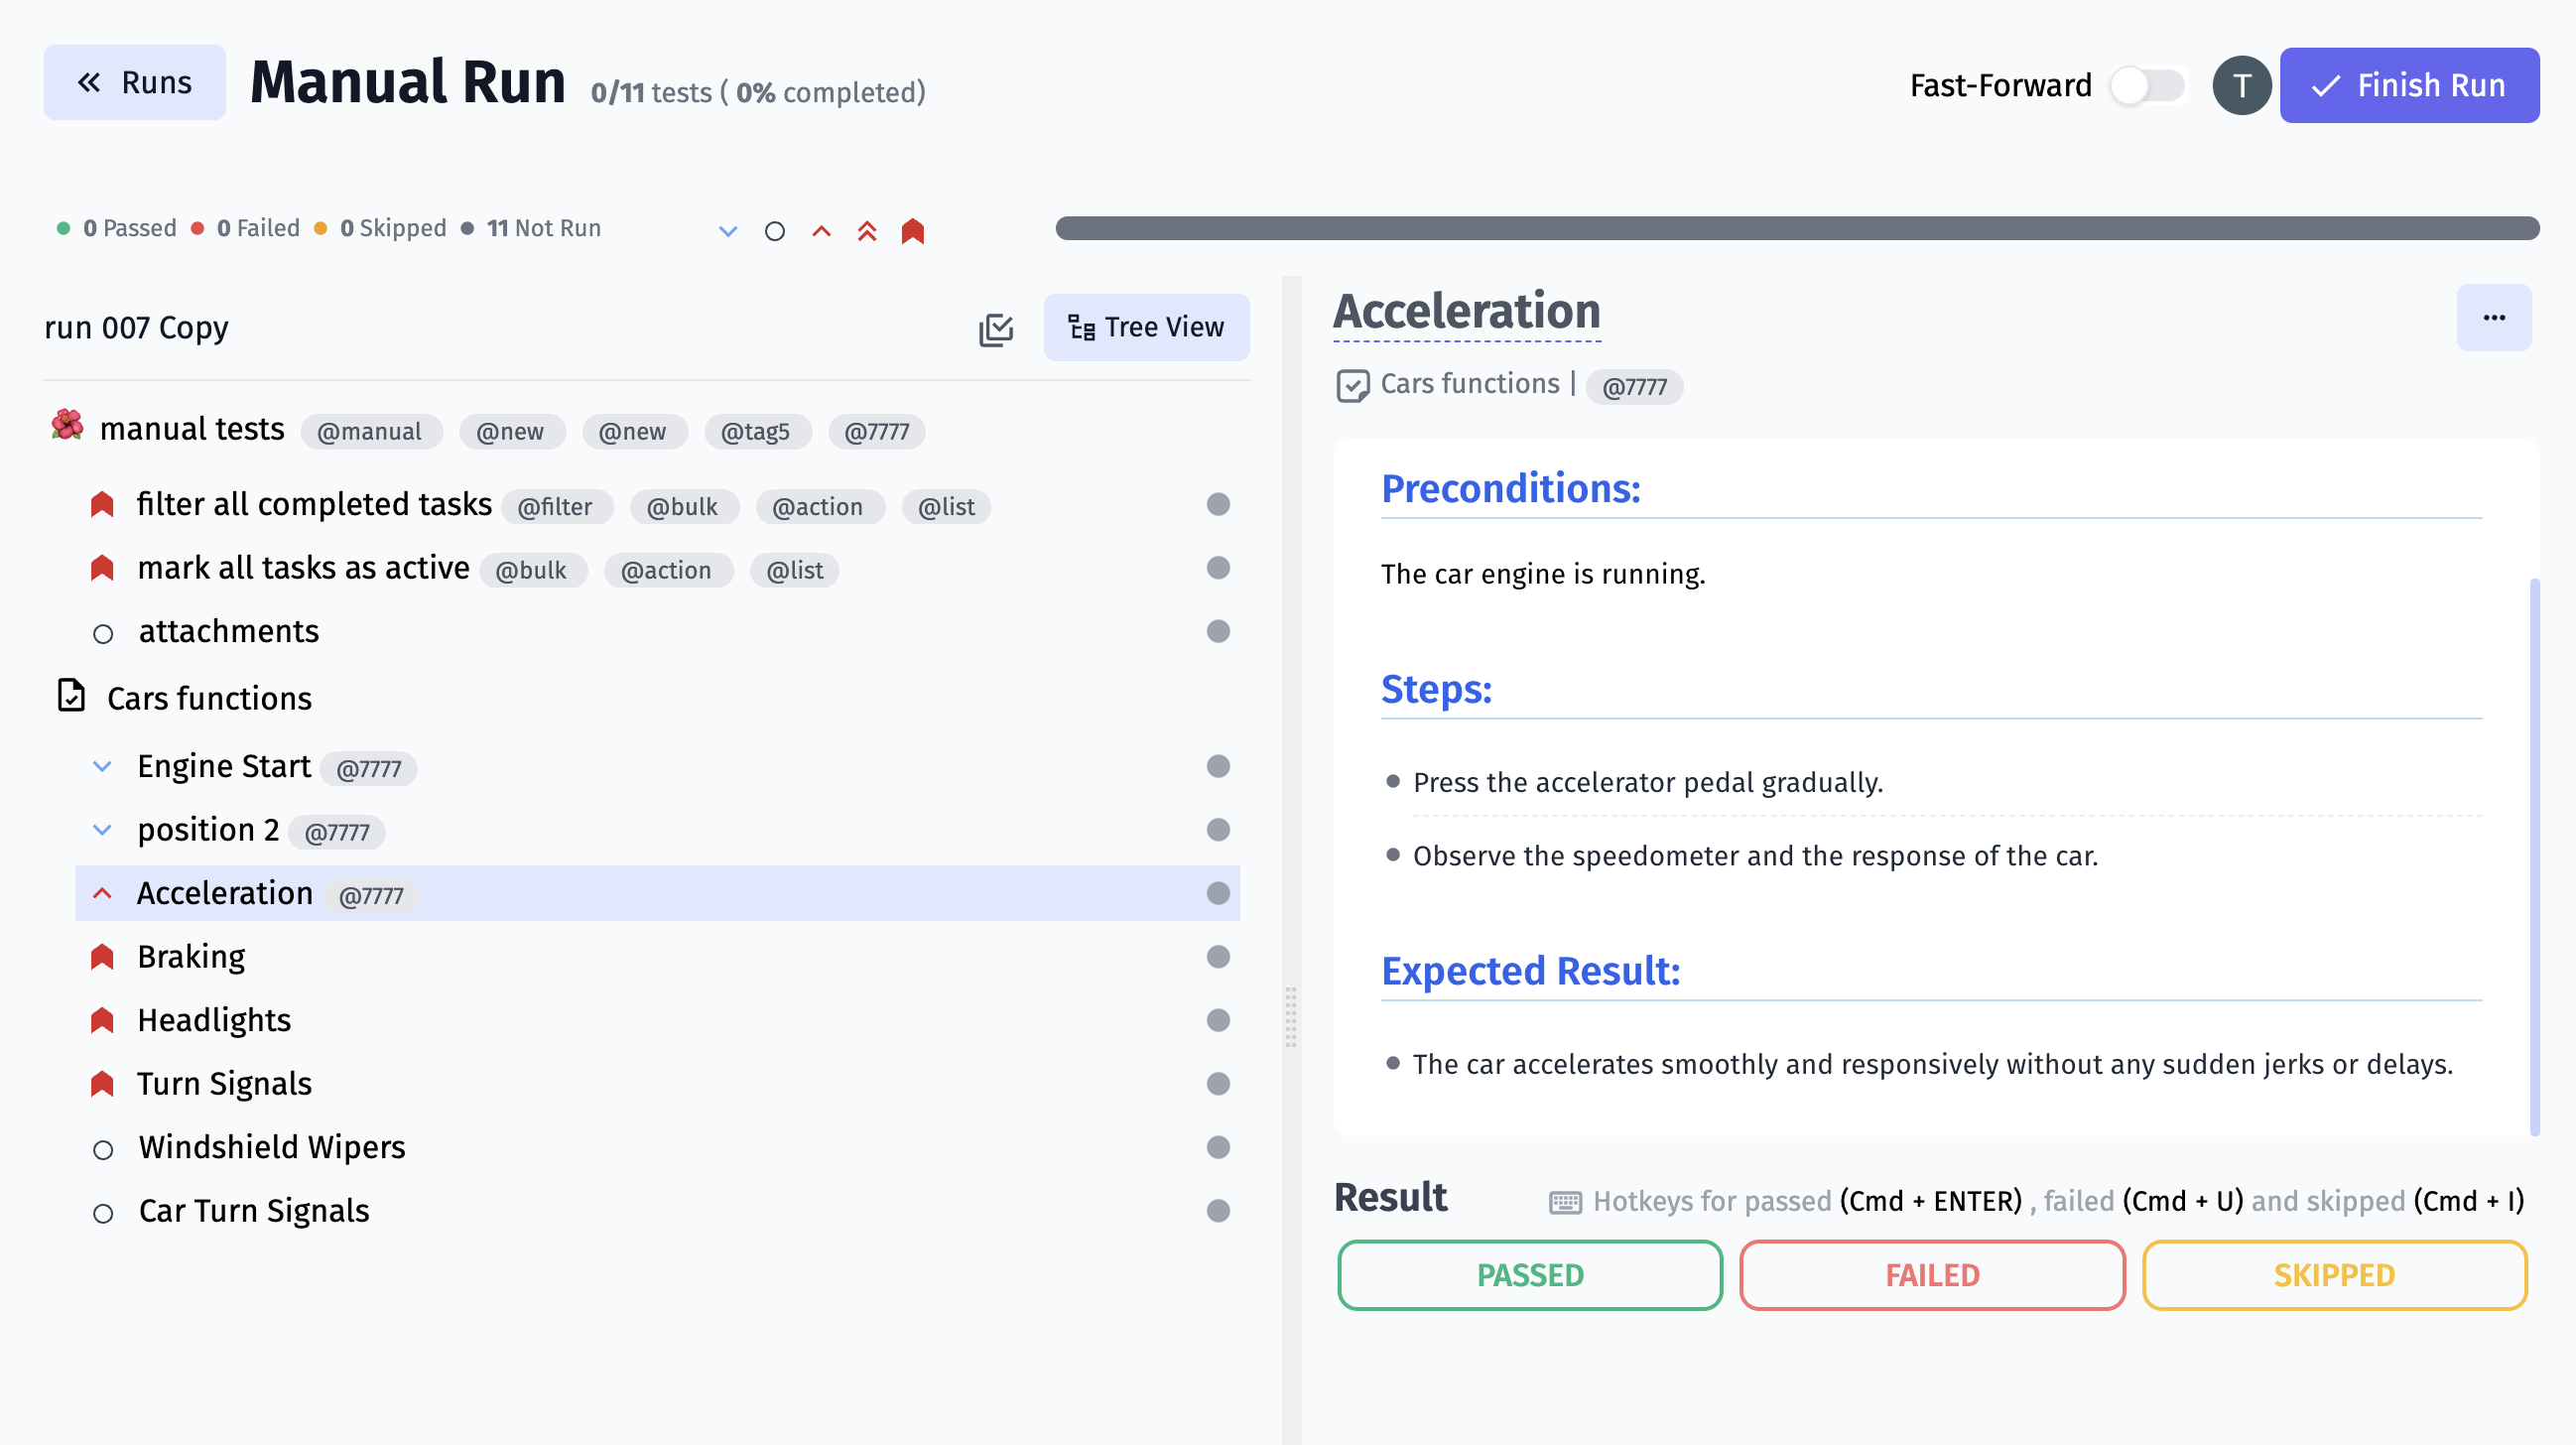
Your Test Run will open in Manual Run window and you will be able to re-check tests and change their status:
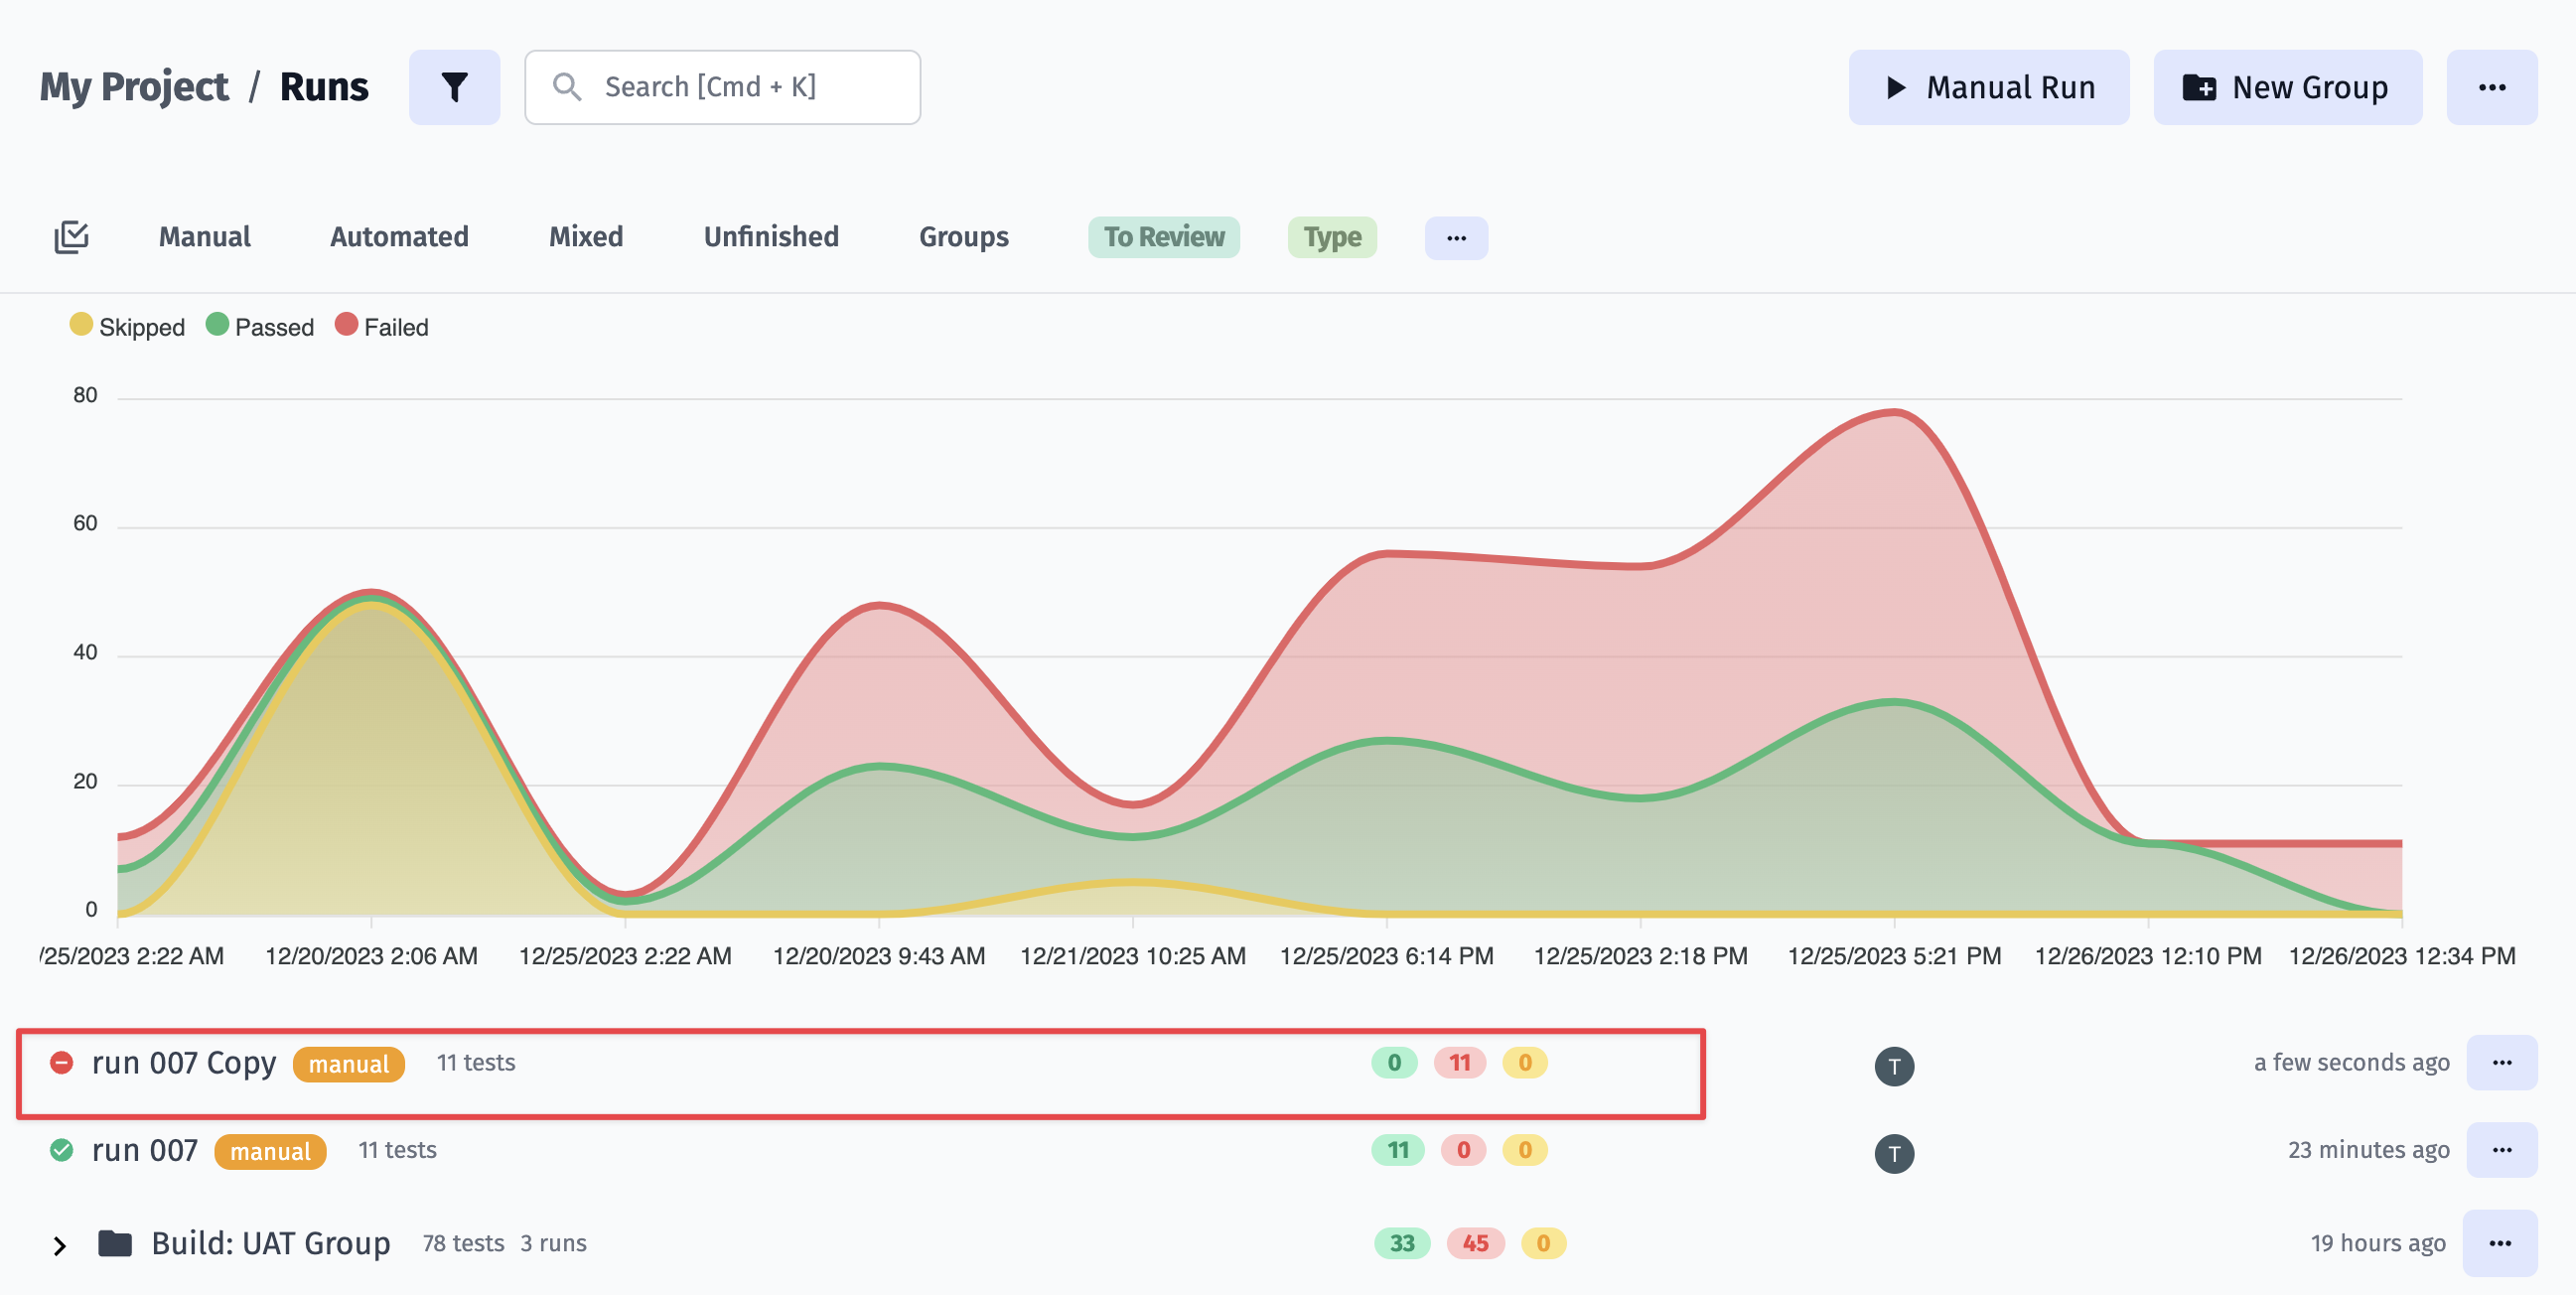
When you finish you need to click on Finish button. You will see a new Test Run tests with new status and new Run Status:

On the Runs page you will see a copy of your Test Run with new tests results:
Archive Runs & Groups
Section titled “Archive Runs & Groups”Archive provides you with the ability to declutter the main Runs board, ensuring that only relevant and active test runs take center stage while preserving historical data. The Runs page displays the 30 most recent Runs and Groups, while all other runs go to Archive.

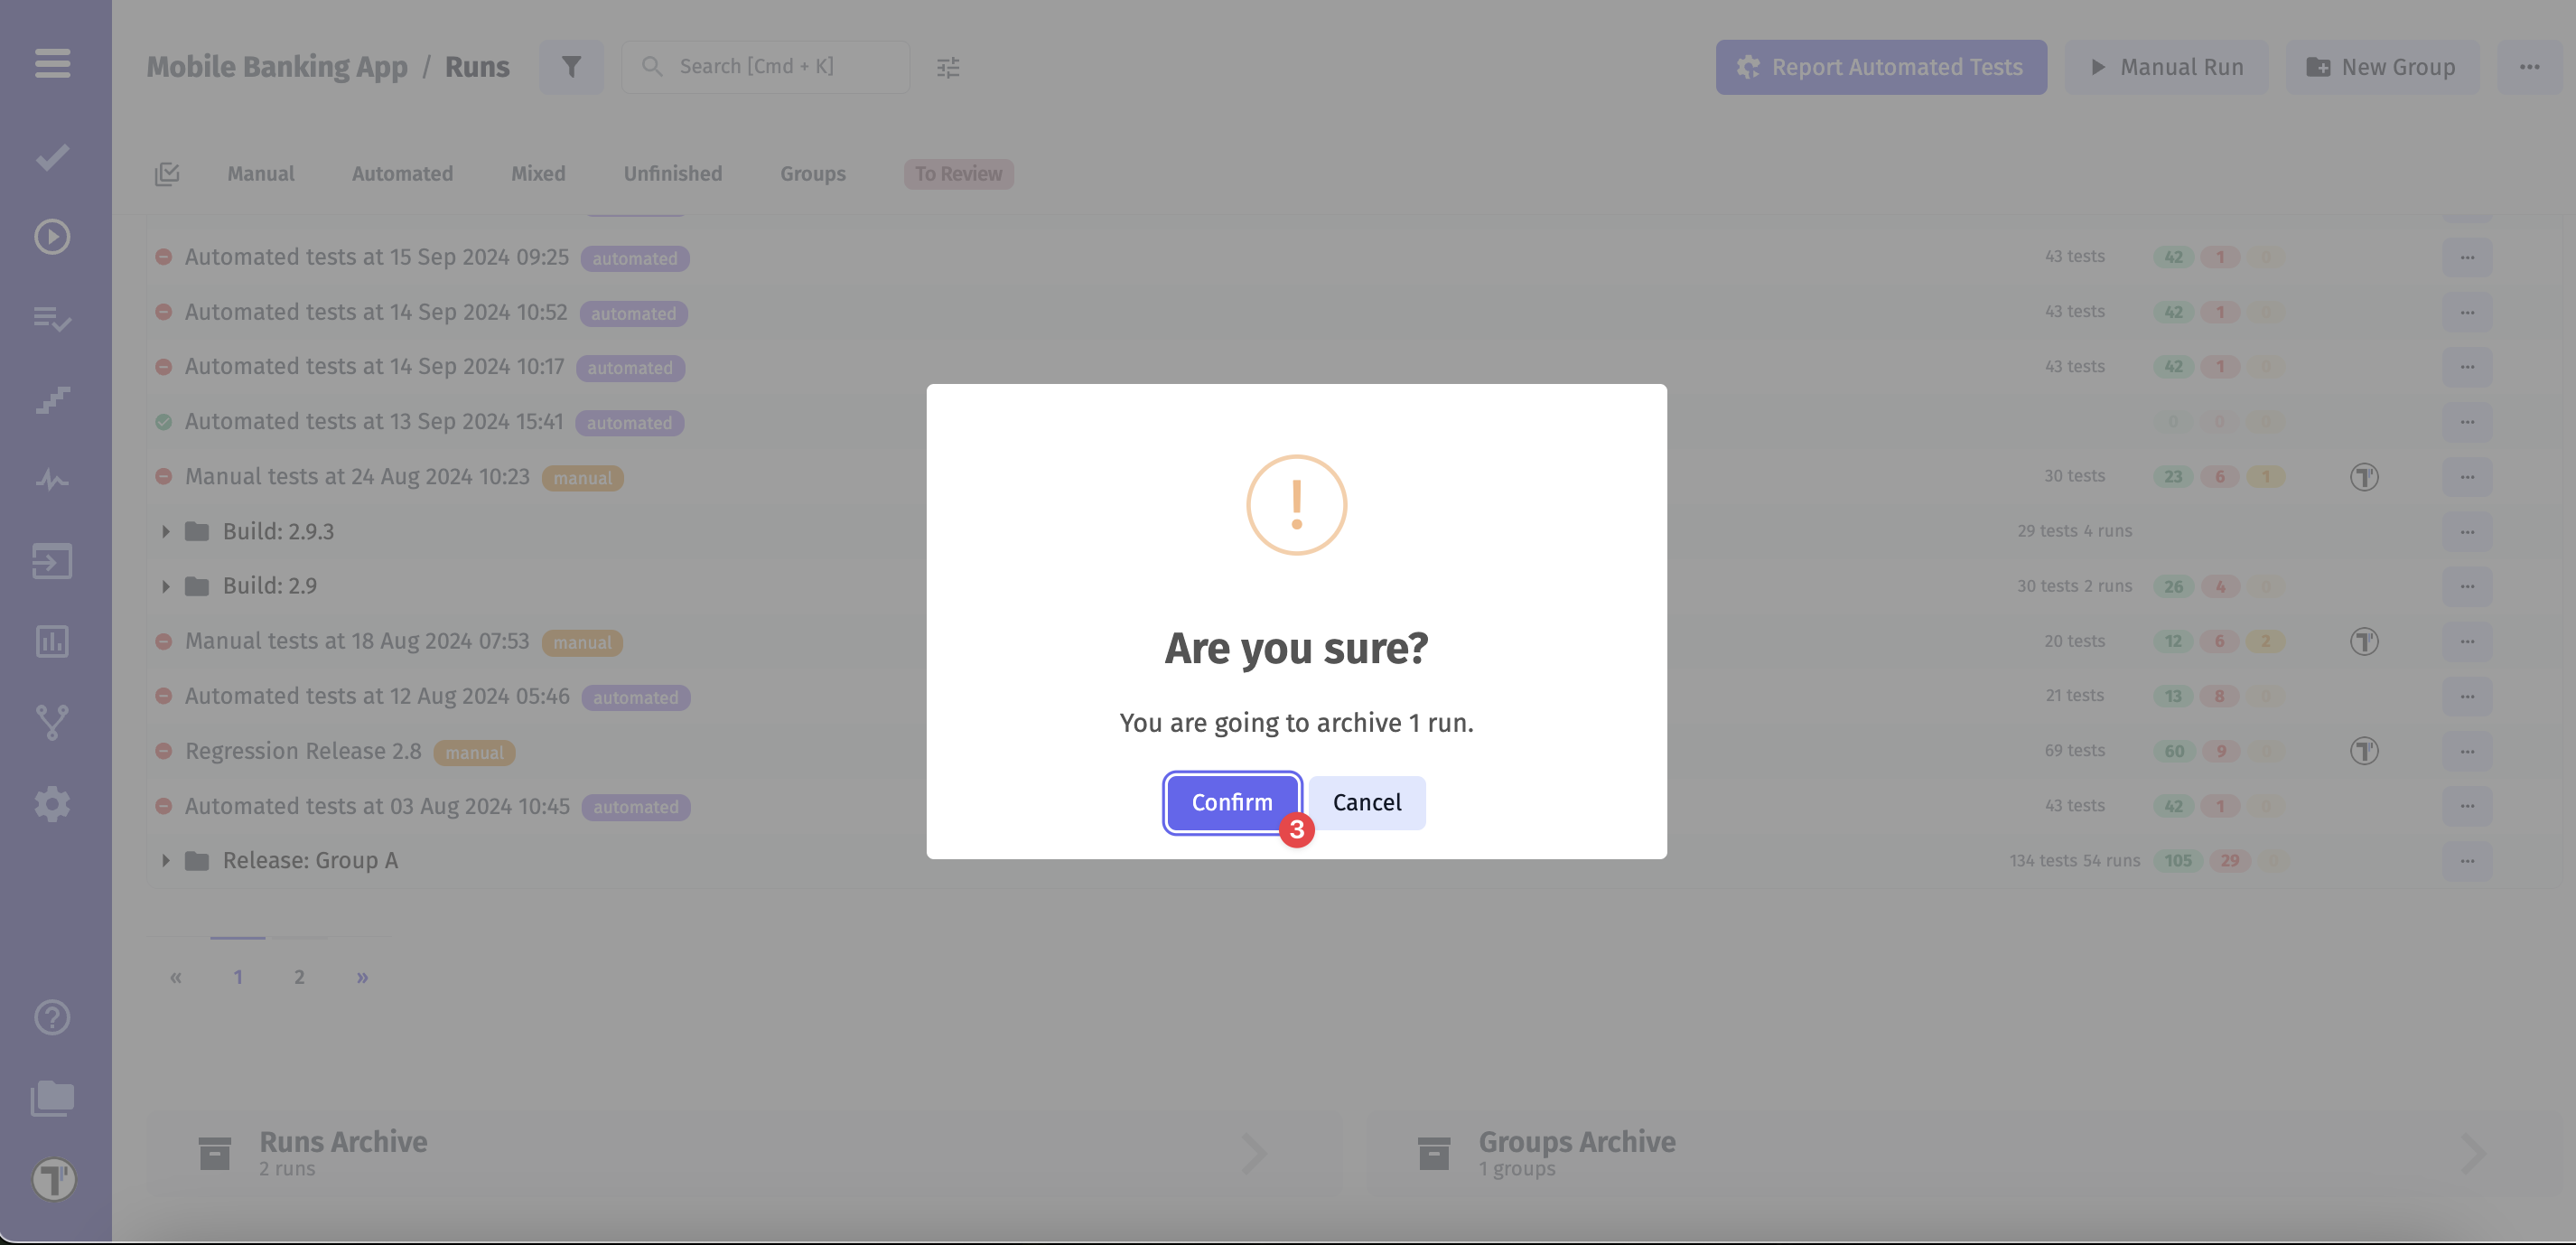
You can also forcefully archive Runs or Groups. To do this, you need:
- Сlick the extra menu
- Click the ‘Archive’ button
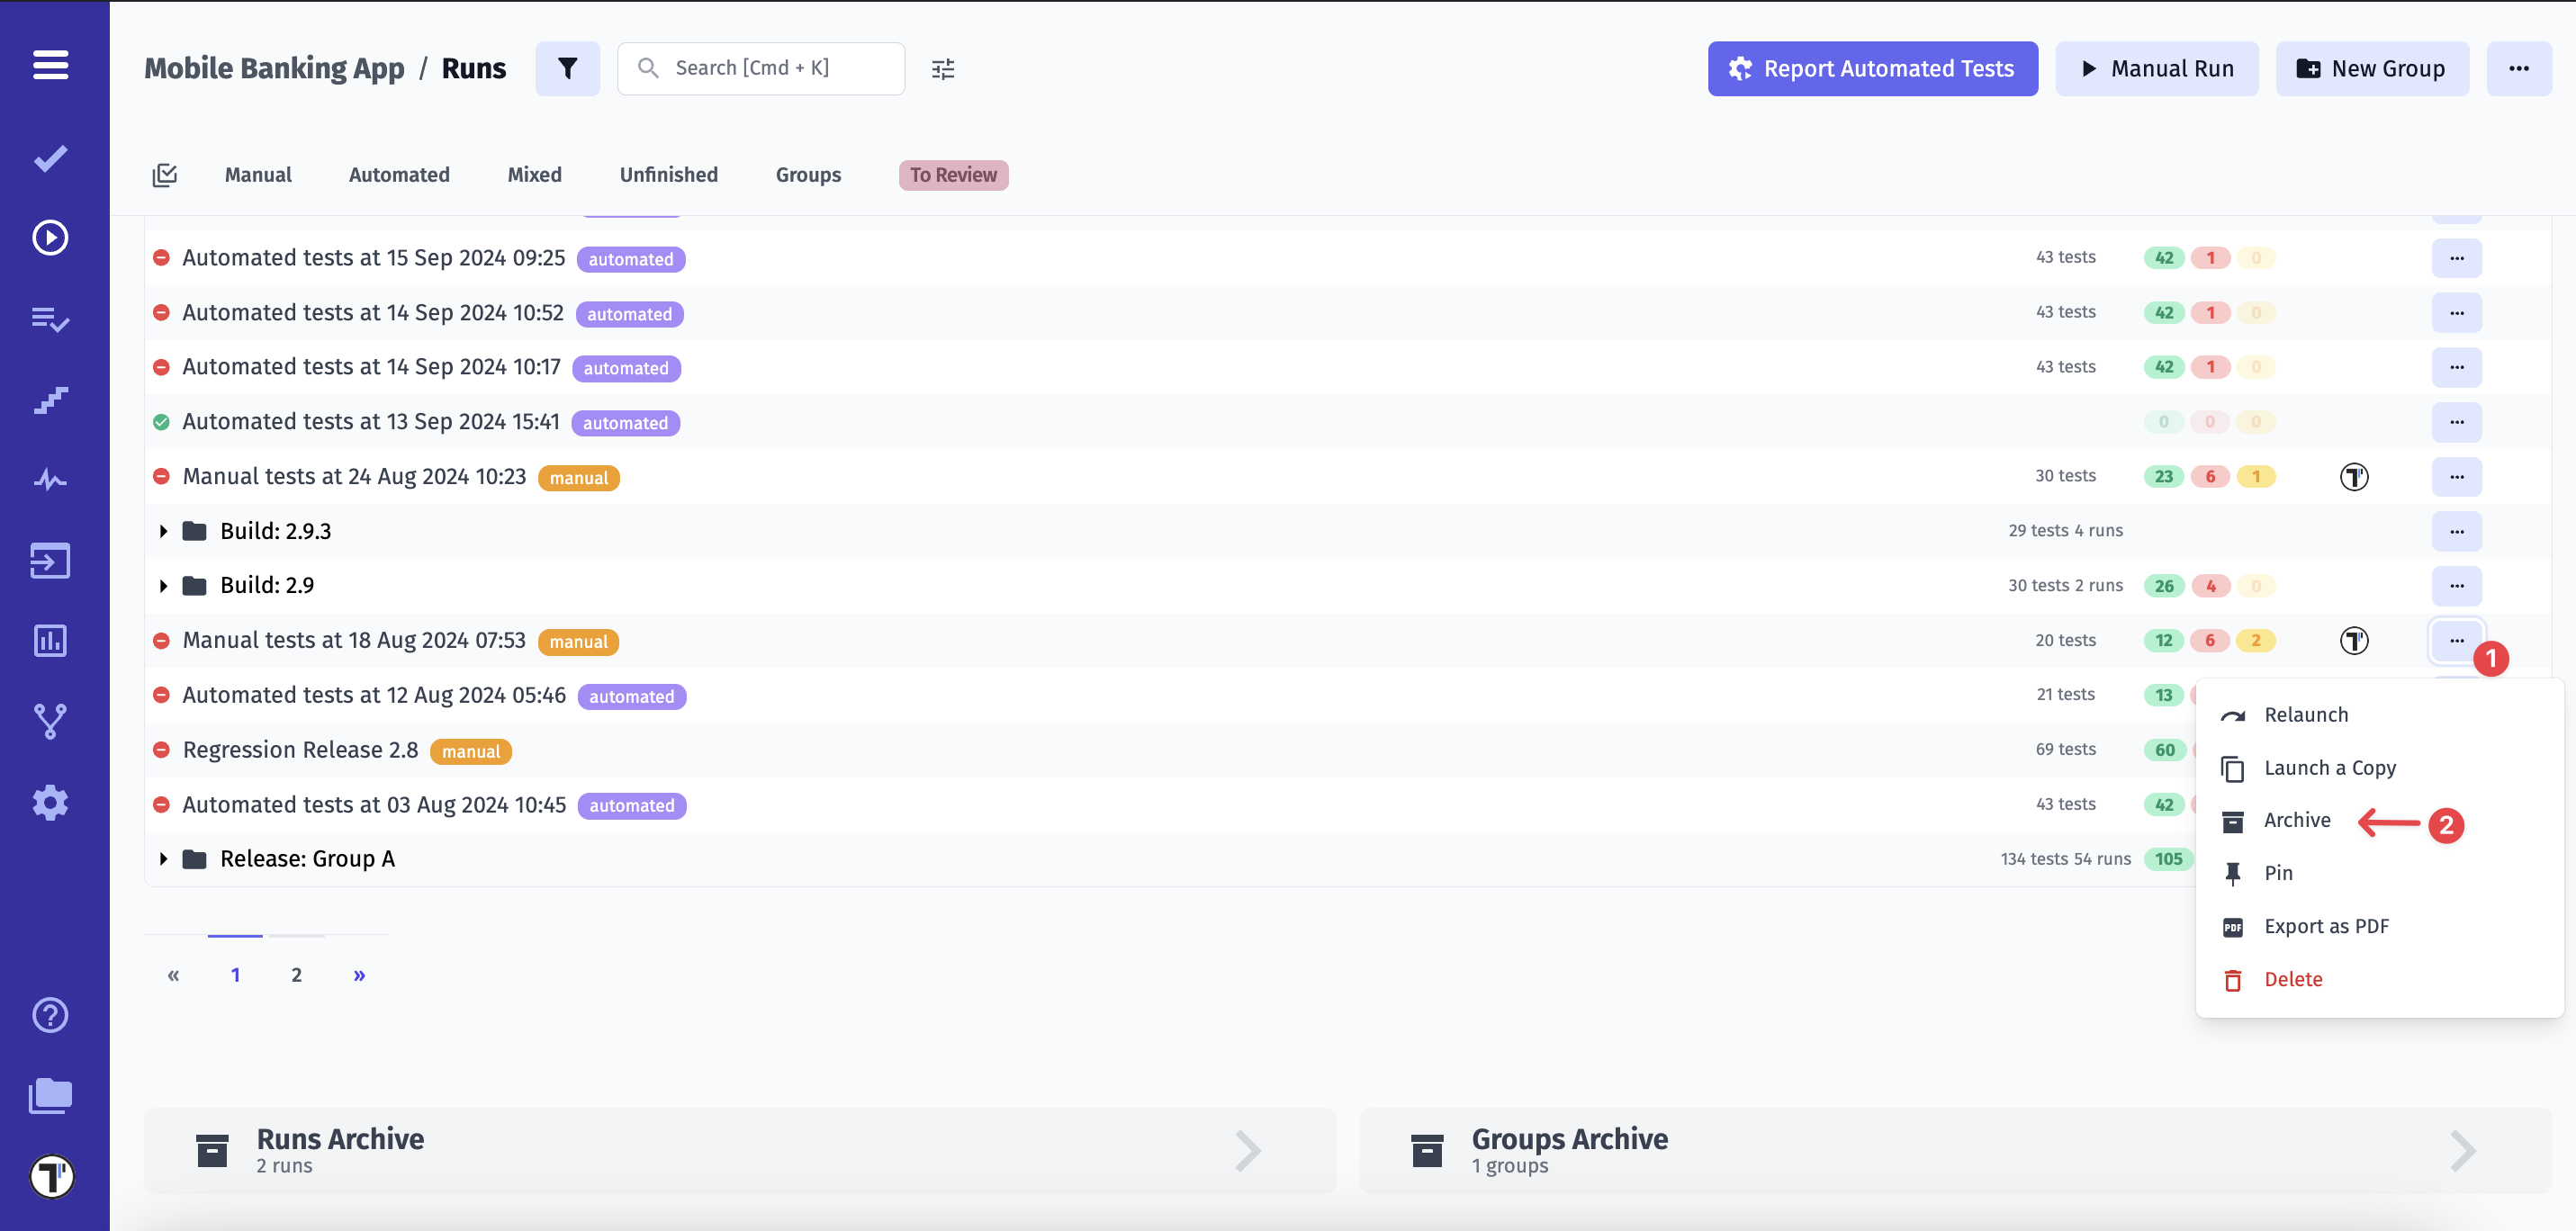
- Click ‘Confirm’ button to archive the run
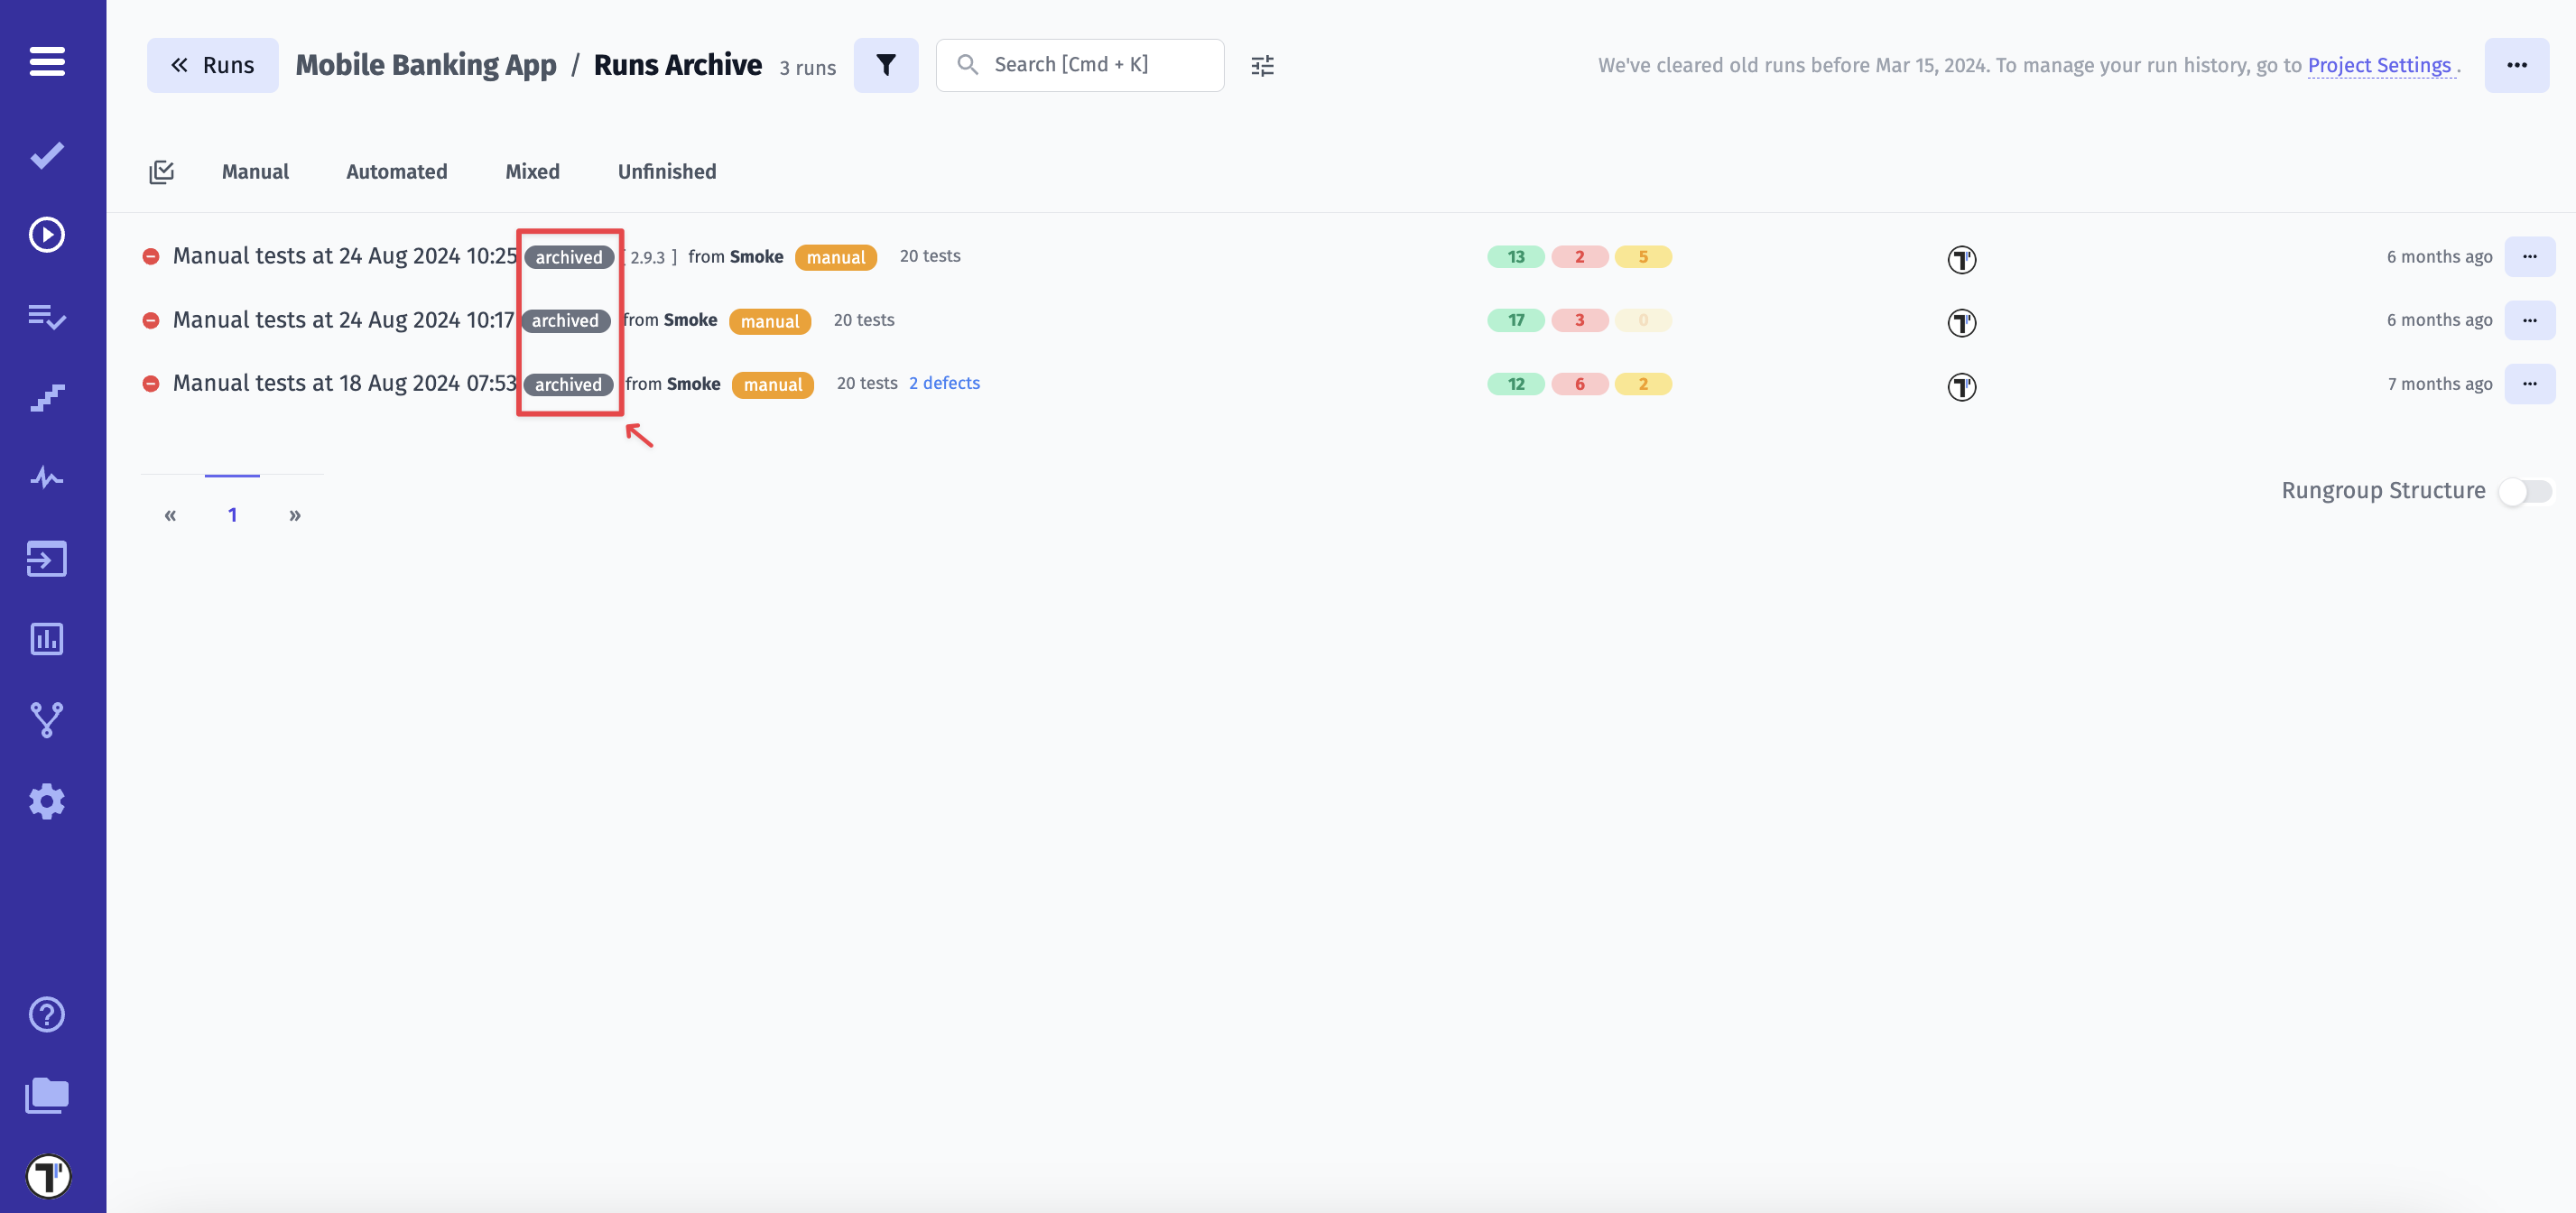
Forcedly archived Runs or Groups get the archived badge.
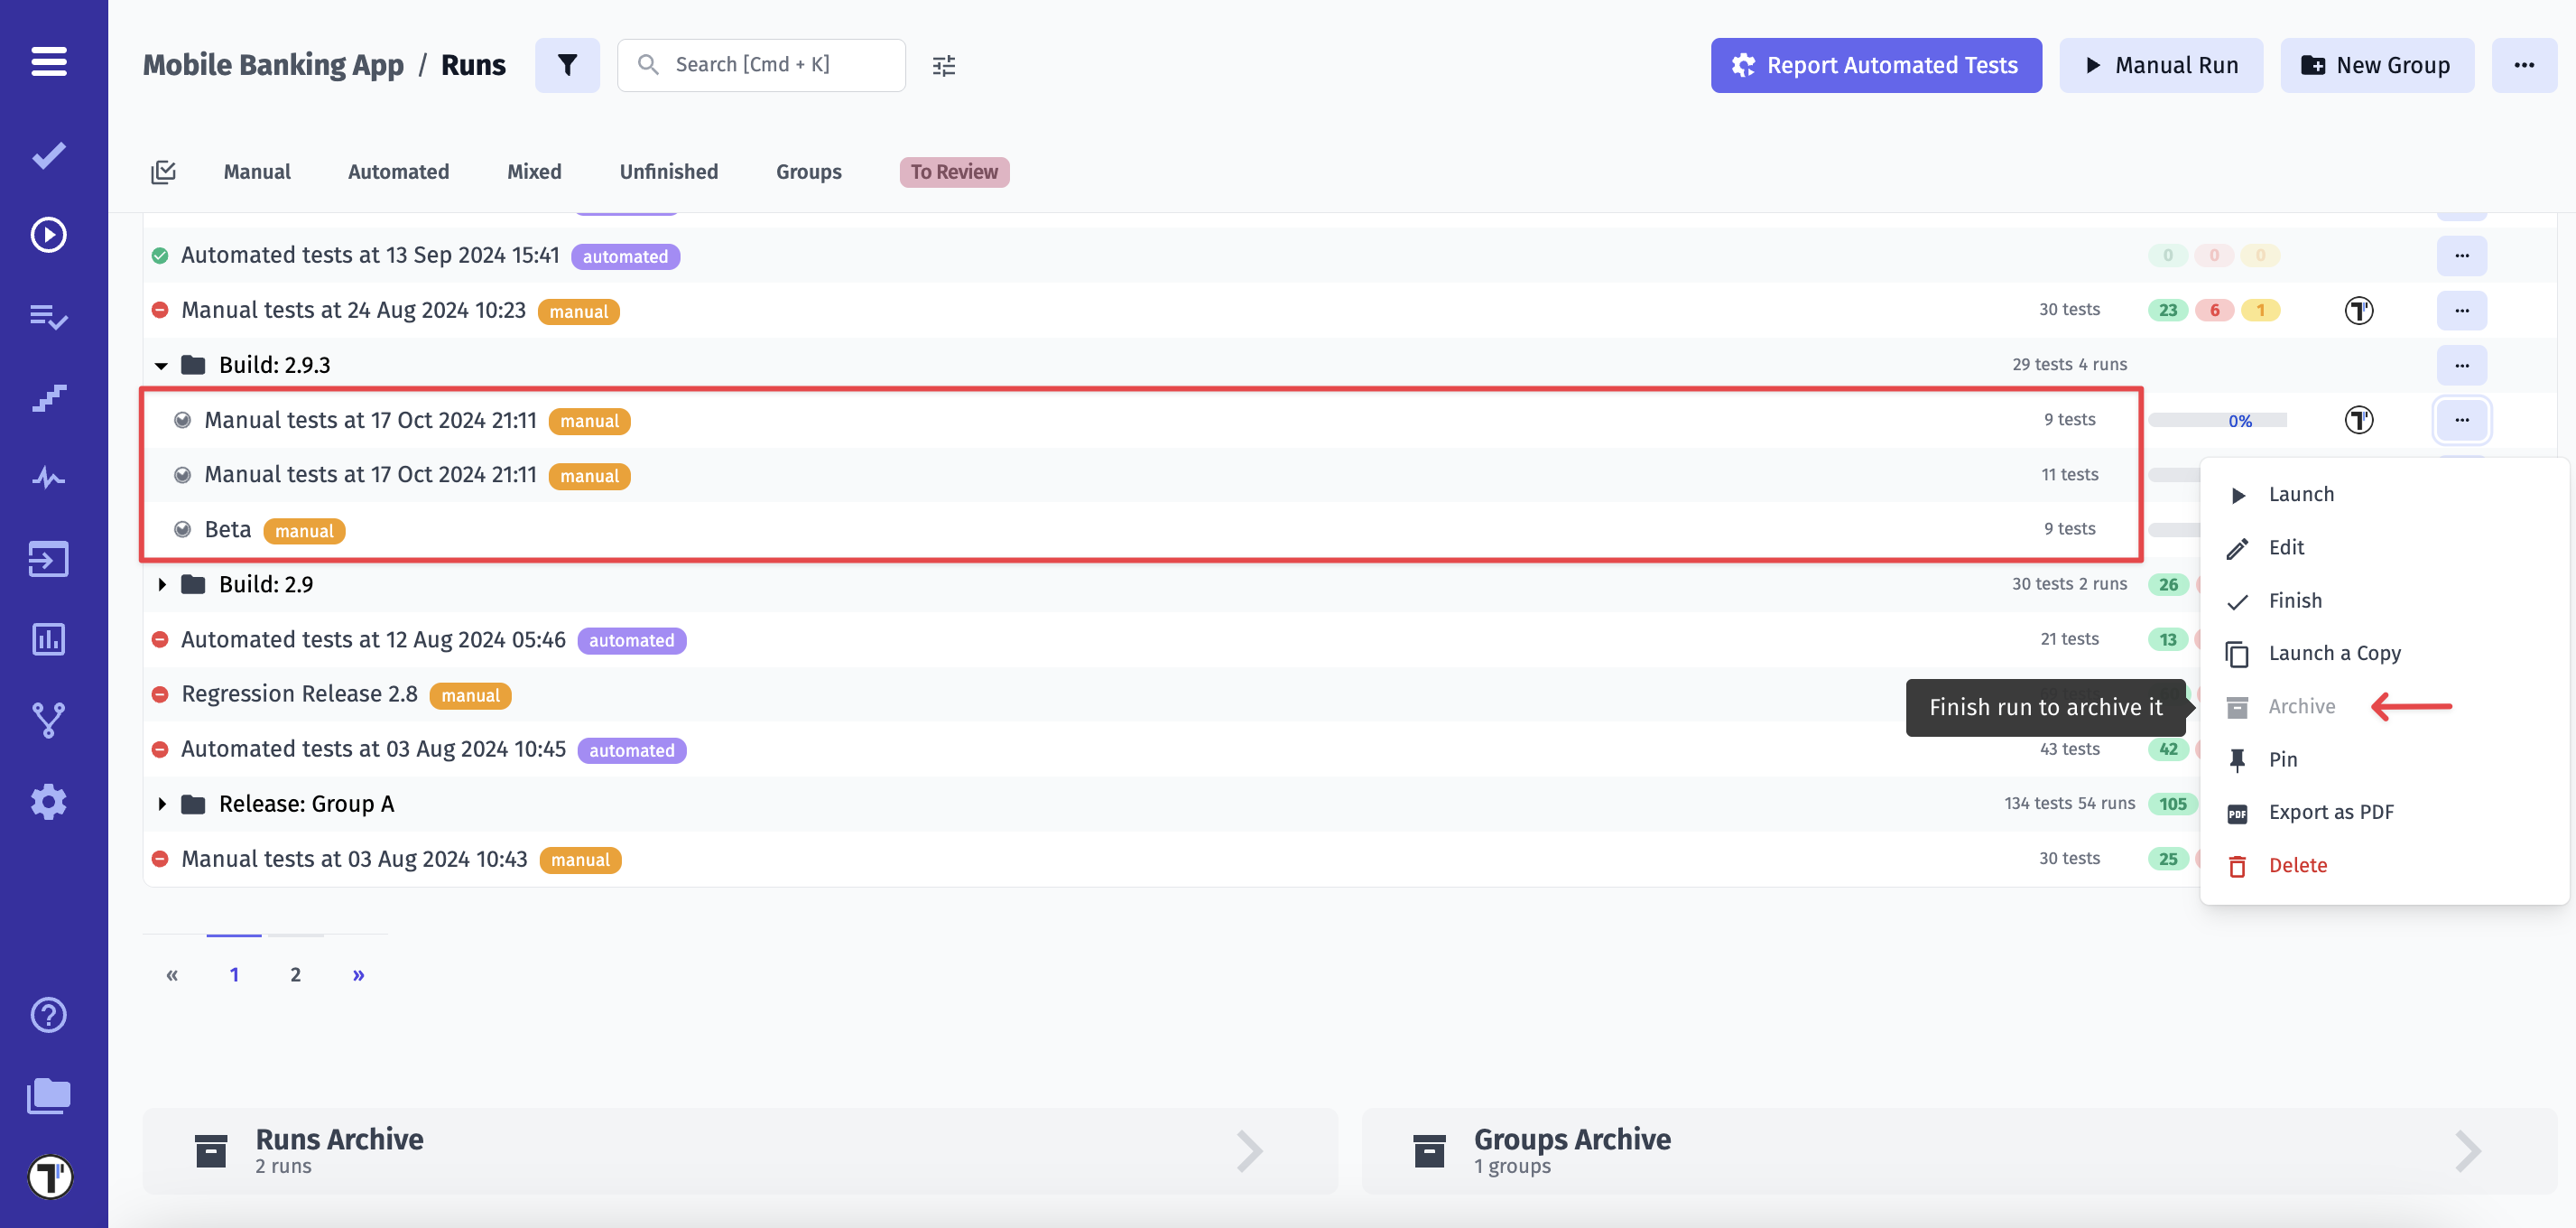
Incomplete Runs or Groups with such runs cannot be archived forcibly or automatically from the main Runs board!
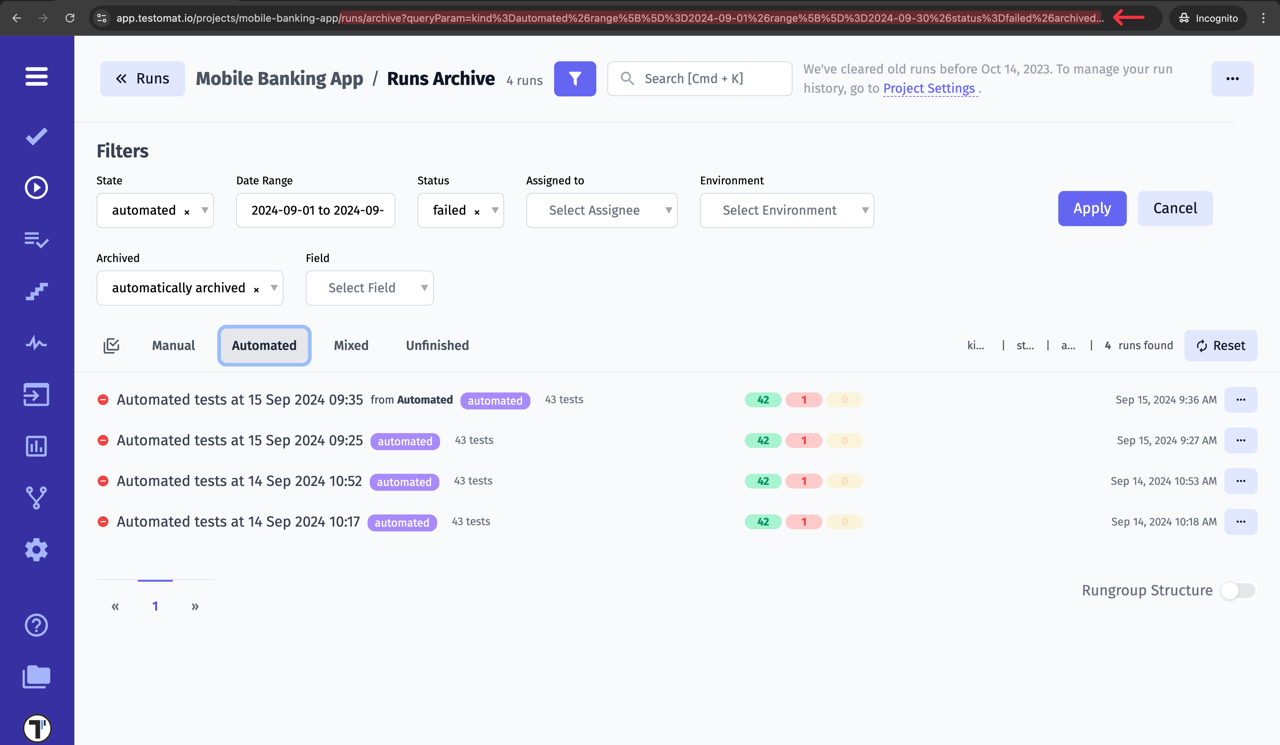
Runs Archive
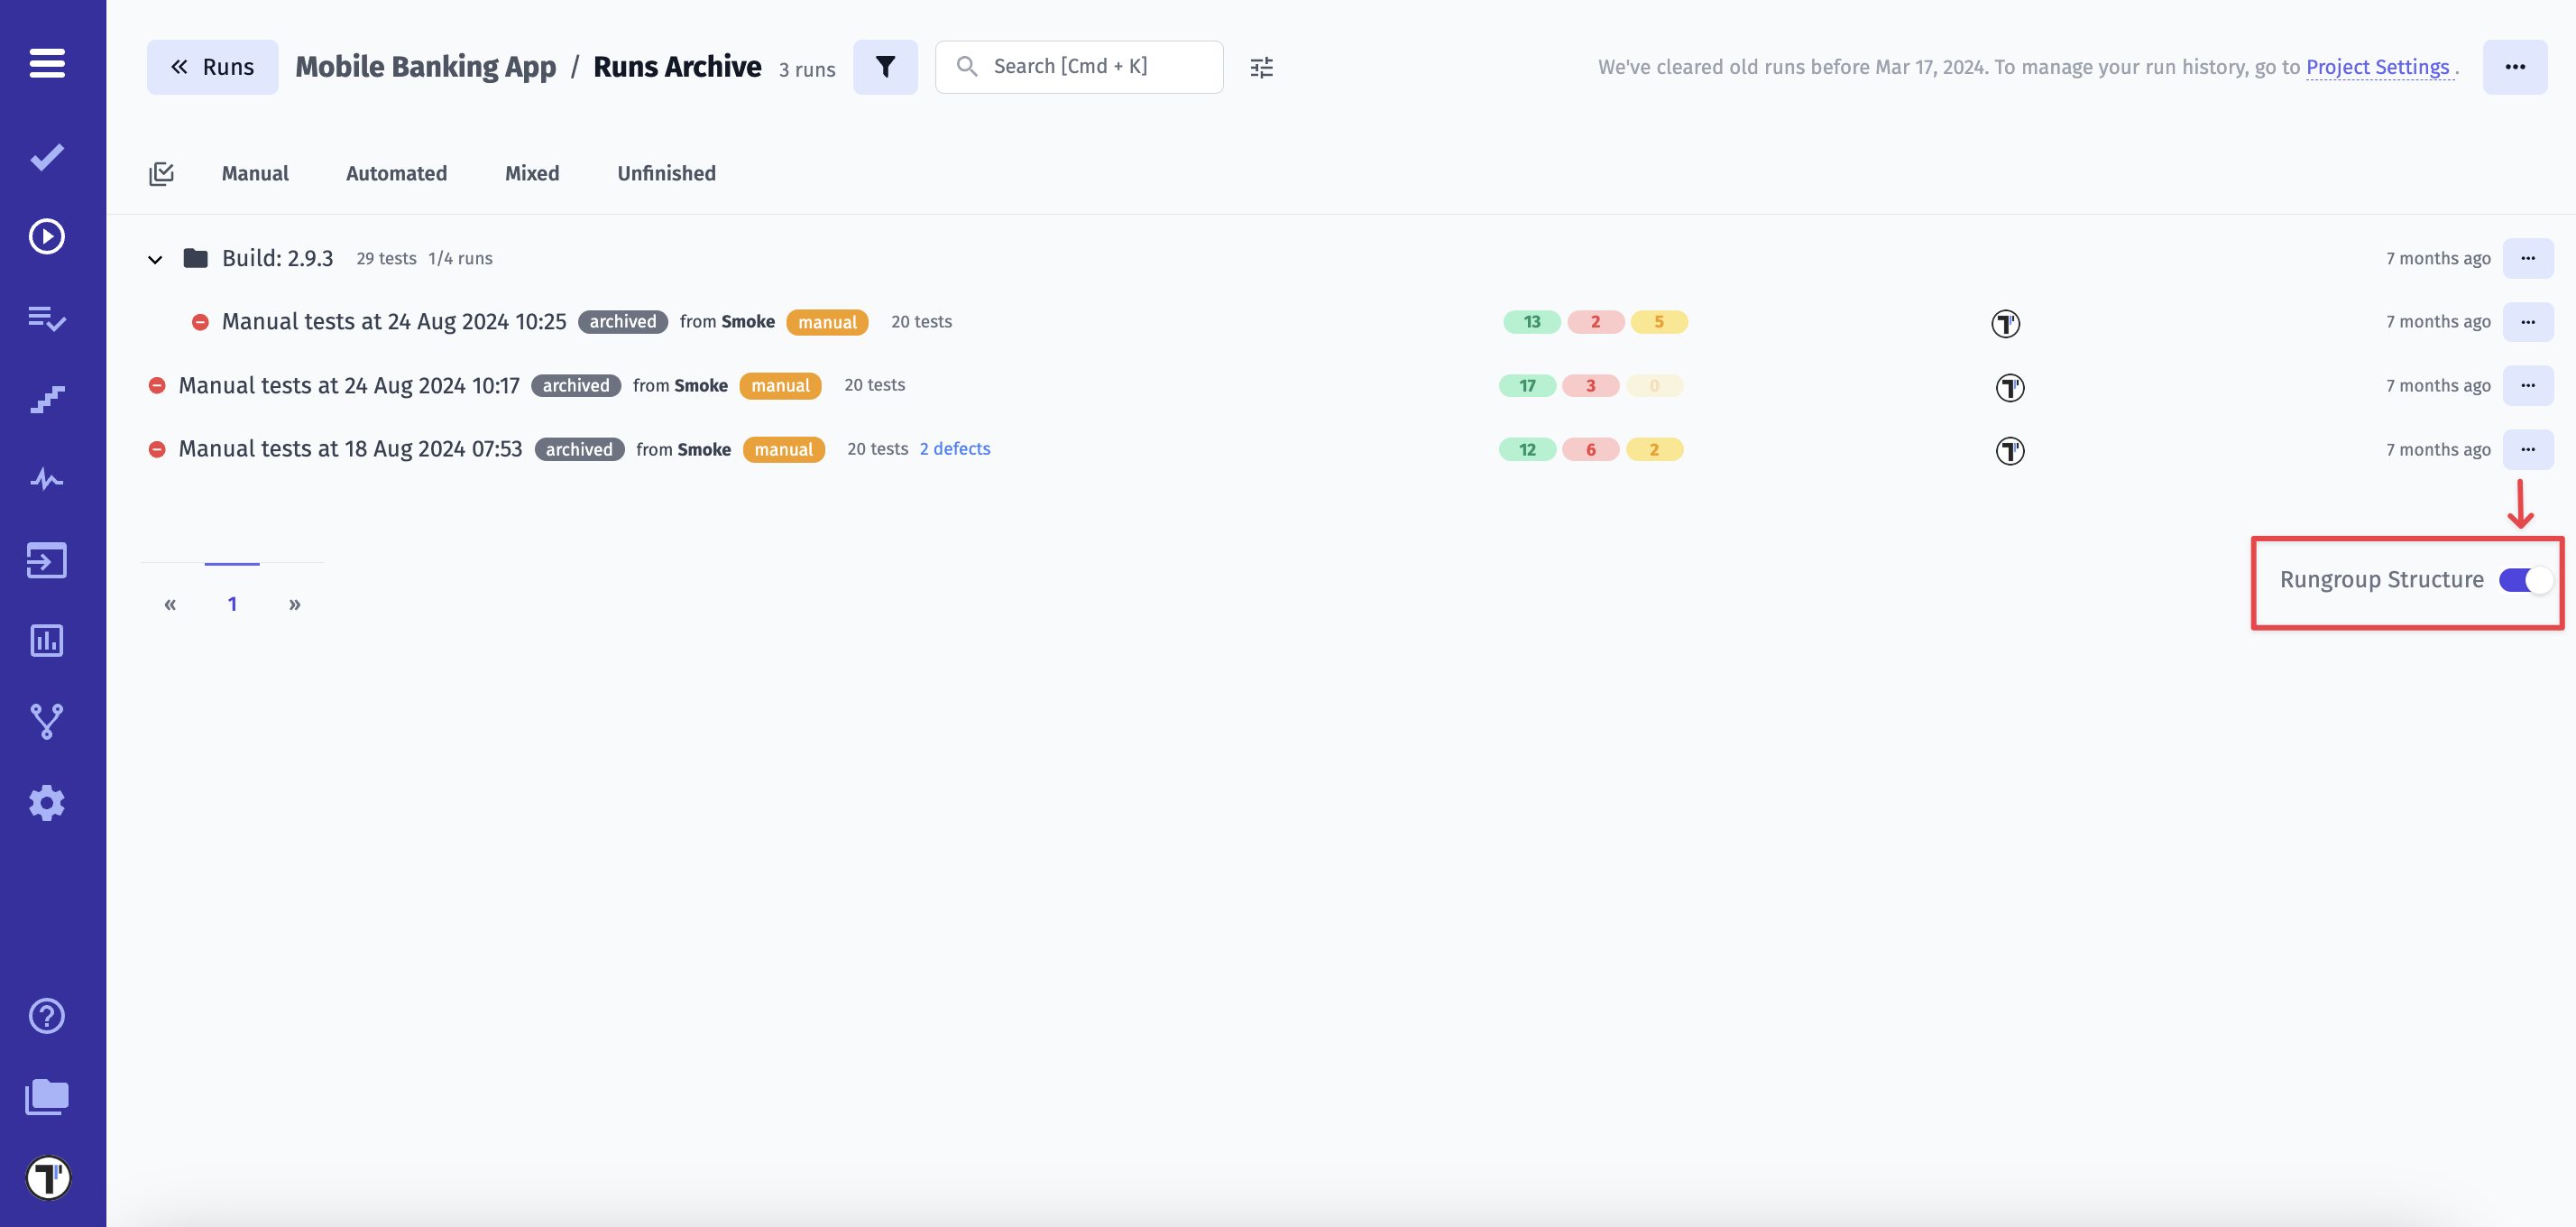
Section titled “Runs Archive”Archived runs find a new home in the dedicated Runs Archive section. This segregated space ensures that your archived data is easily accessible without cluttering the main board. The Runs Archive comes equipped with filtering capabilities.

You can set the period after which old Test Runs will be deleted from the archive. You can do this through the menu button on the Runs Archive page, then click on the Purge Old Runs button, specify the period and confirm. Alternatively, you can specify a term in Project Settings.
In addition, all archived runs can be displayed as a group, which can be organized by clicking the ‘Rungroup Structure’ button.
Groups Archive
Section titled “Groups Archive”For archived groups, there is a separate section called Groups Archive. The Groups Archive can also be filtered.
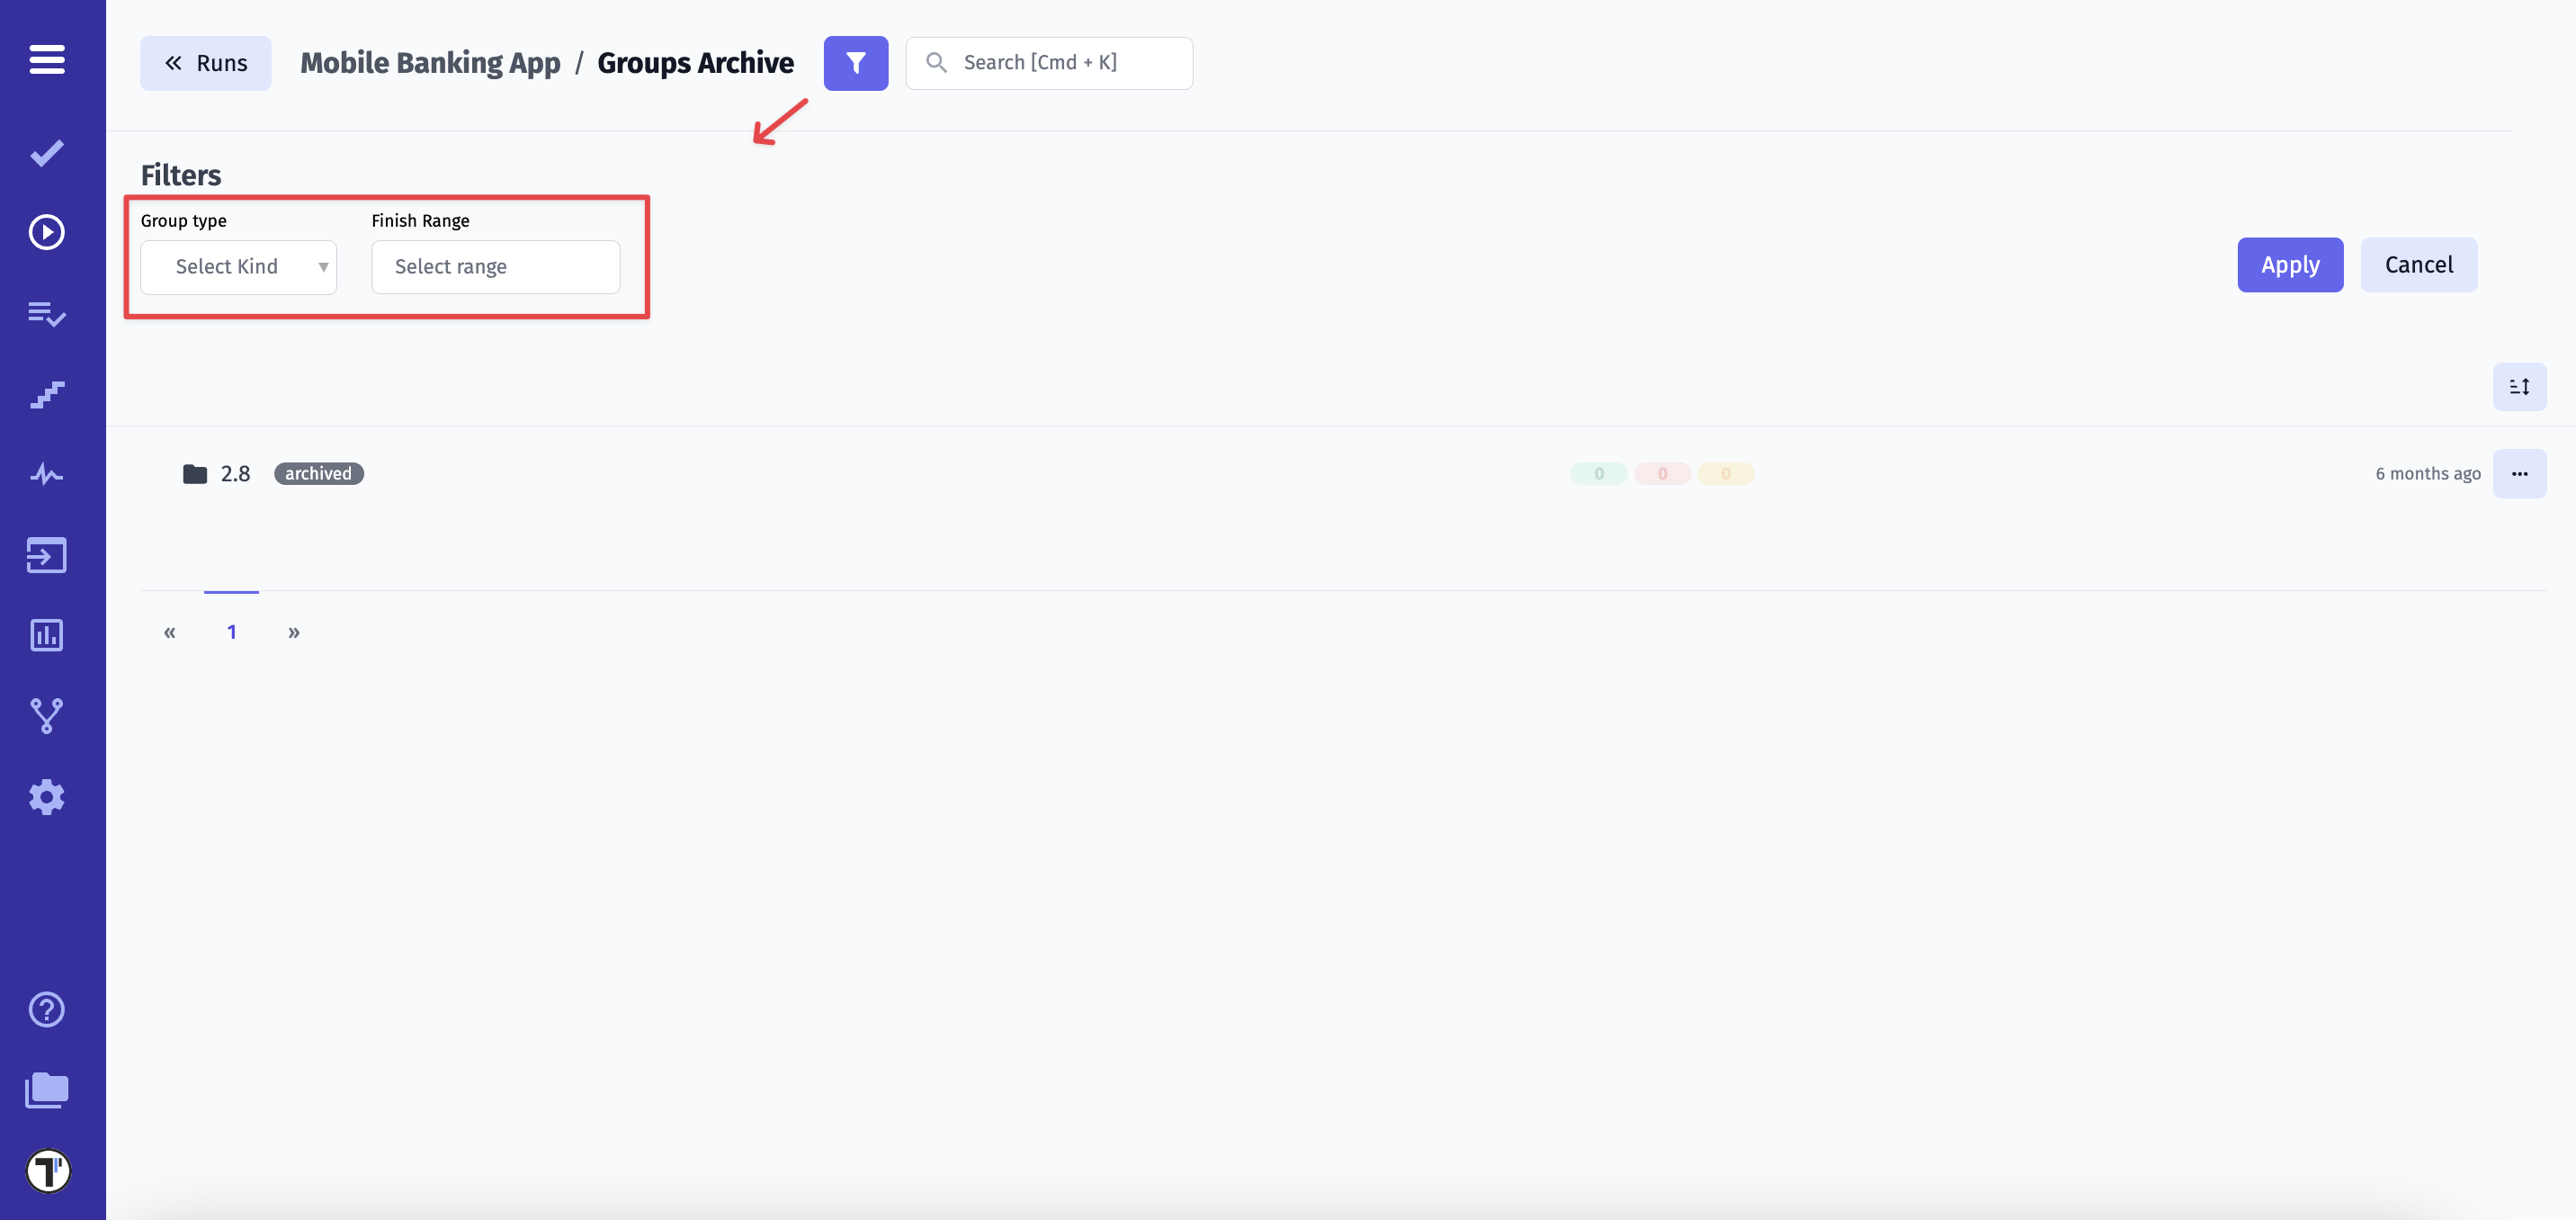
Furthermore, you can sort the groups in a variety of ways.

More About Archives
Section titled “More About Archives”- Automatically or forcibly archived runs and groups can be unarchived. This allows you to display them on the main panel.
- When a group is restored, all of the archived runs will be restored as well.
Runs Archive
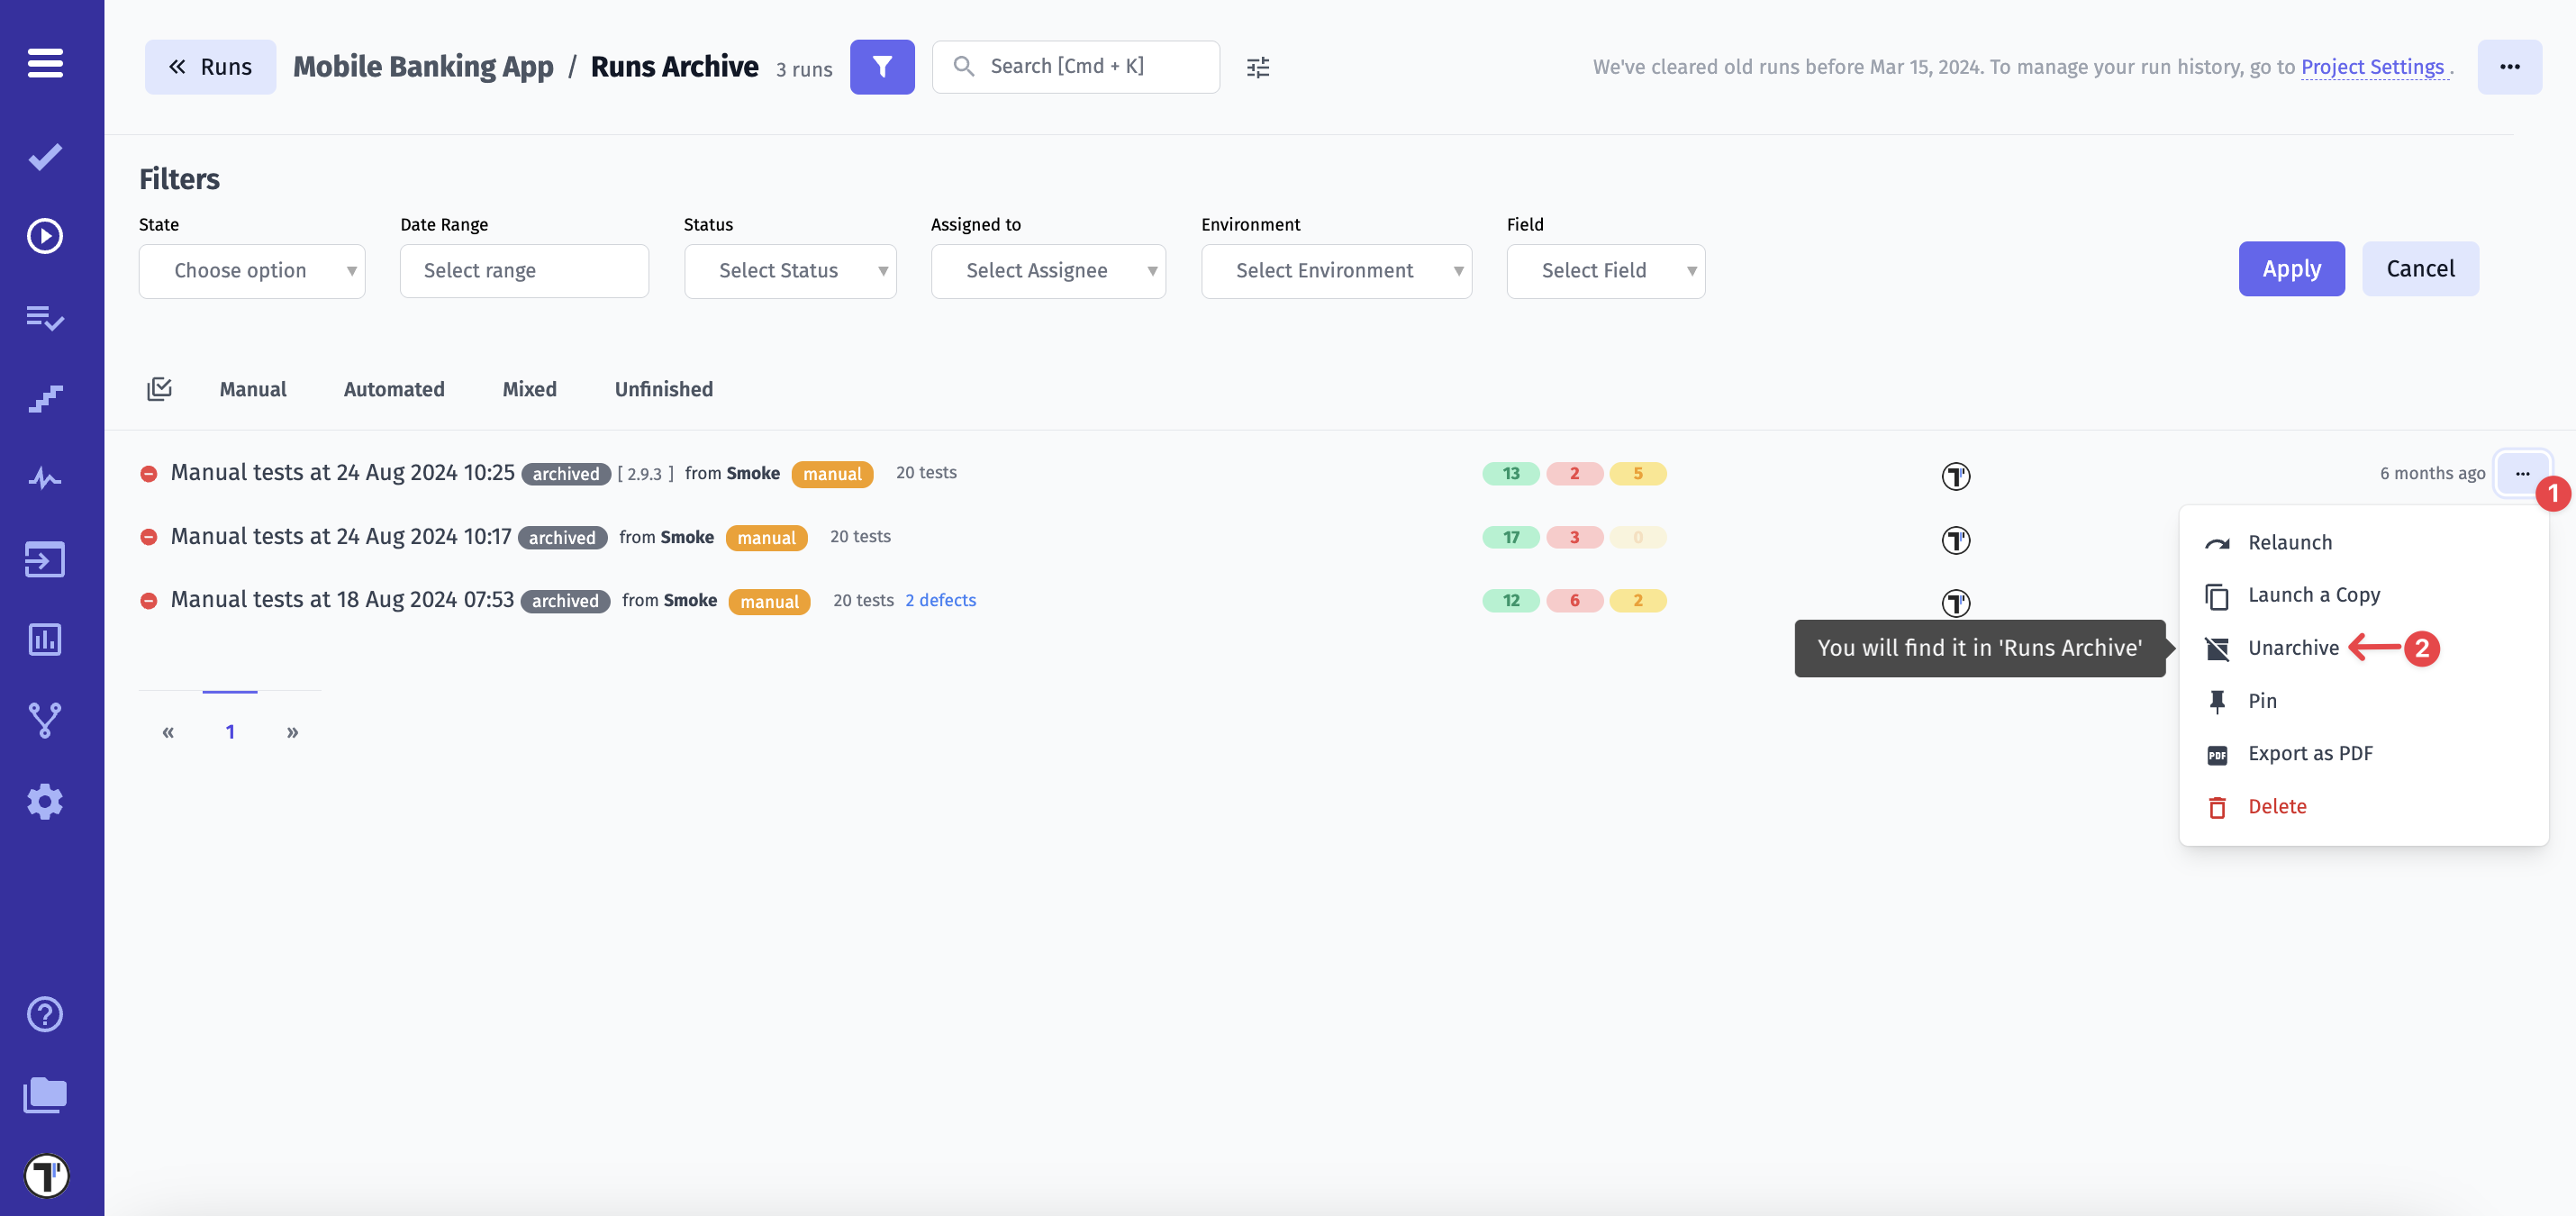
- Сlick the extra menu
- Click the ‘Unarchive’ button
Groups Archive
- Сlick the extra menu
- Click the ‘Unarchive’ button

Filtering Test Runs
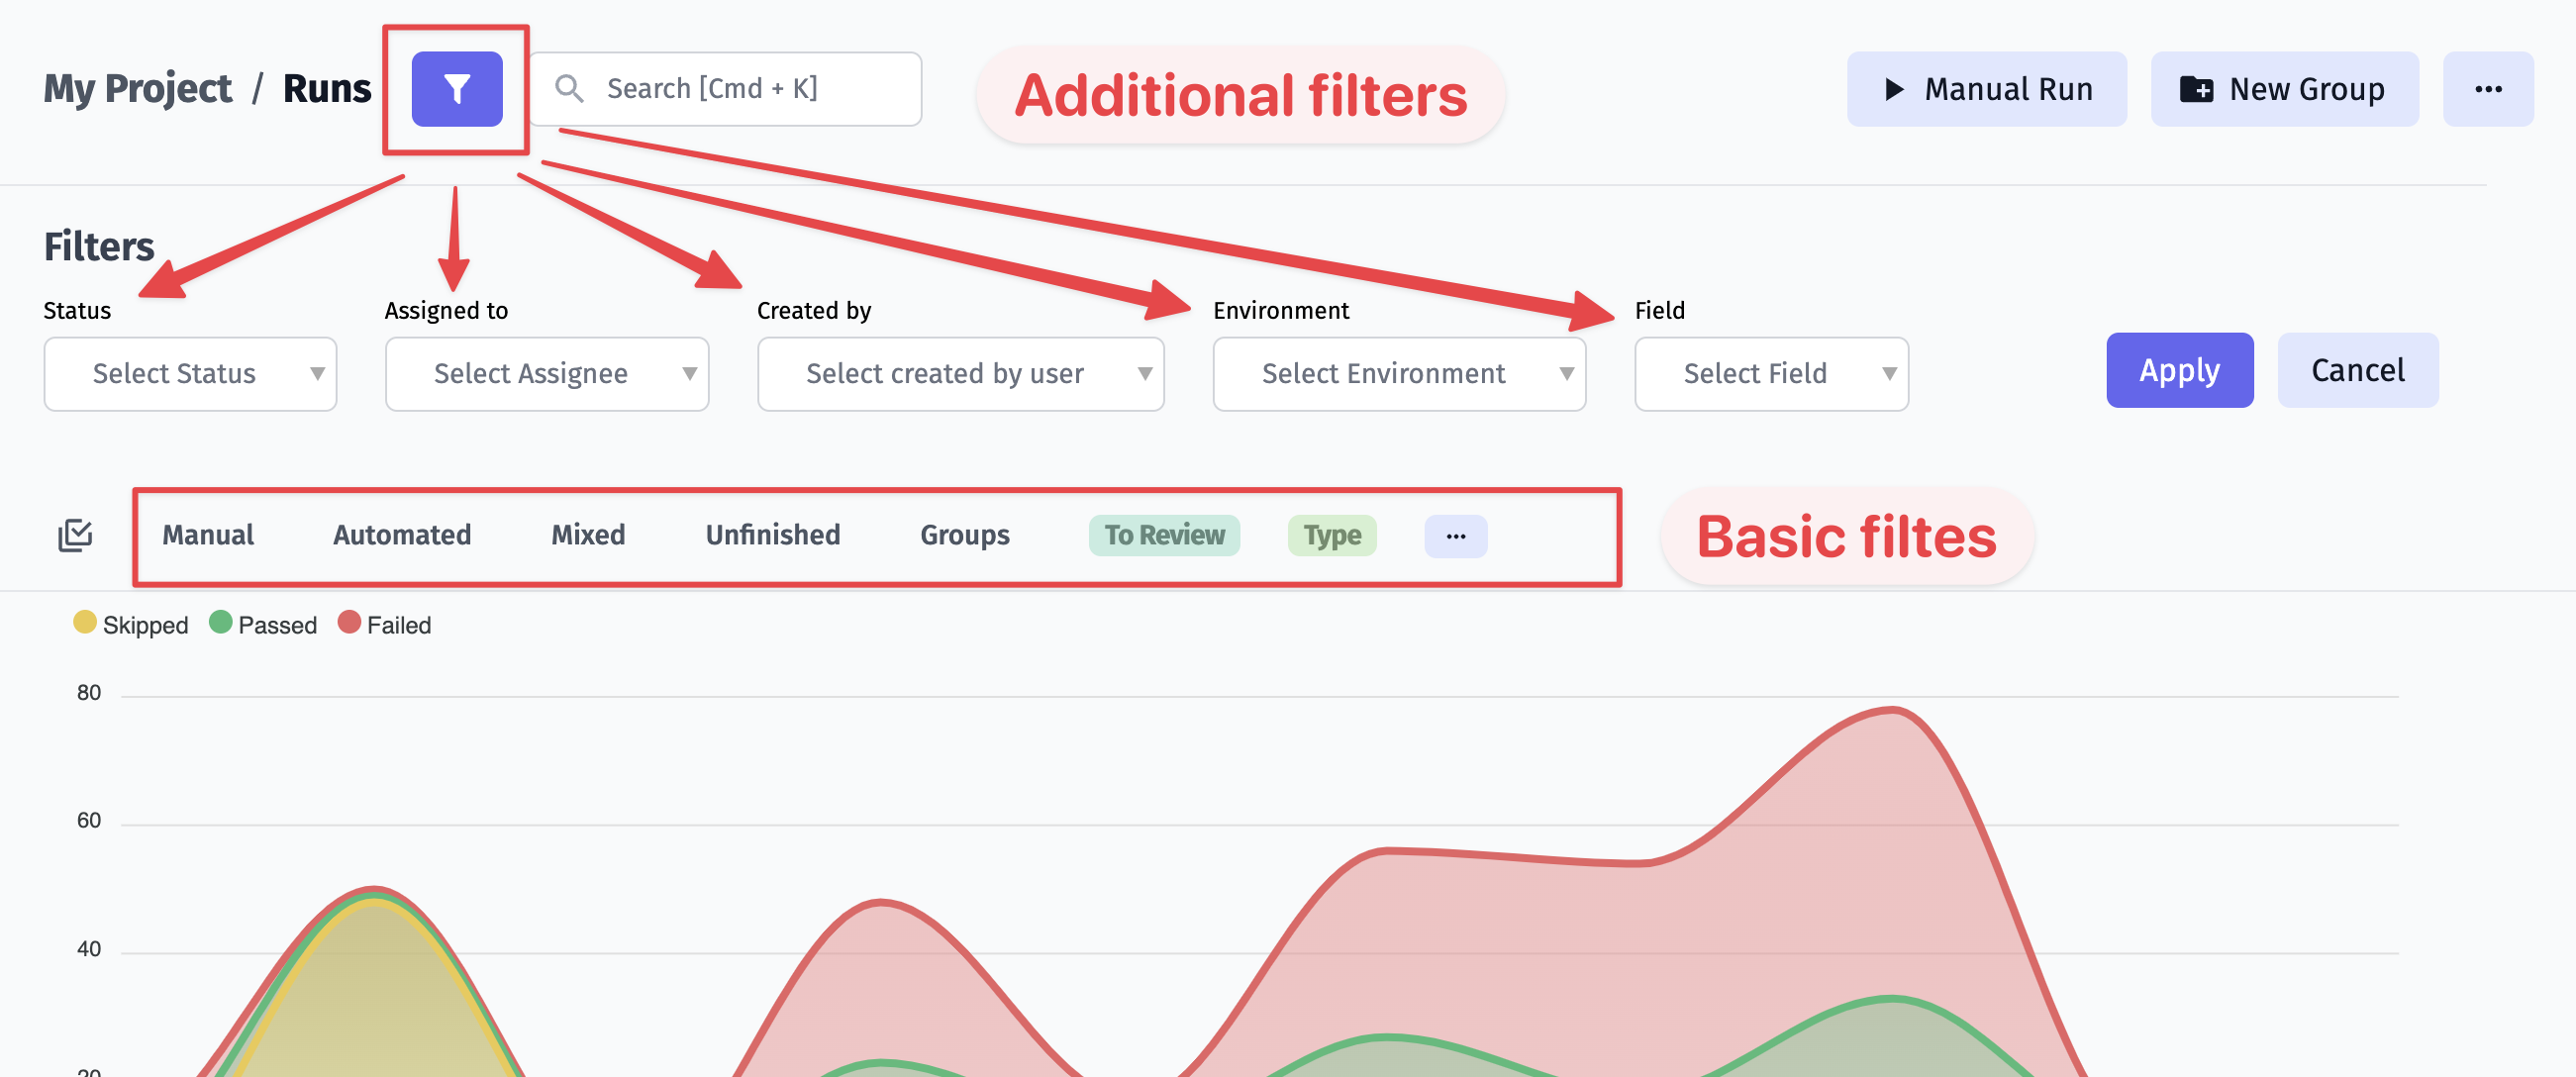
Section titled “Filtering Test Runs”Testomat provides filtering capabilities for Runs and Run Groups. On the Runs page, you can find Basic filters and Additional filters.
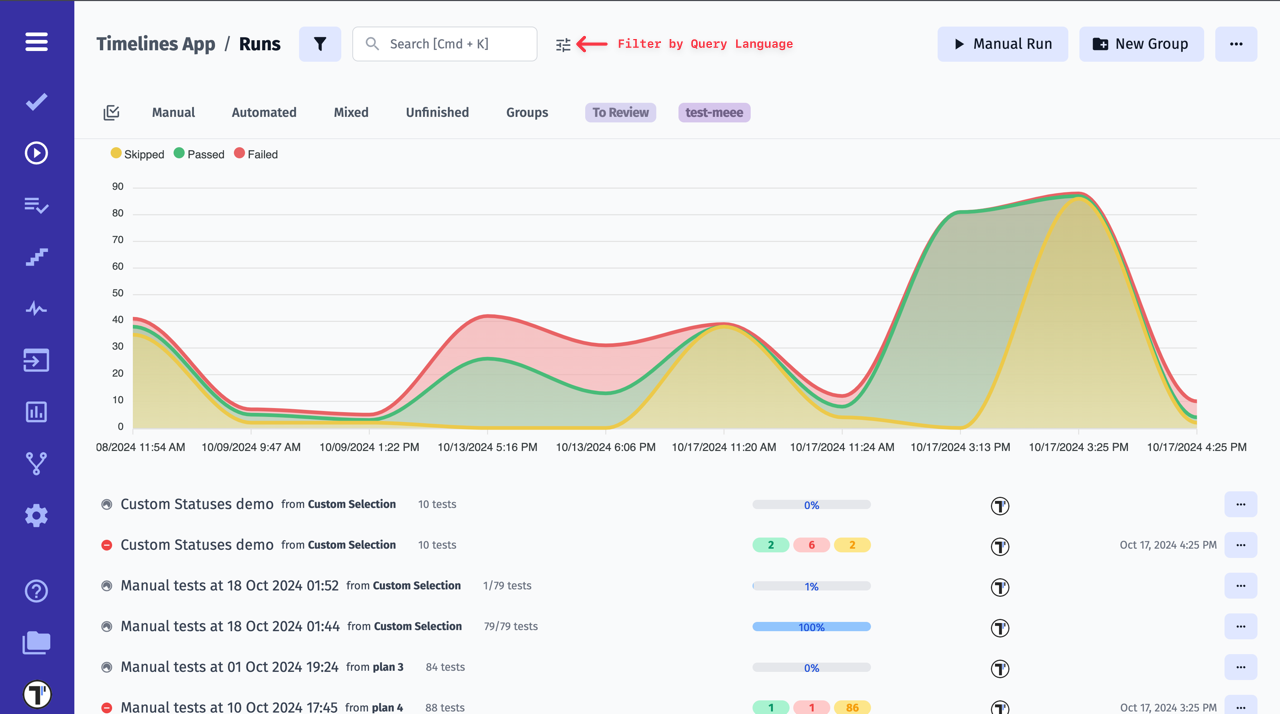
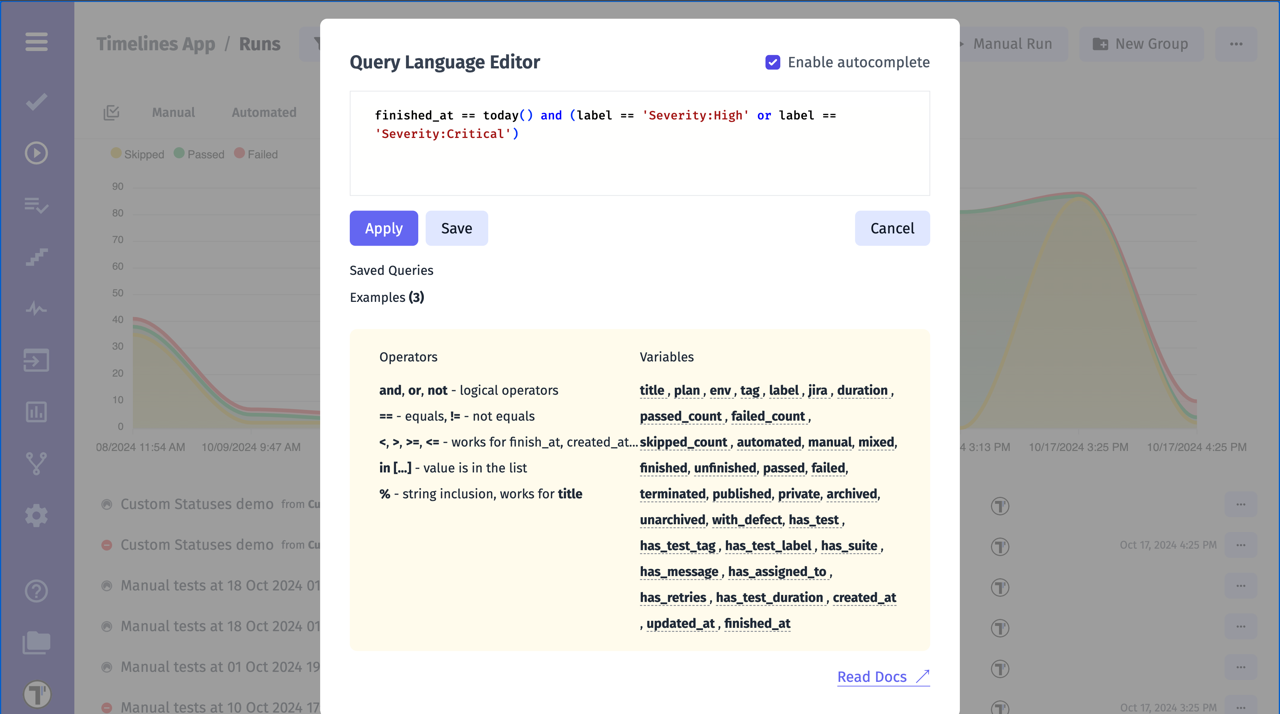
Filter Runs by TQL
Section titled “Filter Runs by TQL”Testomat.io Query Language for Runs enables more flexible searches, allowing users to filter Test Runs by criteria like finished_at, passed_count, has_test_label and many others. This helps quickly find relevant runs and improves test analysis.
If you would like to find out more about the Runs Variables, please visit a separate section of the documentation.
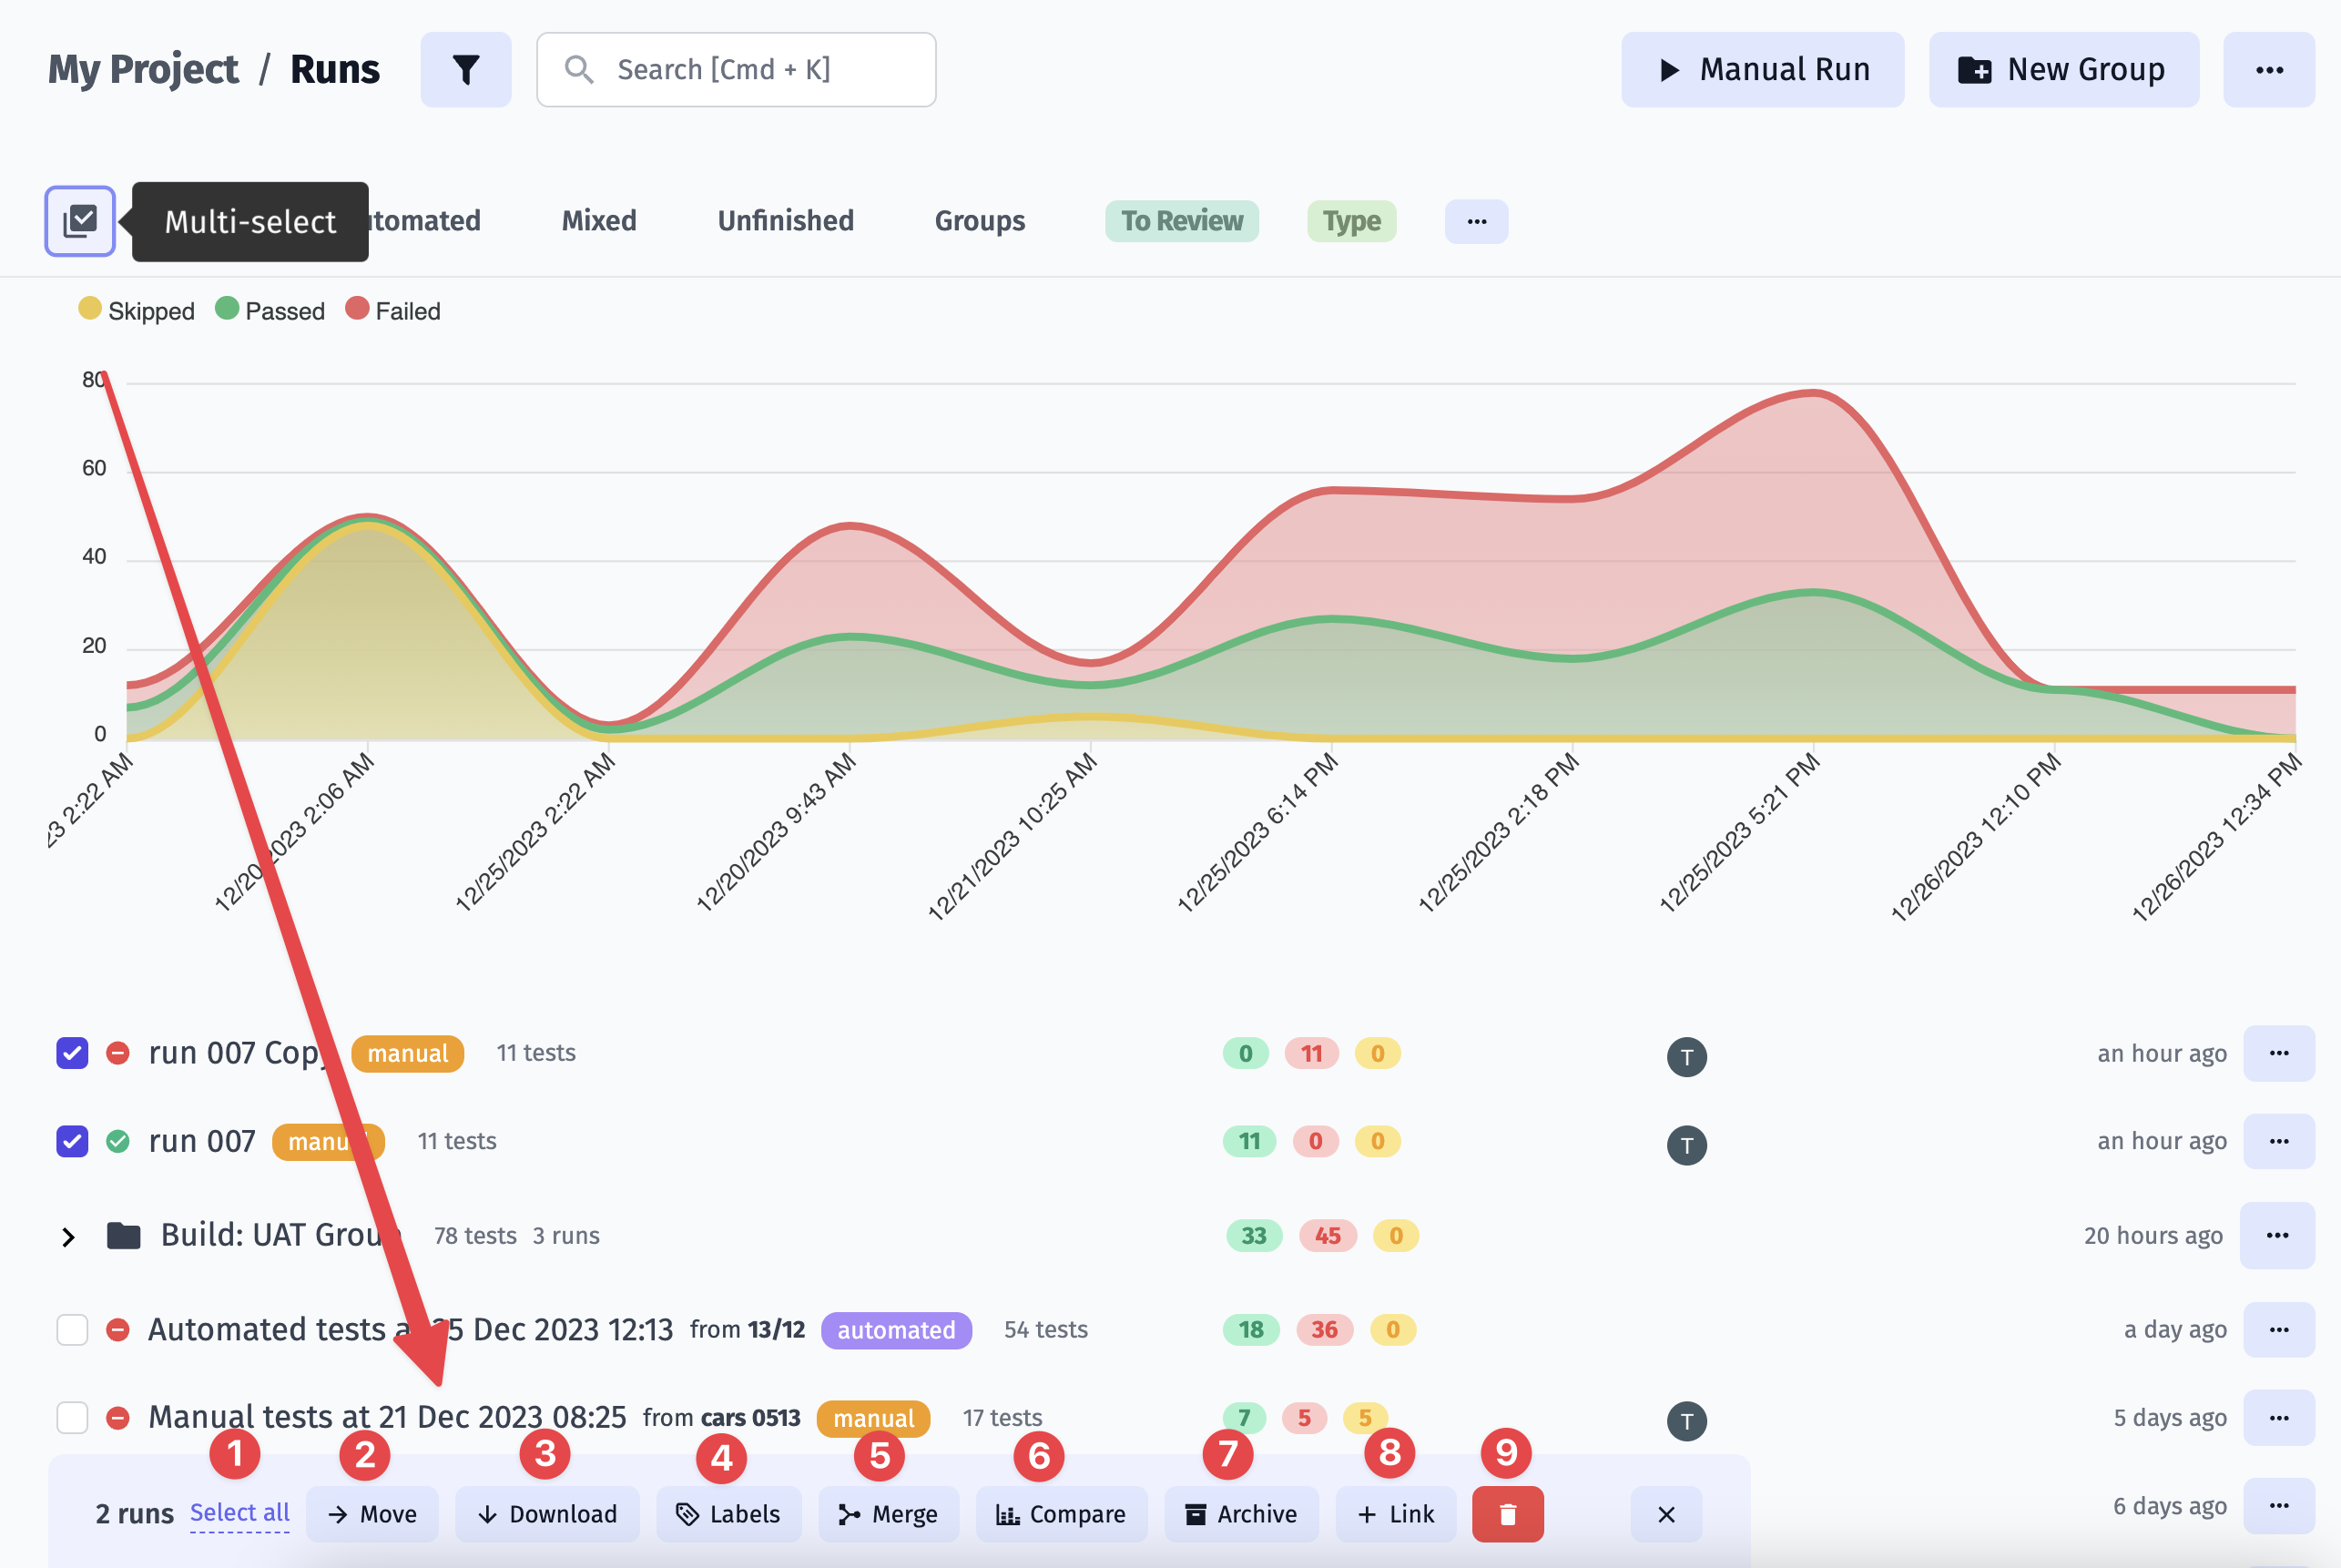
Multiselection For Runs
Section titled “Multiselection For Runs”Multiselection allows the bulk application options to many runs with one click. Here is overview:
- Select all - select all runs on the Runs page
- Move - move runs to/from Run Group
- Download - export selected run reports to spreadsheet
- Labels - apply/remove labels to runs
- Merge - merge selected runs
- Compare - opens Compare runs view
- Archive - archive selected runs
- Link - link selected runs to JIRA, GitHub, Azure,Linear or other issue.
- Delete - delete selected runs
How To Download Run Report as Spreadsheet
Section titled “How To Download Run Report as Spreadsheet”Testomat.io provides option to export Run Reports as spreadsheet so you can get your data in xlsx file. See how it works.
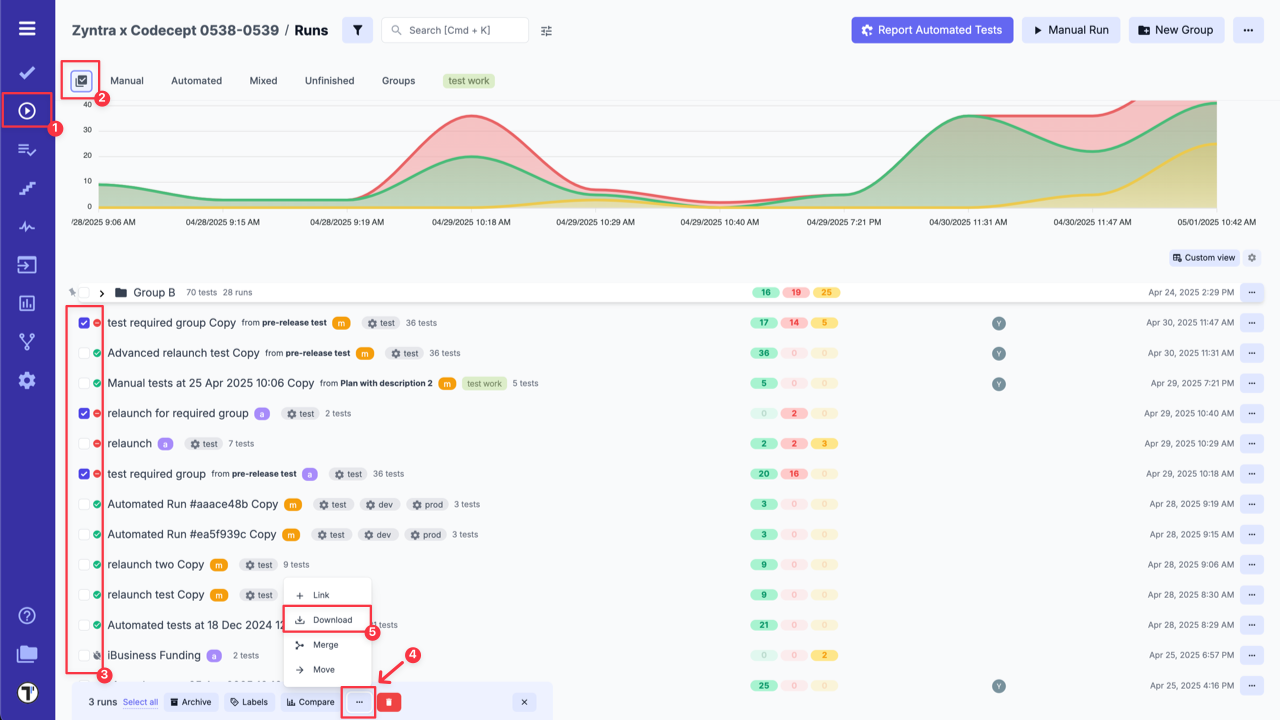
Download few run reports in one file:
- Go to Runs.
- Enable ‘Multi-select’.
- Select Runs.
- Click on ‘Extra menu’ button.
- Select ‘Download’ option.
Download a separate Run Report:
- Go to Runs.
- Select Run Report.
- Click on ‘Report’ button.
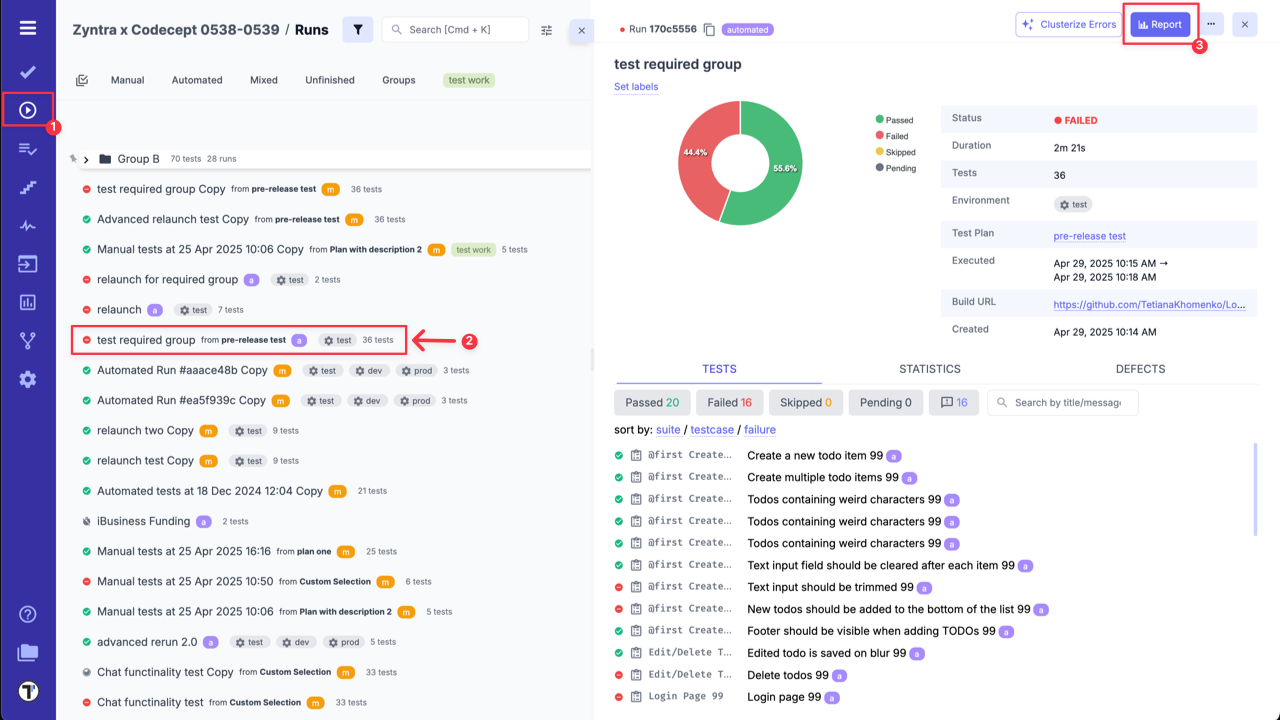
- Click on ‘Extra menu’ button.
- Select ‘Download as Spreadsheet’ option.
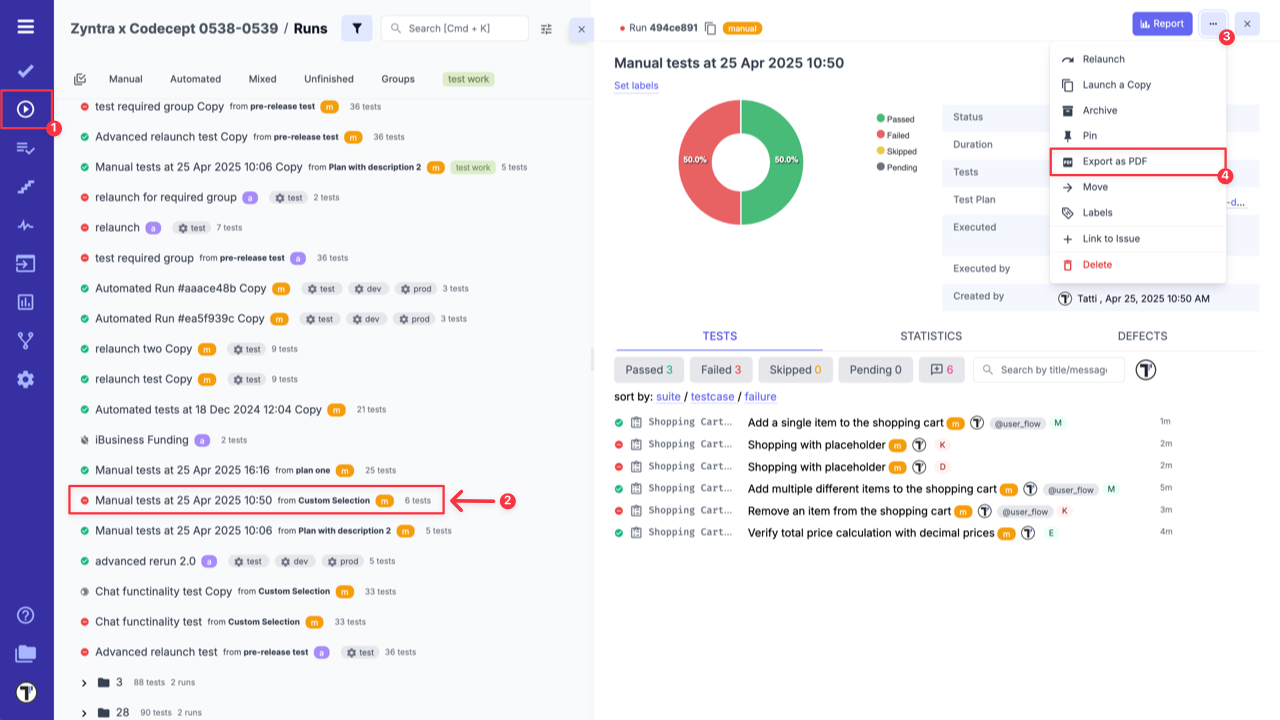
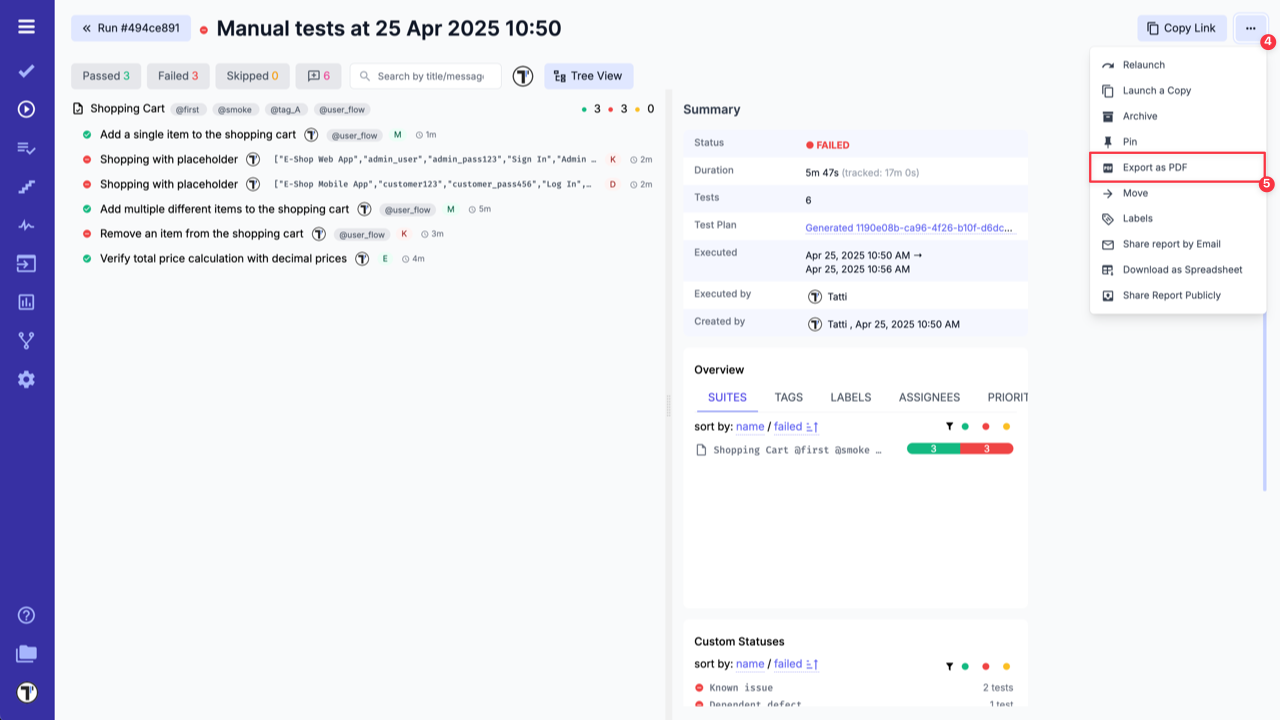
How To Export Run Report in PDF Format
Section titled “How To Export Run Report in PDF Format”Testomat.io also allows you to export your test run results as a PDF report. This feature enables easy sharing and archiving of test outcomes outside of Testomat.io.
There are two ways to generate a structured report with test execution details in PDF format:
- Go to Runs.
- Select Run Report.
- Click on ‘Extra menu’ button.
- Select ‘Export as PDF’ option.
OR
- Go to Runs.
- Select Run Report.
- Click on ‘Report’ button.
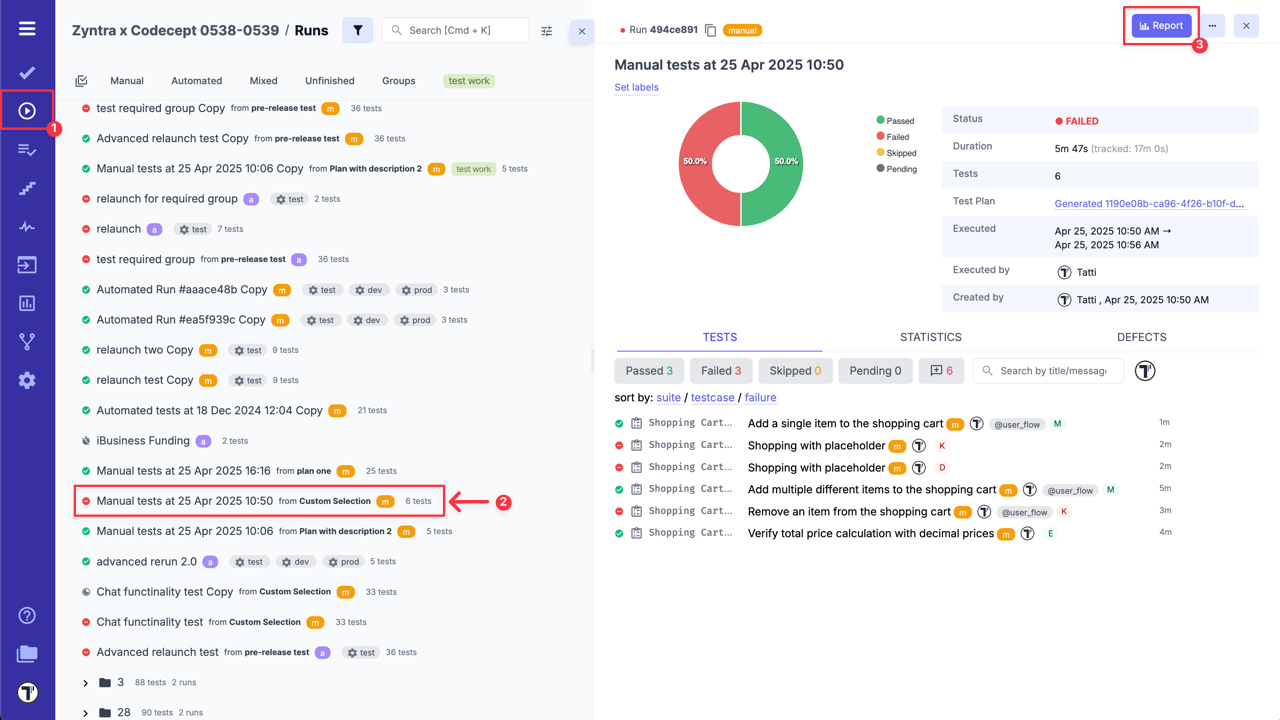
- Click on ‘Extra menu’ button.
- Select ‘Export as PDF’ option.
Example of Test Run Report in PDF format:
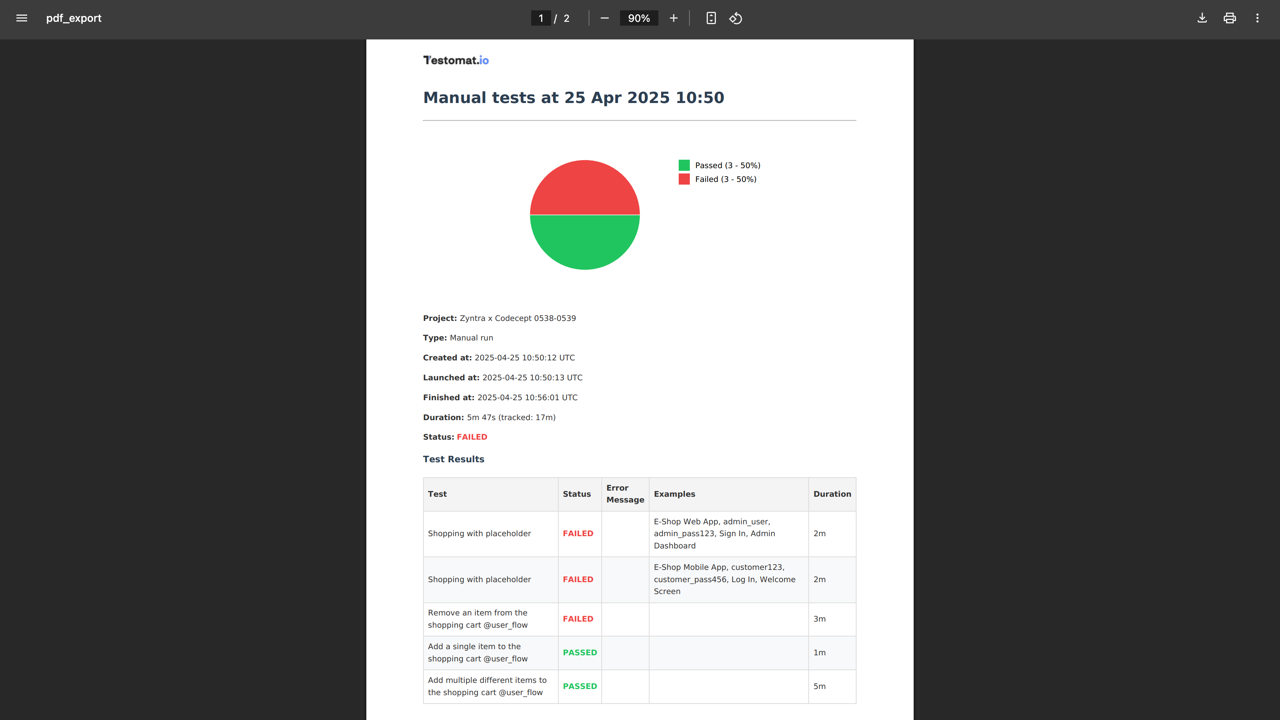
Use cases:
-
Sharing results with stakeholders: Quickly generate a portable summary of test outcomes for product owners, QA managers, or external partners who may not have access to the platform.
-
Audit and compliance documentation: Maintain a formal record of test results in a fixed format for compliance, certification, or audit purposes.
-
Team retrospectives and reviews: Use the PDF report to review test coverage and outcomes during retrospectives or sprint reviews without relying on live access to the system.
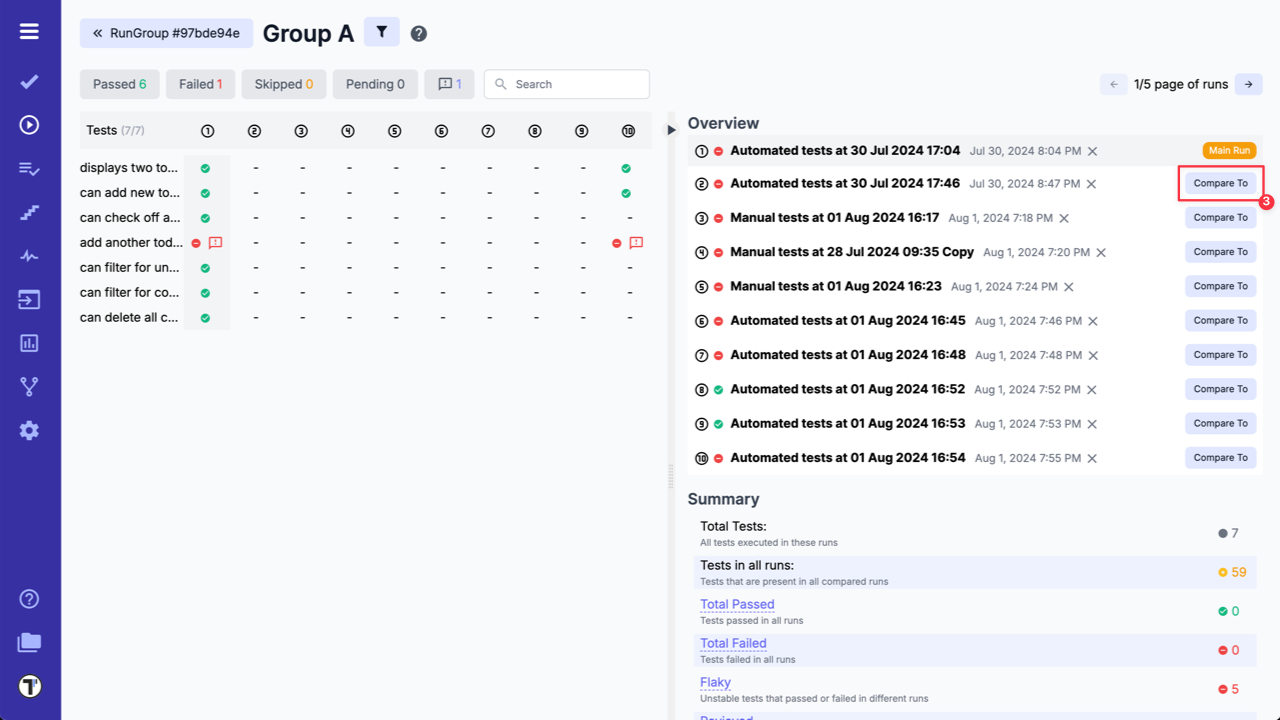
Compare Test Runs
Section titled “Compare Test Runs”Select test runs and see a visual display of the similarities and differences. Compare your run reports and analyze them by such parameters as Flaky, Revieved, Degraded, and more. To do this:
- Enable Multiselection.
- Pick Runs.
- Click ‘Compare’ button.
Also this feature is available for Run Groups and allows you to compare test results from different runs within a single run group.
- Open Run group.
- Click ‘Combined Report’ button.
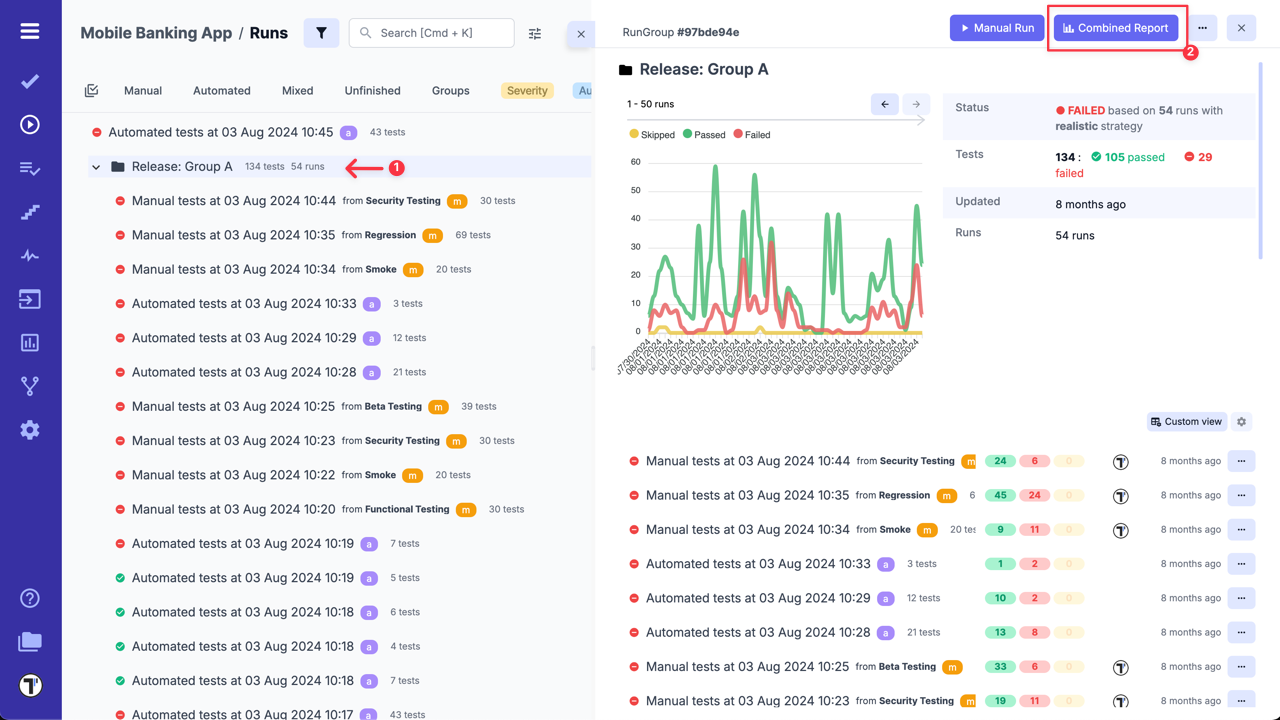
- Click on ‘Compare to’ button to select the run you want to compare with others.
Share Runs Filter
Section titled “Share Runs Filter”This feature allows to pass Runs and Runs Archive filter parameters directly through the URL. This is useful for improving collaboration, as it allows teams to quickly access relevant test results without manually adjusting filters.
Specify the necessary filtering parameters on the Runs or Runs Archive page, copy the URL and share it with interested members.